
A roasted turkey is the heart of any holiday table. Golden skin, tender slices, and the aroma filling the kitchen, nothing compares. But Turkey also has a reputation. Cook it wrong, and it turns out dry and disappointing.
That’s why brining is a game-changer. A turkey brine recipe is simple: water, salt, sugar, herbs, and citrus. This soak locks in moisture and adds flavor from the inside out.
Think of it as a spa bath for your bird. While the turkey rests overnight, the brine does the work. The result? Juicy, flavorful meat and a stress-free holiday feast.
What Is Turkey Brine and Why?

Cooking a turkey is one of those tasks that can make even experienced home cooks nervous. The bird is big, the timing is tricky, and the fear of serving a dry, flavorless turkey is very real. That’s where brining steps in as a secret weapon.
A turkey brine is simply a solution of water, salt, sugar, and aromatic ingredients, such as herbs, garlic, citrus peels, and spices.
When you soak a turkey in brine, something magical (well, scientific) happens. Through a process called osmosis, the salty solution is absorbed into the turkey’s muscle fibers. As a result:
- The meat retains more moisture, even if it is slightly overcooked.
- The turkey absorbs flavors from the herbs, citrus, and spices in the brine.
- The final roasted bird comes out juicy, tender, and aromatic every single time.
Think of brining as an insurance policy for your Thanksgiving or holiday turkey. Instead of worrying about perfect timing and precise oven temperatures, you can relax knowing your turkey has already been prepped to stay moist and flavorful.
Another reason bringing makes sense? You’re going to keep your turkey in the fridge overnight anyway. Why not let it soak in a flavorful bath while it rests? By the time you’re ready to roast, the hard work has already been done for you.
So, whether this is your first Thanksgiving or your tenth, brining is a simple step that transforms an ordinary turkey into a show-stopping centerpiece.
Ingredients You’ll Need
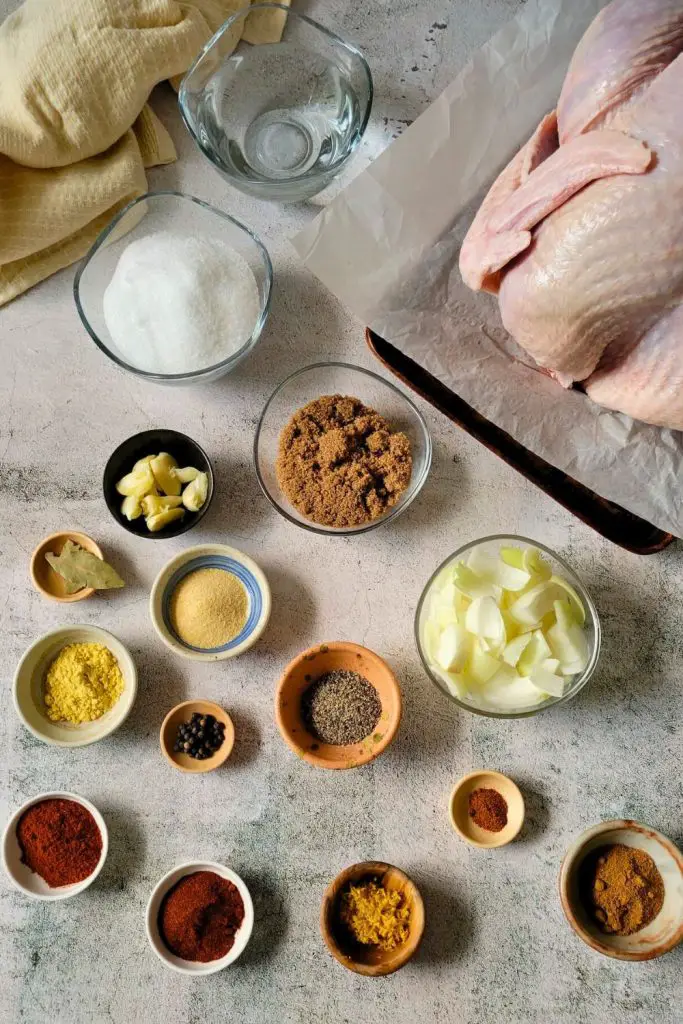
Here’s the classic brine formula based on the subtitle content. This amount works best for a 10–15 lb turkey. If your turkey is larger, double the recipe.
| Ingredient | Amount | Purpose in Brine |
|---|---|---|
| Water | 16 cups (4 cups first, then 12 cups later) | Base liquid to dissolve salt, sugar, and carry flavors |
| Kosher salt | 1 cup | Adds balance, slight sweetness, and helps with browning |
| Light brown sugar | ½ cup, packed | Bright, citrusy flavor that cuts the richness |
| Orange zest (from 2 oranges) | Peel only | Releases natural oils for bold, savory flavor |
| Garlic cloves | 6–9, smashed | Releases natural oils for bold savory flavor |
| Fresh thyme | 6 sprigs | Herbal freshness, classic holiday aroma |
| Fresh rosemary | 6 sprigs (leaves only) | Pine-like aroma that pairs perfectly with poultry |
| Bay leaves | 2 | Subtle earthy depth |
| Whole peppercorns | 2 tablespoons | Warm, peppery bite |
| Optional: Apple cider or apple juice | Replace 3 cups of water | Adds fruity, seasonal sweetness |
💡 Pro Tip: Always let the brine cool to room temperature before submerging your turkey. Adding raw poultry to warm liquid can cause food safety issues and uneven brining.
Step-by-Step: How to Make Turkey Brine
Brining a turkey isn’t complicated, but it does involve patience, timing, and attention to detail. The good news? Once you’ve prepped the brine, it does most of the work while you rest.
Below, I’ll guide you through each step, expanding on the process so you feel confident throughout.
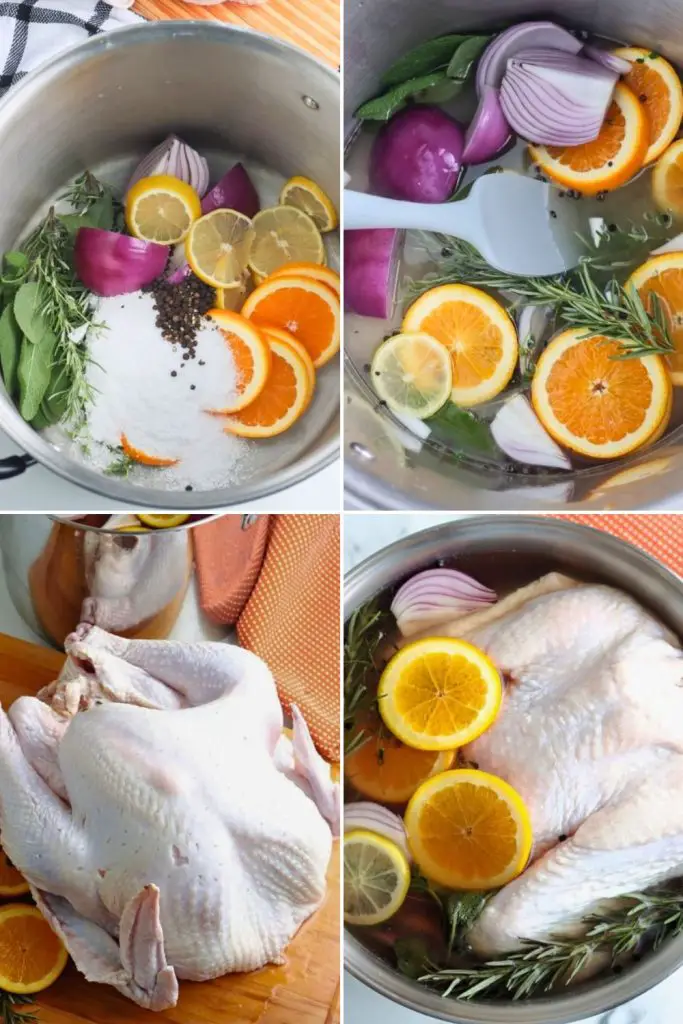
Step 1: Start with the Base
Every great brine begins with the core trio: water, salt, and sugar.
- Water: Start with 4 cups. This smaller portion helps dissolve the salt and sugar efficiently.
- Kosher salt (1 cup): This is the foundation of the brine. Unlike table salt, kosher salt is lighter and less dense, making it ideal for brining because it dissolves well and penetrates the meat evenly.
- Light brown sugar (½ cup, packed): The sugar balances the saltiness and adds subtle sweetness. It also helps with caramelization when the turkey roasts, giving that golden-brown skin we all crave.
Place the water, salt, and sugar in a large pot over medium-high heat. Stir gently until the salt and sugar completely dissolve. At this point, the brine appears simple, but it is this base that allows flavors to be deeply absorbed into the meat.
Pro Tip: Don’t substitute table salt here, it’s more concentrated and can make the brine overly salty. Stick with kosher or sea salt for the right balance.
Step 2: Simmer and Infuse
Now that your salt and sugar have dissolved, bring the mixture to a gentle simmer. You don’t need a rolling boil, just enough heat to help the aromatics release their essential oils when you add them in the following steps.
Think of this step as steeping tea. Just as hot water unlocks the flavor of tea leaves, a warm base brine extracts the oils and essence from citrus peels, garlic, herbs, and spices.
Once the liquid reaches a simmer, remove it from the heat. From here on, you’ll start layering flavors into the brine.
Analogy: Imagine building a house, you’ve poured the foundation (salt and sugar base), and now you’re ready to build the walls with citrus and herbs.
Step 3: Add Citrus
Next, add zest from two oranges. Using a vegetable peeler, carefully strip off long, thin pieces of peel, avoiding the white pith underneath. The pith can be bitter, but the bright orange zest is full of fragrant oils that give your turkey a subtle citrus lift.
Why oranges? They bring a brightness that balances the richness of turkey meat. While the sugar and salt create depth, the citrus cuts through, ensuring every bite tastes lively and fresh.
Wash your oranges thoroughly before peeling, and if possible, choose organic ones to minimize pesticide residue on the skin.
Variation: Want to experiment? Try adding lemon or grapefruit peel for a sharper or slightly bitter edge. Each citrus variety brings its own personality to the brine.
Step 4: Smash the Garlic
Garlic is the heart of savory cooking, and in brine, it’s no exception. Take 6–9 cloves of garlic, peel them, and smash each one with the flat side of a knife.
Crushing garlic is essential, as it releases allicin, the compound responsible for garlic’s robust aroma and flavor.
Drop the smashed cloves into the pot. As they soak, the garlic oils infuse into the brine, giving your turkey layers of bold, savory depth.
Kitchen Wisdom: Always buy whole garlic bulbs rather than pre-peeled or jarred garlic. Fresh garlic has more flavor and no preservatives that could interfere with your brine.
Step 5: Add Herbs and Spices
Now it’s time to add the herbs and spices that transform a basic brine into something unforgettable.
- Thyme (6 sprigs): Adds a subtle earthiness and a hint of minty freshness.
- Rosemary (6 sprigs, leaves only): Woody, pine-like notes that pair perfectly with poultry. Strip the leaves from the stems before adding.
- Bay leaves (2): Earthy and slightly floral, bay leaves add complexity that you might overlook directly but would miss if absent.
- Whole peppercorns (2 tablespoons): Offer a warm, peppery bite that balances the sweetness and citrus.
Adding these herbs is like giving your turkey an herbal steam bath. As they steep, the flavors gently weave themselves into the brine.
Hosting Hack: If you’ve got family or friends hanging around the kitchen who want to “help,” this is the perfect job for them. Hand them sprigs of herbs to strip or peppercorns to measure, but these tasks make people feel involved.
Step 6: Dilute
At this stage, your brine is incredibly concentrated. To make it suitable for soaking a large bird, you’ll need to dilute it with 12 additional cups of cold water.
Pour the water into the pot and stir until well combined. The final mixture should now be balanced, neither overly salty nor overly sweet. This dilution ensures your turkey absorbs the right level of seasoning without becoming overwhelming.
Optional Flavor Boost: Swap out 3 cups of water for apple cider or apple juice. This little twist adds a subtle fruity sweetness, enhancing the holiday feel.
Step 7: Cool the Brine
This step is non-negotiable: let the brine cool completely to room temperature. Never submerge raw turkey into hot liquid, as this creates a food safety risk and can start cooking the outer layers prematurely.
To speed up cooling, you can:
- Place the pot in a sink filled with ice water.
- Stir occasionally to release heat faster.
- Chill in the fridge if you’ve got time.
Only once the brine is completely cool should you move to the next step.
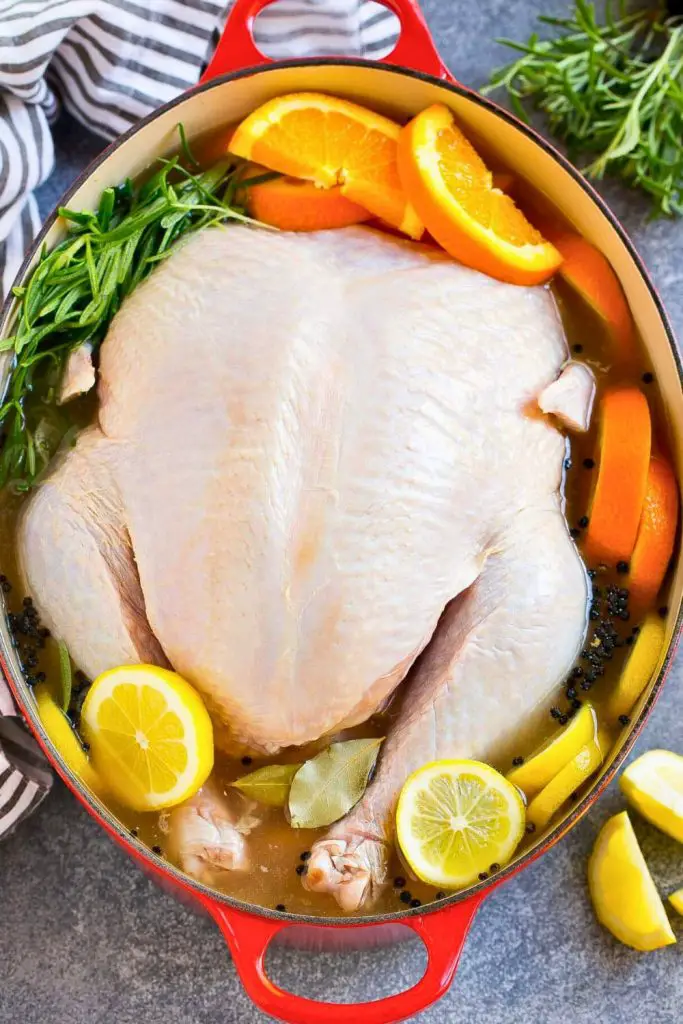
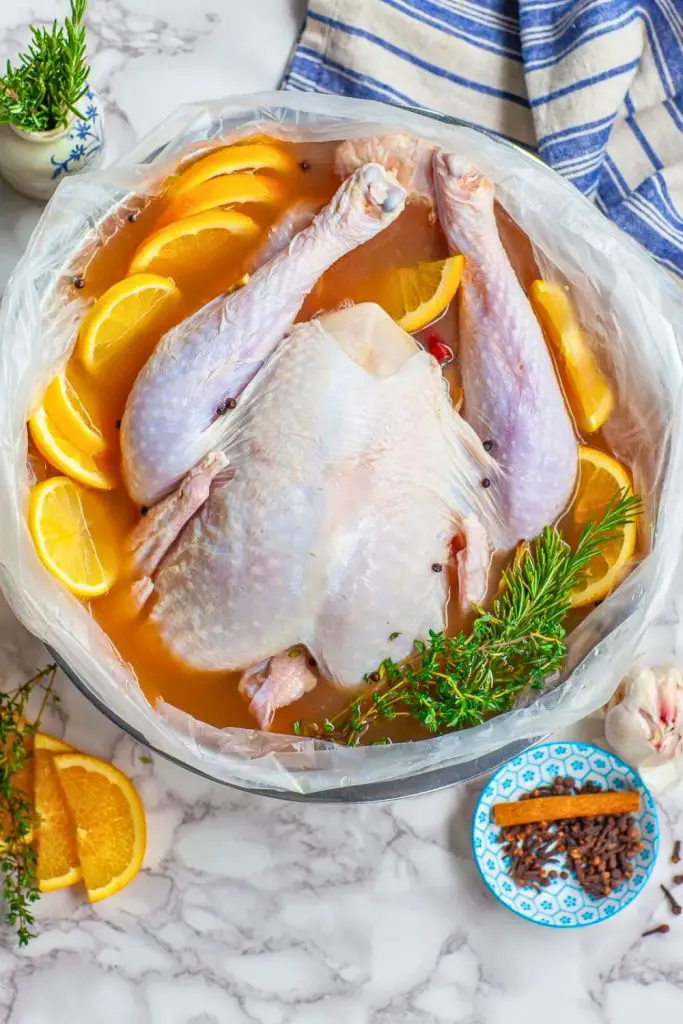
Step 8: Submerge the Turkey
Now for the fun part: introducing your turkey to its flavorful bath.
- Place the turkey in a brining bag (highly recommended for saving fridge space) or in a large pot if you have room.
- Carefully pour the cooled brine over the turkey.
- Ensure the bird is fully submerged, and flip it if necessary.
The liquid should cover the turkey entirely so every part soaks in flavor. If you’re short on liquid, add more cold water (or cider, for flavor) until it’s covered.
Space-Saving Tip: A brining bag is easier to fit into a crowded holiday fridge than a giant stockpot.
Step 9: Refrigerate Overnight
Cover the pot or seal the bag tightly, then place it in the refrigerator. Brine the turkey for 12 to 24 hours.
During this time, the brine does all the heavy lifting. Salt penetrates the meat, locking in moisture and flavor.
The herbs and citrus infuse their subtle notes. By morning, you’ll have a turkey that’s already transformed before it even hits the oven.
If you’re hosting Thanksgiving, this step also doubles as peace of mind—you can prep sides, clean the house, and relax knowing your turkey is being prepped to perfection.
Step 10: Remove, Rinse, and Dry
When you’re ready to cook, remove the turkey from the brine. This part is simple but critical:
- Rinse briefly under cold water. This washes away excess surface salt, preventing your bird from tasting overly salty.
- Pat dry thoroughly with paper towels. Dry skin ensures the outside crisps beautifully in the oven.
- Proceed with seasoning and roasting. Rub the turkey with butter or oil, season with herbs or spices, and roast as you normally would.
The brine has already done its magic, so you don’t need to go overboard with extra seasoning. A light touch of butter, garlic, or fresh herbs is enough to enhance what’s already there.
5 Tips for Turkey Brine Success
Brining a turkey is straightforward, but a few innovative strategies can take it from good to unforgettable. Here are five tips to ensure your brined turkey turns out moist, flavorful, and ready for the holidays.
1. Cool the Brine Completely Before Adding the Turkey
It can be tempting to rush and add the turkey right away. Don’t do it. Warm liquid is unsafe and can even start cooking the outside of the bird.
Always wait until the brine is at room temperature before submerging the turkey. In a hurry? Place the pot in an ice bath. You can also add a few ice cubes to cool it down faster.
2. Use the Right Salt
Kosher salt is the gold standard for brining. Unlike table salt, it’s less dense and dissolves evenly, giving consistent seasoning without over-salting. Using table salt will make your turkey far too salty; stick to kosher or a coarse sea salt instead.
3. Give It Enough Time, But Not Too Much
The optimal brining time is 12 to 24 hours. Less than 12 hours may not allow enough flavor penetration, while more than 24 hours can result in the meat becoming overly salty and spongy.
Overnight brining is perfect; it’s just enough time for the turkey to soak up all those delicious flavors without going too far.
4. Pat Dry for Perfectly Crisp Skin
After brining, always rinse the turkey briefly and pat it completely dry with paper towels. Moisture on the surface will prevent the skin from crisping in the oven.
For extra-crispy skin, let the turkey air-dry, uncovered, in the fridge for an additional hour before roasting. This step makes all the difference between rubbery skin and golden, crackling skin.
5. Think Ahead With Your Prep
The beauty of brining is that it doubles as part of your make-ahead plan. Instead of trying to juggle everything on the day of your holiday meal, the brine works its magic while you’re free to prep other dishes.
Use this time to make pies, wash vegetables, or even set the table. By the time you’re ready to roast, your turkey is already halfway to greatness.
Variations to Try
One of the best aspects of turkey brine is its customization options. You can stick to the classic version, or you can swap in different liquids, herbs, and spices to fit your menu. Below is a variation table to inspire your own signature brine.
| Variation | Swap or Add | Flavor Profile |
|---|---|---|
| Classic Citrus-Herb | Orange zest, rosemary, thyme, garlic | Fresh, aromatic, traditional holiday flavors |
| Apple Cider Brine | Replace 3 cups of water with apple cider | Sweet, fruity, autumn-inspired |
| Maple Brine | Replace brown sugar with maple syrup | Earthy sweetness with caramel notes |
| Spicy Kick | Add red pepper flakes or sliced jalapeños | Warm heat that balances rich meat |
| Herb Garden Brine | Add sage, parsley, dill, or marjoram | Bright, herby, garden-fresh |
| Citrus Medley | Mix orange, lemon, and lime peels | Zesty, vibrant, refreshing |
| Wine Brine | Replace 2 cups water with white wine | Elegant, slightly acidic, gourmet twist |
| Smoky Brine | Add smoked paprika and bay leaves | Deep, smoky flavor that mimics grilling |
💡 Tip: No matter which variation you choose, always keep the salt-to-water ratio consistent. This balance ensures the turkey stays juicy without becoming too salty.
Serving Suggestions
Once your turkey has been brined, rinsed, dried, and roasted, it’s ready to take center stage on the table. But what you serve with it can make the meal truly memorable. Here are some ideas to round out your holiday feast:
1. Classic Pairings
- Stuffing or Dressing: The herby, savory bread dish pairs beautifully with juicy turkey.
- Mashed Potatoes & Gravy: Creamy potatoes with pan drippings create the ultimate comfort food duo.
- Cranberry Sauce: The tart-sweet contrast brightens the richness of the turkey.
2. Vegetable Sides for Balance
- Roasted Root Vegetables: Carrots, parsnips, and sweet potatoes caramelize into sweet perfection.
- Green Beans or Asparagus: Light and crisp veggies balance the richness of the main dish.
- Brussels Sprouts with Bacon: Savory, crispy, and a guaranteed crowd-pleaser.
3. Breads and Grains
- Dinner Rolls or Cornbread: Perfect for soaking up gravy.
- Wild Rice Pilaf: A nutty, earthy side that pairs well with citrus-brined turkey.
4. Salads for Freshness
- Autumn Kale Salad with Apple Slices and Pecans: Adds crunch and freshness to the table.
- Citrus Beet Salad: Vibrant colors and tangy flavors complement the richness of turkey.
5. Drinks That Pair Well
- White Wine: Chardonnay or Sauvignon Blanc highlights the citrus and herb flavors of the brine.
- Apple Cider (spiked or plain): Reinforces the cozy, fall-inspired theme.
- Sparkling Water with Citrus Slices: Refreshing and ties into the brine’s citrus notes.
🍽️ Serving Style Tip: Carve the turkey at the table for a dramatic, centerpiece moment. Arrange slices on a large platter with fresh rosemary sprigs and orange wedges to echo the flavors of the brine.
Final Thoughts
There you have it, the ultimate turkey brine recipe. By combining simple ingredients like salt, sugar, garlic, citrus, and herbs, you transform your holiday turkey into something truly unforgettable.
Think of brining as your holiday helper: while you’re busy prepping sides and desserts, the turkey is quietly soaking up flavor and moisture.
The next time you slice into your bird, you’ll be rewarded with tender, juicy meat that tastes as good as it looks.
So, skip the dry turkey stress this year. Brine your bird, roast it with confidence, and watch your guests go back for seconds.
Reader Favorites This Season
Looking for more cozy, flavorful recipes to add to your seasonal menu? Try these favorites:
- 🥦 Easy 20-Min Creamy Asparagus Soup Recipe – A light yet satisfying soup perfect for weeknight dinners.
- 🍲 Delicious Borscht Soup Trend You Need to Try – A hearty beet-based soup with traditional roots and modern appeal.
- 🍴 Juicy Turkey Meatballs Recipe in Just 30 Minutes – Quick, protein-packed meatballs that make meal prep a breeze.
These recipes are just as approachable and flavorful as this turkey brine, giving you plenty of inspiration to keep your kitchen lively and your meals unforgettable.


Ella Foster, co-founder of FoodBears.com, is a skilled writer whose love for cooking fuels her creative work. Her passion for experimenting in the kitchen brings authentic flavor and culinary inspiration to every piece she crafts for the platform.