
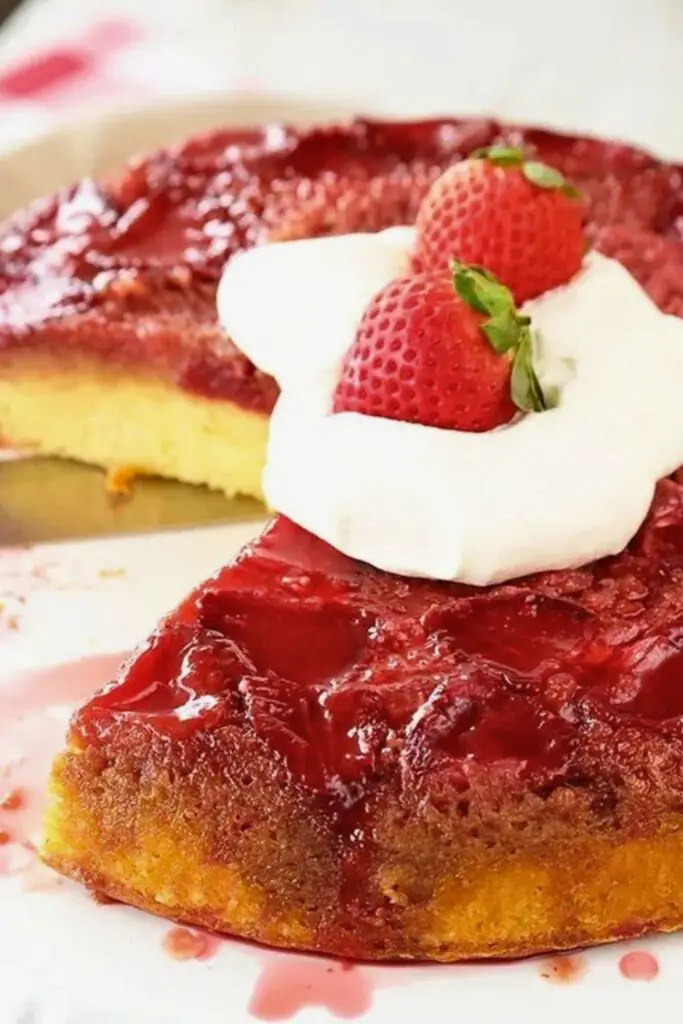
You know those desserts that make you pause after one bite and go, “Whoa… what is this deliciousness?” This is one of those desserts.
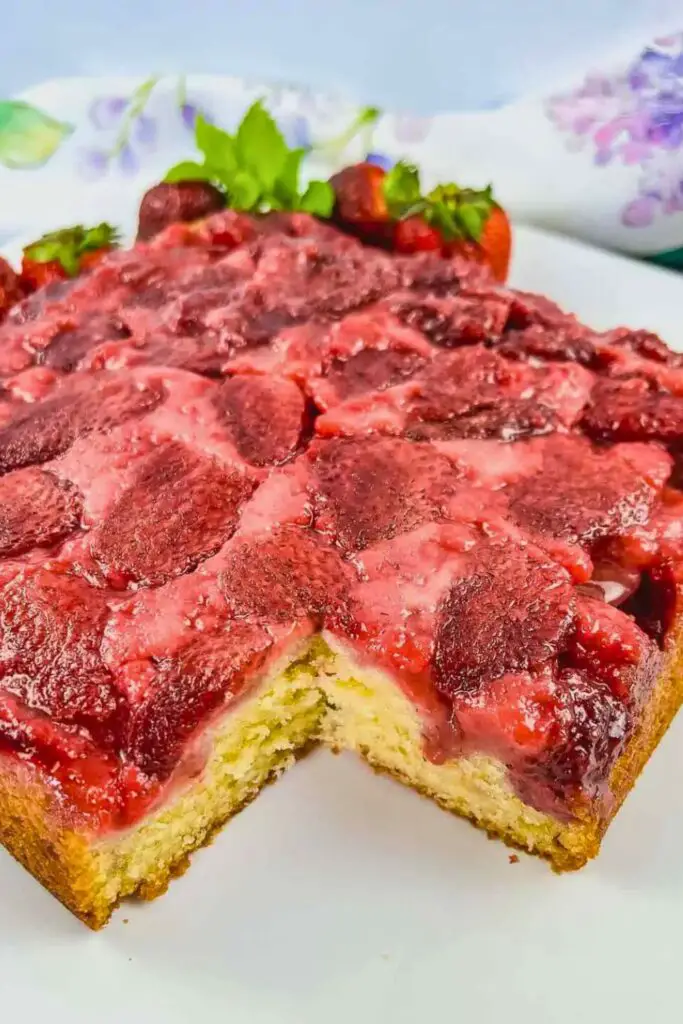
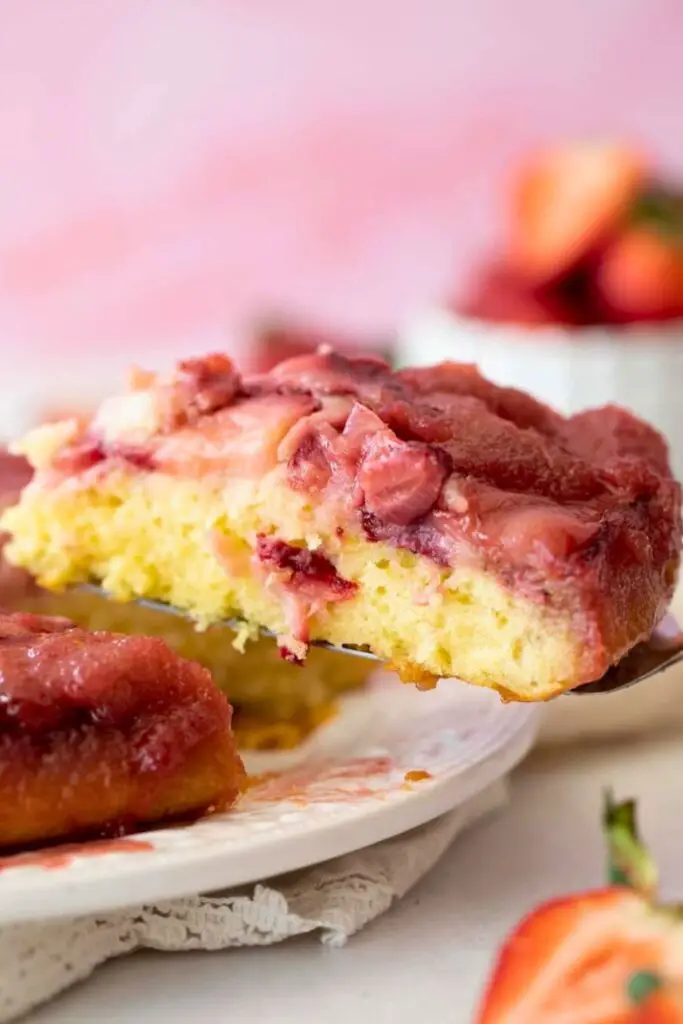
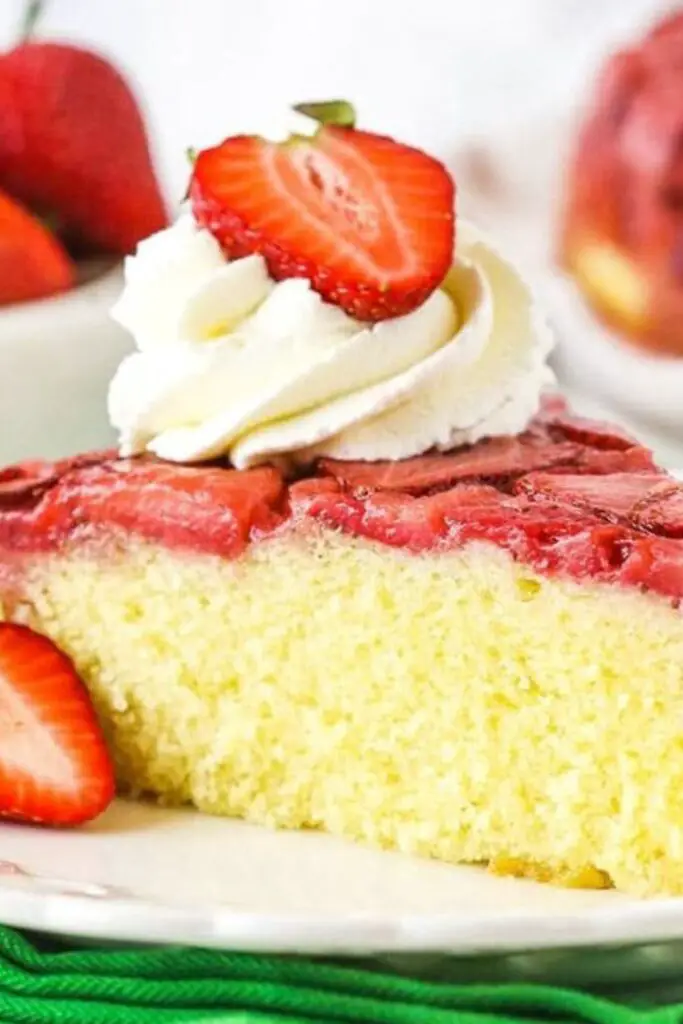
A Strawberry Upside Down Cake is not just a pretty dessert. It’s a soft, buttery cake topped with warm, jammy strawberries that practically melt in your mouth. And here’s the kicker: you bake it upside down!
The fruit goes in first, the cake batter on top, and after baking, you flip the whole thing. The result? A beautiful, caramelized strawberry topping that looks like something out of a bakery window.
But the best part? It’s super easy to make.
You don’t need to be a pro baker or have fancy ingredients. If you’ve got fresh strawberries, a few pantry staples, and an hour to spare, you’re already halfway there.
Read more:
Why You’ll Be Obsessed With This Cake
Let me give you a few solid reasons why this recipe deserves a permanent place in your dessert rotation:
- It’s showstopping but simple. Looks like it took hours, but it’s a 15-minute prep job.
- The flavor is unreal. Sweet strawberries, rich brown sugar, and buttery vanilla cake.
- It works year-round. Fresh strawberries in summer? Perfect. Frozen berries in winter? Still works.
- Zero waste. Got berries that are a little too soft for snacking? This cake’s got them covered.
So whether you’re hosting brunch, baking for a birthday, or just craving something cozy with your coffee, this cake is perfect.
What Exactly Is an Upside-Down Cake?

Upside down cakes are a fun twist on traditional fruit-topped cakes. The idea is simple:
You build the topping first, then add the batter, and flip the whole cake after baking.
The magic happens in the oven. The heat caramelizes the sugar and fruit on the bottom of the pan while the cake bakes on top. Once you flip it out of the pan, the top becomes a glossy, fruit-covered masterpiece.
Originally popularized in the U.S. with canned pineapple rings and maraschino cherries, upside-down cakes are now made with everything from apples to plums to, you guessed it, strawberries.
Ingredients: What You’ll Need (And Why)
This cake uses simple ingredients, but each one plays an important role. Here’s a breakdown of what goes in and why.
🍓 Strawberry Layer (Topping):
- 2 cups fresh strawberries, hulled and sliced – The show’s star. Fresh berries work best, but frozen ones will do (more on later).
- 1/4 cup brown sugar adds rich, molasses-y sweetness, helping the strawberries caramelize and creating that signature syrupy topping.
- 2 tablespoons unsalted butter, melted – Helps the brown sugar melt and gives the topping a buttery gloss.
🍰 Cake Batter:
- 1 ½ cups all-purpose flour – Your structure. Keeps the cake soft yet sturdy enough to flip.
- ½ cup unsalted butter, softened – Adds richness, flavor, and moisture.
- 1 cup granulated sugar – Sweetens the cake without overpowering the strawberries.
- 2 large eggs – Bind everything together and add tenderness.
- ½ cup whole milk – Keeps the crumb soft and moist.
- 1 tsp vanilla extract – Adds warmth and aroma to the cake base.
- 1½ tsp baking powder – Helps the cake rise.
- ¼ tsp salt – Balances the sweetness and brings out the flavor.
How to Make Strawberry Upside Down Cake
Baking this cake is super satisfying, especially when you reach that “flip moment” and reveal a glossy strawberry top. But to make sure everything goes smoothly from prep to serving, here’s a more detailed, foolproof guide:
Step 1: Prepare Your Equipment and Ingredients
Before you start mixing anything, take a few minutes to set yourself up for success:
- Preheat your oven to 350°F (175°C).
This ensures even baking and a beautiful rise. Don’t skip the preheat! - Grease your baking pan.
Use a 9-inch round cake pan, not a springform pan (strawberry juice can leak out). Grease the pan generously with butter or non-stick spray. If you want extra security against sticking, line the bottom with a circle of parchment paper, then grease that, too.
Quick Tip: A dark-colored pan will bake the cake a little faster and give it a deeper golden edge, while a light-colored pan offers a more even, gentle bake. Either work keep an eye on the time.
Step 2: Make the Strawberry Topping
This layer will end up on top after baking, so presentation matters here. Let’s break it down:
- Melt 2 tablespoons of unsalted butter (either on the stovetop or in the microwave).
Make sure it’s fully melted but not too hot. - Pour the melted butter into the greased cake pan.
Tilt the pan or use a brush/spoon to coat the bottom. - Sprinkle 1/4 cup of packed brown sugar evenly over the butter.
The sugar will mix with the butter during baking, turning into a rich caramel that soaks into the berries. - Layer the strawberries.
Use 2 cups of fresh strawberries, hulled and sliced about 1/4 inch thick. Lay them in a single, even layer on top of the sugar. You can:- Arrange them in a spiral for a fancier look.
- Go rustic and scatter them randomly for a more natural design.
Pro Tips:
- Don’t overlap strawberries too much; stick to a single layer for the best texture and clean slices.
- Avoid super juicy or overripe strawberries. They’ll release too much liquid and could make your topping runny.
Step 3: Make the Cake Batter
Here’s where the fluffy, golden cake magic happens. It’s a simple butter cake that holds up beautifully to the juicy topping.
- Cream the butter and sugar.
In a large mixing bowl, combine:- ½ cup softened unsalted butter
- 1 cup granulated sugar
- Add the eggs.
Crack in 2 large eggs, one at a time, beating well after each. This prevents curdling and creates a smooth batter. - Stir in 1 teaspoon vanilla extract.
This gives the cake a warm, classic flavor that pairs beautifully with strawberries. - Mix the dry ingredients.
In a separate bowl, whisk together:- 1½ cups all-purpose flour
- 1½ teaspoons baking powder
- ¼ teaspoon salt
- Alternate adding dry ingredients and milk.
Pour in the flour mixture and ½ cup whole milk in batches:- Add ⅓ of the flour mix
- Then ½ of the milk
- Repeat until both are added, ending with flour
Why alternate? It helps keep the batter smooth and prevents the mixture from separating.
- Don’t overmix.
Stop mixing once the last bit of flour disappears. Overmixing = tough cake.
Extra Tips:
- Want to level up the flavor? Add 1/2 tsp of lemon zest to brighten things up.
- If baking at high altitude, add 1 extra tablespoon of flour to help the cake rise properly.
Step 4: Assemble the Cake
Now, it’s time to bring it all together.
- Gently spoon the batter over the strawberries.
Drop it in spoonfuls over the fruit, then use a spatula to smooth it out. Be gentle. You don’t want to shift the strawberry layer. - Spread the batter all the way to the edges.
The batter is thick, so take your time spreading it evenly. Smooth the top with an offset spatula or the back of a spoon.
Step 5: Bake to Perfection
Place the cake in your preheated oven and bake for 40 to 45 minutes.
- Start checking at the 38-minute mark.
- Insert a toothpick into the center. If it comes out clean (or with just a few crumbs), the cake is ready.
If the top is browning too quickly, loosely tent the cake with foil during the last 10 minutes.
Don’t underbake! The strawberries create moisture underneath, so make sure the top is fully set and springy to the touch.
Step 6: Cool and Flip (The Most Fun Part!)
- Let the cake cool in the pan for 10–15 minutes.
This gives the topping time to settle and helps the cake firm up.
But don’t let it sit too long—waiting more than 20 minutes can cause it to stick to the pan. - Loosen the edges.
Run a butter knife or offset spatula around the edges of the pan to make sure nothing’s stuck. - Flip it!
Place a large plate, cake stand, or serving platter on the pan. Holding both the pan and plate firmly, flip them over quickly. Carefully lift off the pan and… ta-da!
If some strawberries stick, don’t panic. Gently lift and replace them on top of the cake with a spatula.
Bonus Tips for Cake Success
- Want extra shine on top? Brush the strawberries with a little warm strawberry or apricot jam after flipping.
- Make it richer: Add 2 tablespoons of sour cream or Greek yogurt to the batter for extra moisture.
- Need to make ahead? Bake the cake, cool it completely, and store it in the fridge. Reheat in the oven (covered) at 300°F for 10 minutes before serving.
Strawberry Upside Down Cake Tips & Tricks
Want your cake to come out perfect every time? These tried-and-true tips will help you avoid common baking mistakes and elevate your cake to professional levels, even if you’re baking it for the first time!
1. Grease Well—Like, Really Well
Don’t skimp on greasing your cake pan. Use butter or nonstick spray generously, and don’t forget the sides. If you’re worried about sticking, line the bottom with parchment paper after greasing. It’s like insurance for your cake flip.
2. Use Fresh, Firm Strawberries
Choose strawberries that are ripe but still firm. If they’re too soft or overripe, they’ll release too much juice and can make the top soggy. You want them sweet and juicy but still holding their shape.
3. Keep the Strawberry Layer Single and Flat
It’s tempting to pile on the strawberries, but don’t. Stick to a single, flat layer for even baking and clean slices. Overlapping too many berries can make the topping mushy and the cake uneven.
4. Don’t Overmix the Batter
Mix just until everything is combined. Overmixing the batter develops gluten and can make your cake dense and rubbery instead of soft and fluffy.
5. Watch Your Bake Time Closely
All ovens are different. Start checking at the 38-minute mark. The top should be golden and slightly springy, and a toothpick inserted into the center should come clean.
6. Let It Cool Just Enough Before Flipping
10 to 15 minutes is the sweet spot. Flip too early, and your cake might break. Flip too late, and it might stick. Set a timer, and don’t wait too long.
7. Fix Any Topping Mishaps Gracefully
If a few strawberries stay behind in the pan after flipping, no worries! Use a spatula to lift them and gently place them back on the cake. Nobody will notice—promise.
What to Serve With Strawberry Upside-Down Cake
This cake is delicious on its own, but if you want to take it to the next level, here are a few easy, delicious pairings that add even more wow factor:
1. A Scoop of Ice Cream
Vanilla, strawberry, or even a scoop of lemon sorbet adds creamy contrast to the warm, jammy cake. It melts into the strawberries like a dreamy sauce. Chef’s kiss!
2. Whipped Cream
Fresh whipped cream with vanilla or almond extract adds fluff and balance to the rich, fruity topping. A generous dollop on top = perfection.
3. Dusting of Powdered Sugar
Simple but beautiful. A little sprinkle right before serving gives your cake a polished, bakery-style finish.
4. Fresh Mint Leaves
For a pop of color and a touch of freshness, garnish each slice with a mint leaf. It’s a small touch that makes a big visual impact.
5. Coffee, Tea, or Sparkling Lemonade
- Coffee or espresso brings out the buttery richness of the cake.
- Black tea with a hint of lemon complements the berries perfectly.
- Sparkling lemonade or a light rosé is lovely for warm-weather celebrations.
Can I Use Frozen Strawberries?
Yes, you absolutely can use frozen strawberries, but there are a few important things to know before you toss them into your pan:
1. Thaw Them First
Never use frozen strawberries straight from the freezer. Thaw them completely first in the fridge overnight or at room temperature for about an hour.
2. Drain Excess Liquid
Once thawed, gently press them with paper towels to soak up extra moisture. Frozen berries release a lot of liquid, and too much moisture can cause your cake to turn out soggy or gluey.
3. Cut Them (If Needed)
Some frozen strawberries are whole or come in large chunks. Slice them like you would fresh ones to keep the topping even and pretty.
4. Expect a Slight Texture Change
Frozen strawberries are softer after thawing. They’ll still taste amazing but won’t hold their shape as well as fresh ones. The flavor, though? Still totally delicious.
Final Thoughts: A Cake Worth Flipping Over
This Strawberry Upside Down Cake is a recipe you’ll come back to again and again. It’s easy, beautiful, and absolutely delicious. Whether you serve it warm with ice cream or cold with coffee, one thing’s for sure—you’ll have zero leftovers.
So grab those strawberries, preheat the oven, and get ready to fall in love.
Go ahead, flip your dessert game on its head.

Ella Foster, co-founder of FoodBears.com, is a skilled writer whose love for cooking fuels her creative work. Her passion for experimenting in the kitchen brings authentic flavor and culinary inspiration to every piece she crafts for the platform.