
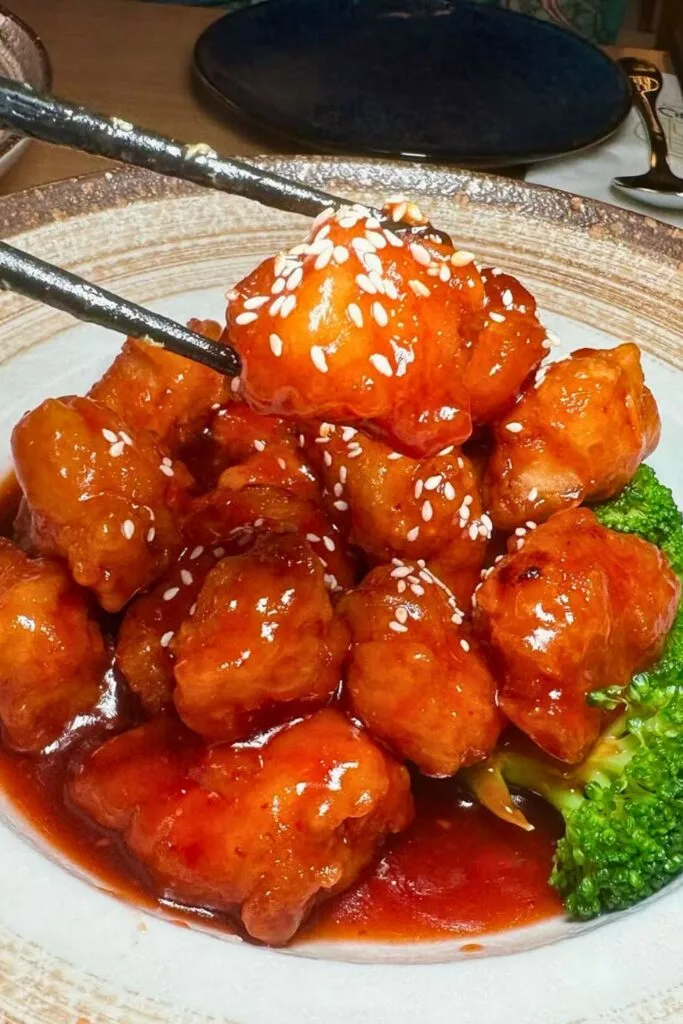
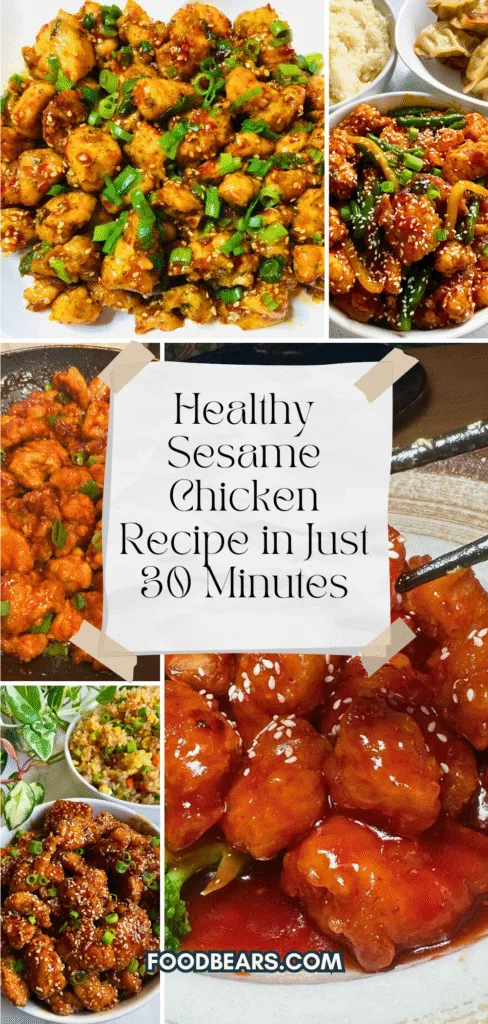
I love takeout sesame chicken, but I wish it were just a little crispier, fresher, and more flavorful. You’re in for a treat!
This homemade sesame chicken recipe delivers ultra-crispy bites coated in a glossy, sweet, and tangy sauce with a nutty sesame kick, ready to rival your favorite Chinese restaurant.
But here’s the secret: not only is it ridiculously delicious, it’s also surprisingly simple to make at home (with a few chef-level tricks you’ll love!).
Why You’ll Love This Sesame Chicken Recipe

This isn’t just another sesame chicken recipe. It’s the crunchy, sticky, saucy version you dream about, only better, because it’s homemade.
Here’s why you’ll love it:
- Crispy Perfection: Every bite delivers that satisfying crunch, thanks to the innovative use of sweet potato starch and the double-frying technique. No soggy leftovers here.
- Balanced Sweet & Savory Sauce: The glossy sesame sauce hits all the right notes—sweet from honey and brown sugar, tangy from vinegar, and savory from soy sauce. It clings to the crispy chicken without drowning it.
- Family-Friendly & Budget-Friendly: Using chicken breast makes this a leaner and more affordable version without compromising flavor. Perfect for weeknight dinners or weekend indulgence.
- Make-Ahead Friendly: Both the sauce and the fried chicken can be prepped ahead of time. That means dinner is only a double-fry and a toss away.
- Tastes Better Than Takeout: Unlike restaurant versions that often sit in sauce and lose their crunch, this one is made fresh, and you control everything from oil quality to seasoning levels.
Whether you’re a fan of Chinese takeout or love bold, comforting flavors, this sesame chicken is a must-make. One bite and you’ll see why it’s a keeper.
A Brief History: Where Did Sesame Chicken Come From?
Sesame chicken might be a menu staple at every Chinese-American restaurant, but its roots go much deeper and more authentically Chinese than you might think.
The story begins with Cantonese sweet and sour pork, a classic dish that early Chinese immigrants brought to the U.S.
The Cantonese community was one of the largest groups to migrate during the early waves of Chinese immigration, especially on the West Coast.
But in America, pork wasn’t always the first choice.
Chicken was cheaper, more accessible, and more familiar to American tastes, especially chicken breast.
That’s when creative chefs began substituting chicken for pork, and over time, variations like sesame chicken, orange chicken, and lemon chicken emerged.
While the deep-fried, sweet-glazed dish is often considered “Americanized,” it’s, in fact, a brilliant fusion, rooted in traditional Chinese cooking but adapted to thrive in the American restaurant scene.
So next time you dig into that glossy, crispy chicken, remember: you’re enjoying a piece of food history that bridges two worlds with flavor.
Ingredients You’ll Need
Here’s a quick list of everything you need to make restaurant-quality sesame chicken at home. The ingredients are broken into categories for easier prep.
🐔 For the Chicken and Marinade:
| Ingredient | Amount |
|---|---|
| Chicken breast | 1 lb, cut into ⅓-inch slices |
| Garlic (finely minced) | 1 tbsp |
| Soy sauce | 2 tsp |
| Salt | ½ tsp |
| Black pepper | To taste |
| Baking soda | ⅓ tsp |
| Egg | 1 |
| Sweet potato starch | 3 tbsp |
🧂 For the Coating:
| Ingredient | Amount |
|---|---|
| Sweet potato starch | Enough to coat the chicken |
| (Optional: water spray) | For DIY coarse texture |
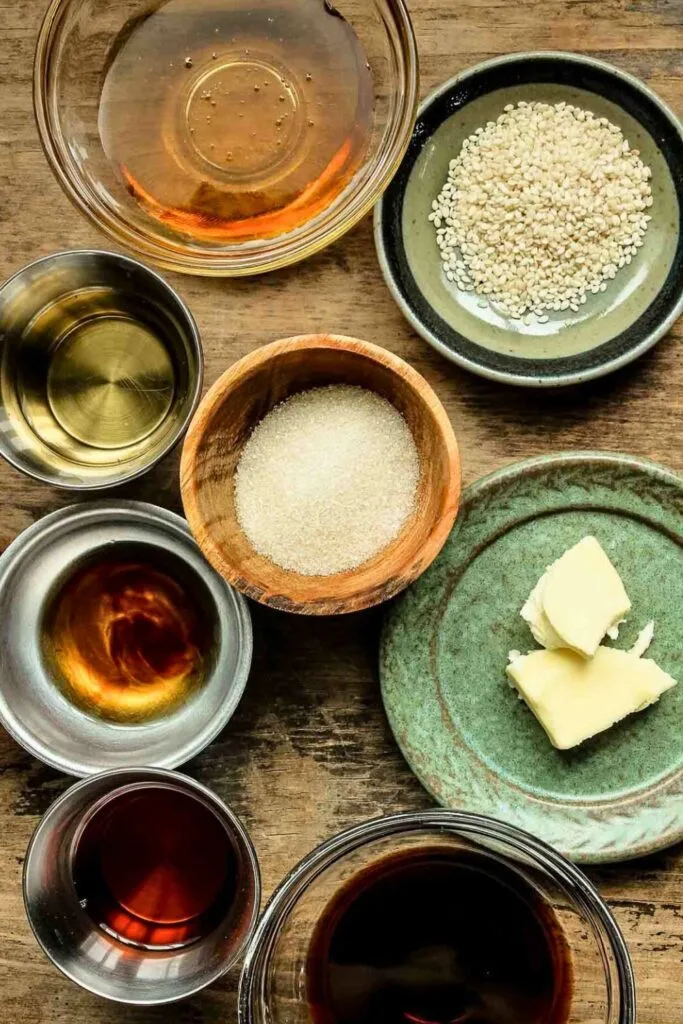
🍯 For the Sauce:
| Ingredient | Amount |
|---|---|
| Honey | 2 tbsp |
| Brown sugar | 3 tbsp |
| Soy sauce | 2.5 tbsp |
| Ketchup | 2.5 tbsp |
| Chinese black vinegar | 1 tbsp (or white vinegar) |
| Water | 3.5 tbsp |
| Sweet potato starch | 2 tsp (to mix with water) |
🧑🍳 For Final Garnish & Flavor:
| Ingredient | Amount |
|---|---|
| Roasted sesame seeds | 1.5 tbsp |
| Sesame oil | A drizzle (about 1 tsp) |
| Sliced scallions | Optional, for garnish |
🔥 For Frying:
| Ingredient | Amount |
|---|---|
| Oil for deep frying | Enough to submerge chicken (3–4 cups) |
🔪 Pro Tip: Try to prep all your ingredients before you start cooking. This dish moves quickly once you start frying and saucing!
Step-by-Step: How to Make Sesame Chicken at Home
Ready to cook up your crispy sesame chicken masterpiece? Let’s walk through each step in detail, from slicing the chicken just right to that glorious final toss in a glossy sauce.
These eight steps will help you master the dish, even if it’s your first time cooking with oil.
Step 1: Prep the Chicken Breast Properly
The base of this dish starts with your chicken: 1 pound of chicken breast, to be exact. Although thighs are juicier and more forgiving, we’re using breast meat here because it’s lighter and preferred by many for this dish (my husband included!).
📝 Here’s what to do:
- Cut each chicken breast in half lengthwise to make them thinner.
- Then slice into even pieces about ⅓-inch thick.
Why so specific? Because even thickness means even cooking, and when deep-frying, that’s essential. Too thick, and your chicken might be raw in the center. Too thin, and it could dry out.
🔪 Tip: Place the chicken in the freezer for 10 minutes before slicing. It firms up just enough to make slicing easier and cleaner.
Step 2: Marinate for Moisture and Flavor
Now it’s time to give that chicken some flavor and prep it for a crispy coating. This marinade also tenderizes the meat and forms a sticky base that starch will cling to later.
🧂 Add the following to your sliced chicken:
- 1 tbsp finely minced garlic
- 2 tsp soy sauce
- ½ tsp salt
- Black pepper to taste
- ⅓ tsp baking soda
- 1 egg
- 3 tbsp sweet potato starch
Mix everything thoroughly until it looks slightly sticky and gooey.
Let the chicken sit for 20 minutes.
🤔 Why these ingredients?
- Baking soda: Breaks down protein just enough to tenderize the breast meat.
- Sweet potato starch helps thicken the marinade, preventing breast meat from drying out during frying.
- Egg: Binds everything and gives the coating a better texture.
⏳ Letting it rest is key. It provides the starch and egg time necessary for the coating to adhere properly, which means your coating will hold up better in the fryer.
Step 3: Create a Crispy Coating
Now, for the fun part: making that legendary, crispy crust. Sweet potato starch is our go-to choice here because it creates an airy, shattering crunch that rivals the crunch of fried takeout.
But not everyone has access to coarse sweet potato starch, especially if you don’t live near an Asian market. No worries! You can DIY coarse crumbs using this genius trick:
🧪 DIY Crunchy Coating Hack:
- Take any starch (sweet potato, tapioca, or cornstarch) and spread it out in a large container.
- Lightly spray it with water using a spray bottle.
- Wait 20 seconds, then fluff it up with a whisk.
- Repeat the process 5 times—spray, wait, whisk.
This causes the starch to clump together into tiny, crunchy bits, almost like gluten-free breadcrumbs. And these little clumps are gold when it comes to creating a crispy texture.
Step 4: Coat the Chicken with Starch Clusters
Once your starch clumps are ready, it’s time to coat!
Here’s how to do it:
- Drop the marinated chicken into the clumpy starch one piece at a time.
- Make sure each piece has space and is coated individually—don’t dump them all in at once.
- Gently toss or shake the container. You can use chopsticks or cover the lid and shake, as if you’re making shake-and-bake.
- When they’re fully coated, use a sieve to shake off excess starch and place each piece on a tray.
🍗 Rest the coated chicken for 15 minutes before frying. This allows the starch to bond, reducing the chance of the coating falling off in the oil.
Step 5: First Fry—Cook the Chicken Through
Heat oil in a wok or deep pan to 380°F (193°C). This is hot enough to quickly set the coating without browning the chicken too fast.
Frying Tips:
- Work in batches to avoid overcrowding. Too much chicken in the oil lowers the temperature, resulting in a soggy crust and overcooked meat.
- Fry until the chicken turns white and firm—you don’t need deep color just yet.
- Each batch takes 2–3 minutes.
- Use a wire rack or paper towels to drain the excess oil.
🧽 Be sure to remove any loose starch or crumbs from the oil between batches using a mesh skimmer or sieve. Otherwise, they’ll burn and make your oil taste bitter.
Step 6: Let the Chicken Rest (Again!)
After the first fry, don’t jump straight into the second fry or sauce.
Let the chicken sit for 15 minutes.
Why?
- The residual heat finishes cooking the center.
- The crust will soften slightly, which is what you want before the final double fry.
- This rest time also helps redistribute moisture, keeping the chicken juicy inside.
This step may seem odd, but trust the process—it’s key to locking in flavor and texture.
Step 7: Make the Sesame Sauce
While your chicken is resting, let’s make the sticky, sweet, and tangy glaze that gives sesame chicken its name.
In a bowl, combine:
- 2 tbsp honey
- 3 tbsp brown sugar
- 2.5 tbsp soy sauce
- 2.5 tbsp ketchup
- 1 tbsp Chinese black vinegar (or substitute white vinegar)
- 3.5 tbsp water + 2 tsp sweet potato starch (mixed separately, then added)
Whisk everything together until smooth.
🍯 Sauce Tip: You can make this in bulk and store it in the fridge for up to 3 months. Just reheat and pour when needed!
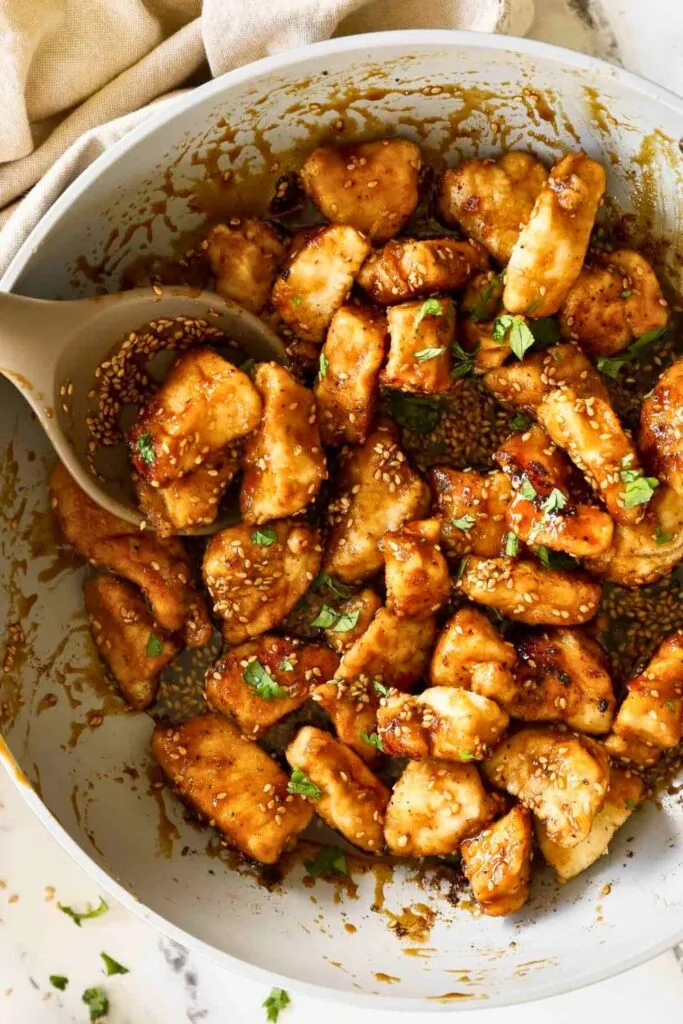
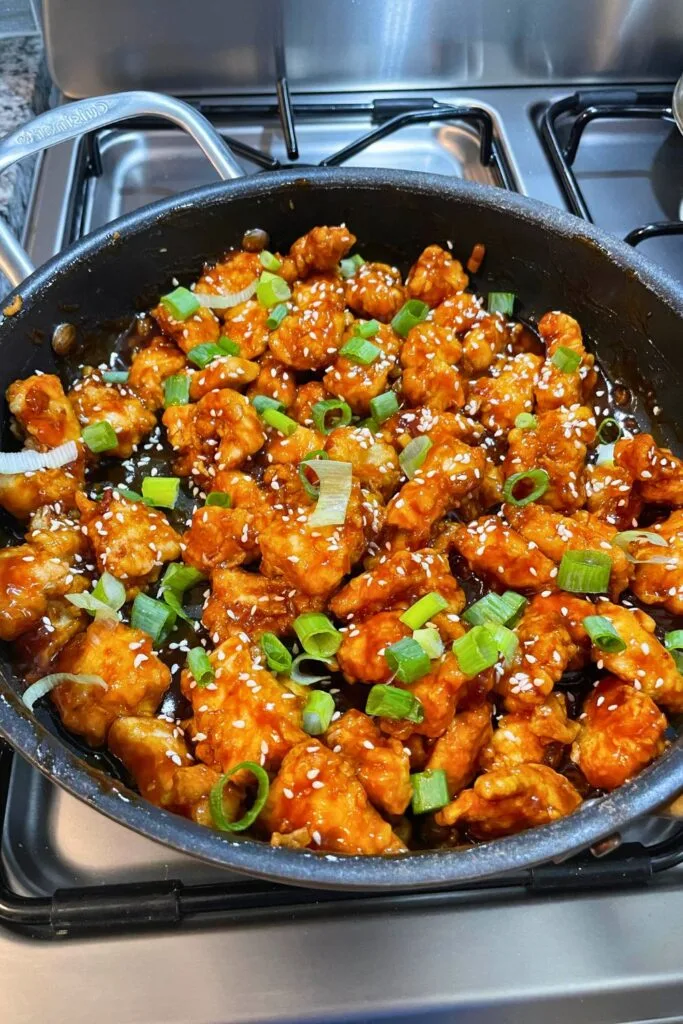
Step 8: Double Fry and Toss in Sauce
Time for the final fry, and this is what separates good sesame chicken from incredible sesame chicken.
Heat oil to 400°F (204°C).
Add the chicken back in for the second fry, working in batches. This time, you want the coating to turn golden brown and ultra crispy. This should take about 2–3 minutes per batch.
Drain the chicken again on a rack or paper towels.
Now, pour out the oil from your wok, leaving behind just a teaspoon or two.
Add the prepared sauce and heat it until it begins to bubble and thicken—this should only take a minute or so.
Toss the hot, crispy chicken into the sauce. Stir quickly to coat every piece without letting the chicken sit too long in the sauce (to keep the crunch).
Finally, finish with:
- A drizzle of sesame oil for flavor
- 1.5 tbsp of roasted sesame seeds for that signature nutty bite
Optional: Garnish with chopped scallions.
🥢 You want just enough sauce to coat the chicken, not drown it. Takeout versions often come with a heavy sauce, which can soften the coating. This version keeps things crispy and balanced.
Tips for Crispy Chicken Every Time
Getting that golden, crackly coating on sesame chicken is the ultimate goal—and yes, it’s 100% achievable at home if you follow a few key steps. These tips are drawn straight from years of experience and experimentation (with plenty of fried chicken along the way!).
1. Choose the Right Starch
Your crispy coating lives or dies by the starch you use. Here’s how they rank in terms of crunch:
- 🥇 Sweet Potato Starch – Light, airy, and shatteringly crisp. The best option.
- 🥈 Tapioca Starch – Still crispy but slightly chewier.
- 🥉 Potato Starch – Not bad, fairly neutral.
- ⚠️ Cornstarch – OK in a pinch, but not as resilient.
- ❌ All-Purpose Flour – The least crispy. The gluten absorbs moisture and quickly turns soft after saucing.
✅ Pro Tip: Use coarse sweet potato starch if you can find it—it’s the secret weapon for that ultra-crispy texture. If not, use the DIY spray-and-whisk method to simulate the coarse texture using powdered starch.
2. Don’t Skip the Rest Time
Let the coated chicken rest for at least 15 minutes before frying. Why?
- It gives the starch time to bond.
- The crust sets better and holds up during deep frying.
- Less chance of the coating falling off in the oil.
3. Double Fry for Long-Lasting Crunch
You might be tempted to skip the second fry, but don’t! Double frying:
- Reinforces the crust
- Prevents sogginess after tossing in sauce
- Brings out that deep golden color
First Fry: Cook through at 380°F (193°C)
Second Fry: Crisp up at 400°F (204°C)
4. Keep the Oil Clean
Tiny fried bits (crumbs) can burn fast. After your first batch, strain out any remaining debris from the oil using a fine-mesh sieve. This keeps the oil fresh and maintains a clean taste.
5. Control the Sauce Quantity
The sauce should coat the chicken, not smother it. Too much sauce = soggy results.
Keep the ratio tight so the crust remains intact and crunchy, even after tossing. That’s the trick most takeout joints don’t tell you.
Serving Suggestions

Sesame chicken is the star of the show, but it definitely deserves a flavorful supporting cast. Here are some delicious and visually appealing sides and pairings to complete your meal:
🍚 Serve with Steamed Rice
- The perfect neutral base for that sticky sauce to shine.
- Jasmine or short-grain white rice works beautifully.
🥬 Add Stir-Fried Greens
- Quick sautéed bok choy, baby spinach, or Chinese broccoli with garlic.
- Balances out the richness with a touch of freshness.
🍜 Try with Fried Rice or Lo Mein
- Want something more indulgent? Serve sesame chicken over homemade fried rice or alongside lo mein noodles.
- Add some scrambled eggs, green onions, and peas for a whole takeout experience at home.
🥢 Serve Family-Style
- Plate the sesame chicken in a large bowl, sprinkle sesame seeds and scallions on top, and let everyone dig in.
- Add chopsticks and small serving bowls to create a cozy, authentic vibe.
🍻 Drink Pairings
- Cold jasmine tea, sparkling water with citrus, or even a light lager balances the sweet-savory richness.
🥡 Planning a party? Sesame chicken makes a fabulous appetizer or finger food when served with mini toothpicks.
What’s the Difference Between Sesame Chicken and General Tso’s?
Both dishes are crispy, saucy, and delicious, but there are a few key differences that distinguish them. Here’s a side-by-side comparison to help you understand (and maybe help you choose next time you’re craving takeout!).
| Feature | Sesame Chicken | General Tso’s Chicken |
|---|---|---|
| Origin Inspiration | Cantonese sweet and sour pork | Hunan cuisine (spicy-sour notes) |
| Flavor Profile | Sweet, mild, nutty (from sesame oil & seeds) | Sweet, tangy, with a bit of heat |
| Sauce Ingredients | Soy sauce, honey, brown sugar, ketchup, vinegar | Soy sauce, sugar, garlic, ginger, vinegar, chili |
| Spiciness Level | Very mild (non-spicy) | Medium to hot (depending on how it’s made) |
| Toppings | Toasted sesame seeds, scallions | Dried red chilies, garlic slices, green onions |
| Crunch Factor | Moderate (balanced with glossy coating) | Often crispier, less glossy |
| Color | Golden brown with light amber sauce | Darker, reddish-brown sauce |
| Popularity | Very popular in American-Chinese cuisine | Equally popular, especially for spice-lovers |
🍽️ Verdict: Go for sesame chicken if you love sweet, nutty, crunchy bites. Opt for General Tso’s when you’re craving heat and bold, zesty flavors.
FAQs
1. What is sesame chicken sauce made of?
Sesame chicken sauce is a glossy, sweet-savory glaze made from a combination of soy sauce, honey, brown sugar, ketchup, vinegar (often Chinese black vinegar), water, and a thickening agent like sweet potato starch. It’s finished with a drizzle of toasted sesame oil and roasted sesame seeds for that signature nutty depth.
2. What to season sesame chicken with?
The chicken itself is seasoned during marination with soy sauce, salt, black pepper, minced garlic, and baking soda. These ingredients tenderize the meat and lay the flavor foundation before the crispy coating and sauce come into play.
3. Does General Tso’s sauce have sesame?
No, traditional General Tso’s chicken does not include sesame oil or sesame seeds. The sauce tends to be spicier and tangier, often made with chili peppers, soy sauce, vinegar, and sugar. While some restaurants might add a drizzle of sesame oil for flavor, sesame is not a defining ingredient.
4. What is the difference between tahini and sesame sauce?
While both are made from sesame seeds, they’re very different in taste, texture, and use:
| Tahini | Sesame Sauce (for chicken) |
|---|---|
| Made from ground sesame seeds | Made from soy sauce, honey, vinegar, etc. |
| Thick, paste-like texture | Smooth, pourable glaze |
| Nutty and slightly bitter | Sweet, tangy, and savory |
| Used in Middle Eastern dishes | Used in Chinese-American cuisine |
5. What does rice vinegar do to chicken?
Rice vinegar helps to balance flavors and tenderize meat. Its acidity cuts through the richness of fried chicken and enhances the brightness of the sauce. In sesame chicken, it also adds a mild tang that elevates the sweet and savory profile of the glaze.
Final Thoughts
Making sesame chicken at home might seem like a project, but once you try it, you’ll see why it’s worth every step. The crunch, the glossy sauce, the nutty sesame pop—it’s all there, but fresher, crispier, and more flavorful than takeout could ever be.
This recipe isn’t just dinner. It’s a confidence-boosting, better-than-restaurant experience you’ll want to repeat again and again.
So next time that sesame chicken craving hits, skip the delivery app. Head to your kitchen, pull out your wok (or pan), and make magic happen!
More Easy & Delicious Recipes to Try Next
🍯 Easy Honey Garlic Chicken Bites in 25 Min
Creamy, sticky, and crowd-pleasing, ready in under 30 minutes!
🍛 Quick Indian Butter Chicken Recipe in 20 Minutes
Rich, comforting, and spiced just right, perfect for weeknights.
🥗 Healthy Grilled Chicken Salad in Just 20 Mins
Light, protein-packed, and bursting with flavor for clean eating days.

Ella Foster, co-founder of FoodBears.com, is a skilled writer whose love for cooking fuels her creative work. Her passion for experimenting in the kitchen brings authentic flavor and culinary inspiration to every piece she crafts for the platform.