
There’s just something magical about fall: the crisp air, cozy sweaters, and, of course, everything pumpkin spice.
And what better way to bring the warmth of the season into your kitchen than with these soft, chewy pumpkin sugar cookies?
These cookies are more than just a sweet treat. They’re edible pillows infused with all the comforting spices of fall.
If you’re ready to bake the best pumpkin sugar cookies ever, you’re in for a treat. This recipe is simple, flavorful, and perfect for both beginner bakers and seasoned pros who want to add something new to their fall baking list.
So grab your apron, and let’s get baking!
Why You’ll Love Pumpkin Sugar Cookies
Imagine the perfect sugar cookie but with a cozy fall upgrade. That’s precisely what these pumpkin sugar cookies bring to your kitchen.
They’re soft, chewy, warmly spiced, and subtly pumpkin-flavored, making them a crowd-pleaser whether it’s October or not.
You’ll love these cookies for a few irresistible reasons:
- They’re ultra-soft and fluffy. Thanks to a well-creamed butter-sugar mixture and the correct ratio of flour to fat, each cookie practically melts in your mouth.
- They’re full of fall flavor. Cinnamon, nutmeg, allspice, ginger, and mace combine with pumpkin puree to create a taste that screams autumn.
- They’re easy to make. You don’t need fancy tools—just a hand mixer or stand mixer, a few bowls, and some pantry staples.
- They’re versatile. Would you like to roll them in maple sugar instead of granulated sugar? Prefer more ginger than cinnamon? This dough welcomes little tweaks to fit your taste.
- They’re freezer-friendly. Bake them ahead of time or freeze the dough for later use. Perfect for party prep or spontaneous cravings.
And here’s the best part: they’re not overpoweringly pumpkin-y. You get that faint orange hue, a hint of earthy sweetness, and a warm spice blend that enhances everything without stealing the show. They’re the edible version of your favorite fall candle, but better.
Ingredients You’ll Need
Before you begin baking, ensure you have all the necessary ingredients on hand. Here’s a full breakdown of both the dry and wet ingredients used to make these soft, spiced sugar cookies:
Dry Ingredients
| Ingredient | Amount | Purpose |
|---|---|---|
| All-purpose flour | 2 ½ cups (300g) | Base structure of the cookies |
| Baking powder | ½ teaspoon | Leavening agent for slight lift |
| Ground cinnamon | ½ teaspoon | Classic fall spice warmth |
| Ground ginger | ½ teaspoon | Adds a little spice and zing |
| Ground mace | ½ teaspoon | Deep aromatic fall flavor |
| Allspice | ½ teaspoon | Complex spice that complements pumpkin |
| Sea salt | ½ teaspoon | Balances sweetness and enhances flavor |
| Freshly ground nutmeg | ½ teaspoon | Adds warmth and depth to the flavor |
Tip: Always sift the dry ingredients using a fine mesh strainer. This breaks up any flour clumps and helps the spices mix evenly into the flour for a more consistent cookie dough.
Wet Ingredients
| Ingredient | Amount | Purpose |
|---|---|---|
| Unsalted butter (softened) | 14 tbsp (196g) | Adds richness, softness, and flavor |
| Granulated sugar | ¾ cup (150g) | Sweetens and helps texture |
| Dark brown sugar | ¾ cup (150g) | Adds moisture and deep molasses flavor |
| Pumpkin puree | ½ cup (120g) | Gives color, moisture, and mild pumpkin flavor |
| Vanilla extract | 1 tablespoon | Enhances and rounds out the flavor |
| Egg yolk (room temperature) | 1 large yolk | Adds richness and helps bind the dough |
Important: Use pure pumpkin puree not pumpkin pie filling. The latter contains extra sugar and spices that can throw off the texture and taste of your cookies.
With these ingredients in hand, you’re just a few easy steps away from making the softest, most comforting pumpkin sugar cookies you’ve ever had.
How to Make Pumpkin Sugar Cookies (Step-by-Step)
Ready to make the softest, most flavorful pumpkin sugar cookies ever? Let’s walk through each step in detail because baking is part science, part art, and all fun.
Whether you’re a beginner baker or a seasoned pro, these directions will help you achieve perfect cookies every time.
Step 1: Prep the Dry Ingredients
Let’s start by preparing our dry mix. This is where all the cozy fall flavors come together.
Grab a medium-sized bowl and a fine mesh strainer (yes, sifting is worth the effort). Into the strainer, dump:
- 2½ cups (300g) all-purpose flour
- ½ tsp baking powder
- ½ tsp cinnamon
- ½ tsp ground ginger
- ½ tsp ground mace
- ½ tsp allspice
- ½ tsp sea salt
- ½ tsp freshly ground nutmeg
If you don’t have fresh nutmeg, pre-ground nutmeg will also work. But if you want those intense aromatic notes, a quick grate from a whole nutmeg goes a long way.
After sifting, give everything a good whisk. You’re looking for a flour blend with little speckles of spice throughout; that’s how you know it’s well mixed.
Set this bowl aside. We’ll come back to it in just a bit.
Step 2: Cream the Butter & Sugar
This step marks the beginning of the magic. Creaming is what gives our cookies their signature soft, airy texture. Don’t rush it!
Grab your stand mixer with the paddle attachment or use a hand mixer and a large mixing bowl. Start by adding:
- 14 tablespoons (196g) room-temperature unsalted butter
Turn the mixer to medium speed and beat the butter for 30 seconds to loosen it. Then, add in:
- ¾ cup (150g) granulated sugar
- ¾ cup (150g) dark brown sugar (be sure to break up any clumps before adding)
Now crank up the mixer to medium-high and cream the butter and sugars together for 5 to 6 minutes.
Why this matters: The sugar crystals cut tiny air pockets into the butter. These little pockets puff up in the oven, giving you that dreamy soft cookie texture.
Scrape down the sides and bottom of the bowl about halfway through, then again at the end. You’ll know it’s ready when the mixture looks fluffy, light, and almost doubled in volume. It should feel airy and soft when lifted with a spatula.
Step 3: Add Pumpkin, Vanilla, and Egg Yolk
Time to bring in the fall star of the show: pumpkin.
With your mixer on low to medium speed, add:
- ½ cup (120g) pure pumpkin puree
Important: Make sure it’s 100% pumpkin puree not pumpkin pie filling!
Mix until the batter turns a soft orange color and the pumpkin is fully incorporated. Then, add:
- 1 tablespoon vanilla extract
Give that a good mix, then separate one large egg and add just the yolk to the bowl. A quick tip: crack the egg into a small bowl and use your fingers to gently pass the yolk back and forth, letting the white fall away.
After adding the yolk, wash your hands thoroughly and beat the mixture just until the yolk disappears into the dough. Scrape down your bowl again to keep everything evenly mixed.
Step 4: Add the Dry to the Wet
Now it’s time to bring the dry and wet ingredients together—this part requires a bit of care.
With the mixer on low, slowly add half of the dry ingredients. Mix until the flour is no longer visible. Don’t go past that point.
Then, add the second half of the dry mix. Again, mix just until no flour is visible.
Do NOT overmix! Overmixing activates the gluten in the flour, and that leads to dense, chewy cookies not the soft, melt-in-your-mouth ones we want.
Once combined, the dough should feel light, fluffy, and airy. If you’re nervous about overmixing, stop the mixer early and fold the dough by hand with a rubber spatula until everything comes together.
Scrape down the sides of the bowl and pat the dough into an even layer inside the bowl. Now we’re ready to let it chill.
Step 5: Chill the Dough
This is one of the most important (yet most skipped) steps in baking soft cookies: chilling the dough.
Press a piece of plastic wrap directly onto the surface of the dough to keep it from drying out. This helps prevent the dreaded crusty top layer.
Put the whole bowl in the refrigerator and let it rest for 30 to 45 minutes.
Why chill? Cold dough is easier to work with and helps prevent cookies from spreading too much in the oven. It also gives the flour time to hydrate and the flavors time to deepen.
While it chills, you can wash up, prep your baking trays, or treat yourself to a coffee break.
Step 6: Preheat & Portion
When your dough is nearly done chilling, preheat your oven to:
- 350°F (176°C)
Line your baking trays with parchment paper or silicone baking mats. Silicone mats are reusable and help cookies bake more evenly, making them a worthwhile investment.
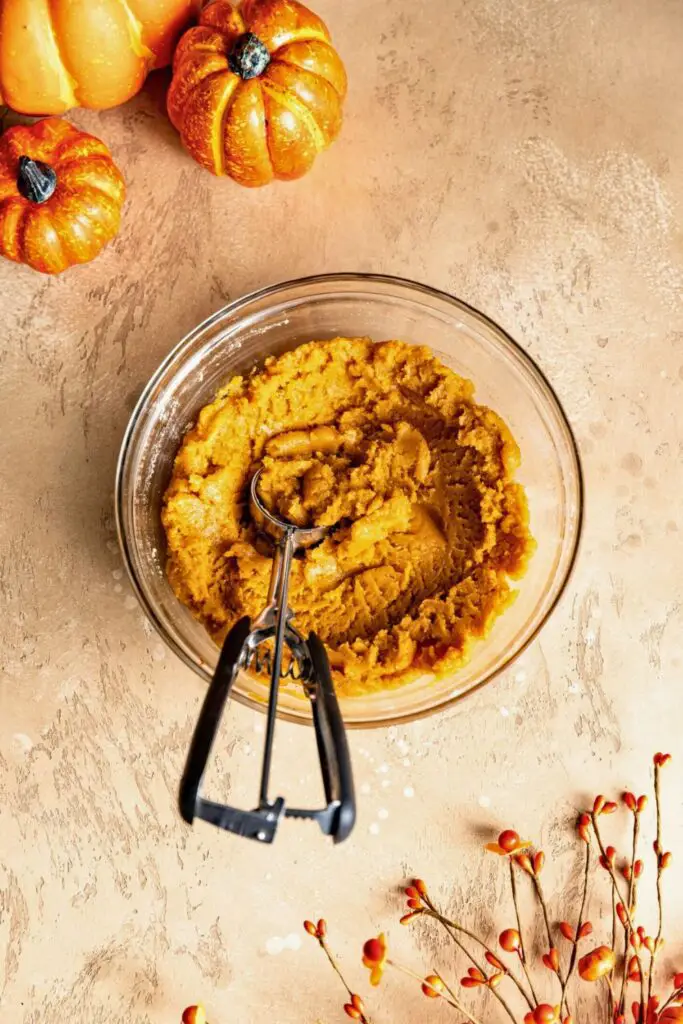
Now it’s time to scoop. Use a tablespoon or a cookie scoop to portion the dough into balls, approximately 1 inch in diameter (about 20g or ¾ ounce per cookie).
Drop each ball into a small bowl of granulated sugar and roll it around to coat. This gives that lovely sugar-crusted exterior.
Place each sugared dough ball onto your tray, spacing them about 2 inches apart. Slightly flatten them into discs about ½ inch thick. This helps them bake more evenly and gives you that classic sugar cookie look.
Test Bake First! Bake just one cookie to check the spread, texture, and bake time. It’s a great way to catch issues before baking the whole batch.
Step 7: Bake & Set
Once you’re satisfied with the test bake, proceed with baking a full tray.
Place the baking sheet on the middle oven rack for even heat distribution and bake for 10 to 12 minutes.
You’ll know they’re done when the edges appear set, but the centers still look slightly soft. That’s perfect! You want that slightly underdone center so they finish baking on the tray.
Pro tip: Cookies continue to bake after you pull them out of the oven. If they look perfectly done in the oven, they’ll likely overbake and get hard. Slightly underbaked is the way to go for that ultimate softness.
Let the cookies cool on the tray for 5 to 6 minutes to firm up before transferring them to a wire rack.
Step 8: Repeat & Enjoy
Repeat the scoop, roll, and bake process with the remaining dough. Depending on how consistent your portioning is, this recipe makes around 42–43 cookies.
Once all the cookies are baked and thoroughly cooled, you’re ready for the best part: the taste test!
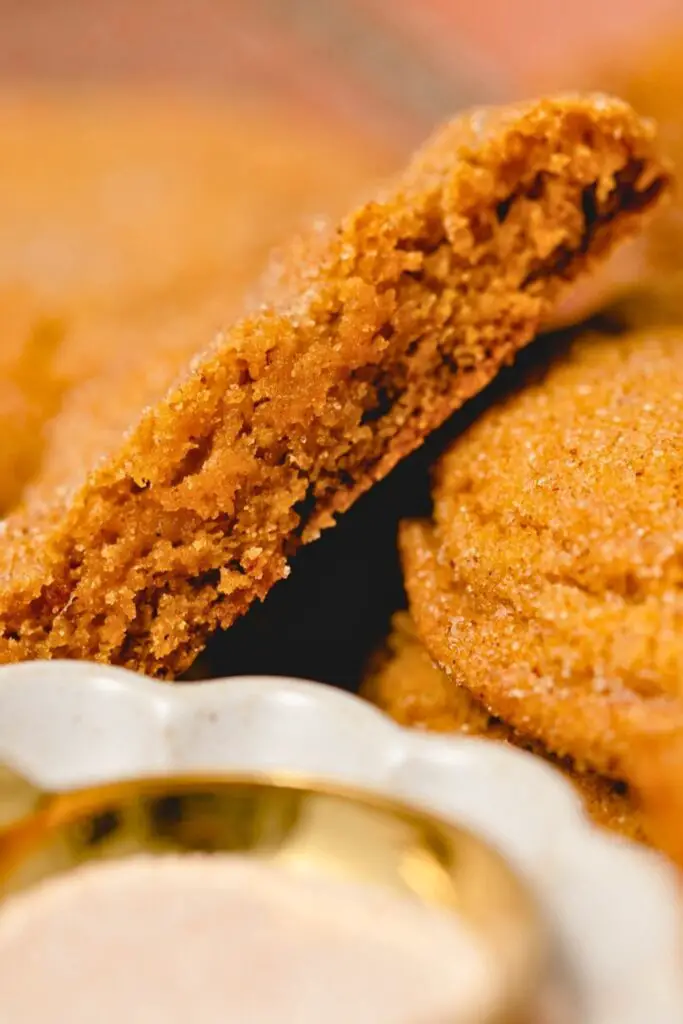
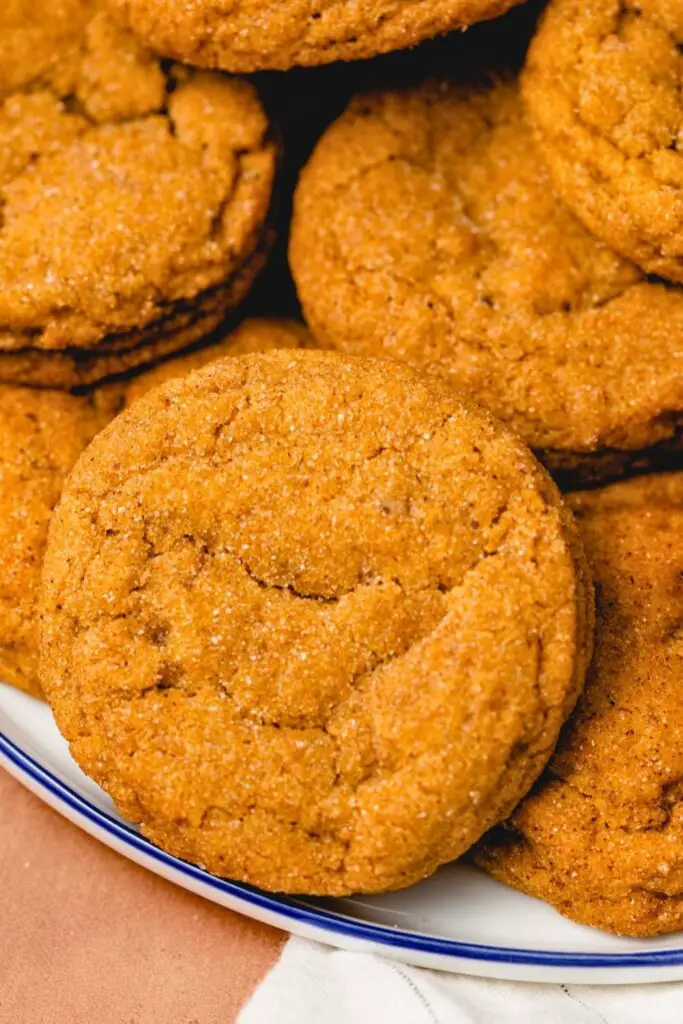
They’ll look stunning with a soft orange hue, visible flecks of spice, and that signature sugar sparkle on top.
The bottoms will have a caramelized, golden-brown edge that adds just a hint of crispness to contrast with the soft, airy center.
Tasting Notes
- Texture: They break apart easily and feel like biting into a sweet, buttery pillow. Light and soft with a touch of crunch at the edge.
- Flavor: A delicate blend of fall spices complements the mild pumpkin, while the addition of brown sugar adds depth and warmth.
- Smell: Your kitchen will smell like an upscale autumn bakery, rich, spicy, and completely addictive.
They’re incredible on their own, but if you’re feeling adventurous, pair them with:
- Pumpkin spice lattes
- Cinnamon cream cheese frosting
- Maple glaze drizzle
- Or even a scoop of vanilla ice cream to make cookie sandwiches!
Tips for the Best Pumpkin Sugar Cookies
Want cookies that come out perfect every single time? Follow these tried-and-true tips straight from the baking trenches. These little tweaks and habits make a world of difference when it comes to texture, flavor, and bake quality.
✅ 1. Don’t Skip the Creaming Step
Creaming the butter and sugars for a full 5–6 minutes isn’t just busywork; it’s the key to ultra-soft cookies. The tiny sugar crystals cut into the butter, creating microscopic air pockets. Those air bubbles expand in the oven, giving you that pillow-like texture we’re after.
Baker’s Note: If your mixture looks pale and doubled in volume, you’ve nailed it.
✅ 2. Use Pumpkin Puree, Not Pumpkin Pie Filling
This is a common mistake. Pumpkin pie filling contains added sugars and spices, which can mess with your flavor balance and texture. Always double-check the label to make sure you’re using 100% pure pumpkin puree.
✅ 3. Avoid Overmixing the Dough
Once you start adding the dry ingredients, mix just until the flour disappears. Overmixing activates the gluten in the flour, resulting in tough, dense cookies. And nobody wants that.
When in doubt, switch to folding with a spatula for the last part of mixing.
✅ 4. Chill the Dough for at Least 30 Minutes
Chilling the butter solidifies it, and relaxing the flour means the cookies spread less and bake more evenly. It also gives the flavors time to mingle and develop.
Bonus: Chilled dough is easier to handle when scooping and rolling.
✅ 5. Do a Test Bake First
Bake one cookie before committing to a full tray. This lets you:
- Test the thickness and spread
- Adjust your oven time
- Tweak spice or sweetness (if needed)
A 10-minute investment that saves the entire batch.
Flavor Variations to Try
Want to take these cookies to the next level? Here are some creative variations you can try to customize the flavor profile while sticking to the same base dough.
| Variation | What to Do |
|---|---|
| Maple Sugar Coating | Roll cookie dough balls in maple sugar instead of granulated sugar. |
| Extra-Spiced Pumpkin | Add an extra pinch of clove or increase the ginger and nutmeg. |
| Frosted Pumpkin Cookies | Top cooled cookies with cinnamon cream cheese frosting. |
| Pumpkin Chai Sugar Cookies | Replace allspice with chai spice blend for a bold, tea-spiced flavor. |
| Pumpkin Chocolate Chip | Fold in mini chocolate chips before chilling the dough. |
| Glazed Pumpkin Cookies | Drizzle with a simple glaze made from powdered sugar, vanilla, and milk. |
| Vegan Pumpkin Cookies | Use plant-based butter and a flax egg (1 tbsp flax + 3 tbsp water) instead. |
| Pumpkin Spice Sandwiches | Pair two cookies with a layer of vanilla buttercream or marshmallow fluff. |
| Nutty Crunch | Add ¼ cup chopped pecans or walnuts to the dough. |
| Pumpkin Mocha Cookies | Add ½ tsp espresso powder to the dough for a cozy coffee twist. |
How to Store Pumpkin Sugar Cookies

Once you’ve baked a whole batch of these dreamy fall treats, the next question is, how do you keep them fresh, soft, and snackable?
🏡 At Room Temperature (Best for Short-Term)
- Storage method: Airtight container
- Duration: Up to 5 days
- Pro Tip: Add a slice of sandwich bread to the container. It helps the cookies stay soft by absorbing excess air moisture (and don’t worry, it won’t affect the flavor).
❄️ In the Refrigerator
- Storage method: Sealed container, lined with wax or parchment paper
- Duration: Up to 1 week
- Note: Let them come to room temperature before eating for the best texture.
🧊 In the Freezer (Baked Cookies)
- Storage method: Layer cookies between parchment sheets in a zip-top freezer bag
- Duration: Up to 2 months
- To use: Let thaw on the counter for 1–2 hours or warm briefly in the oven.
⏳ In the Freezer (Unbaked Dough)
Want fresh cookies on demand? Freeze the dough!
- Step 1: Scoop dough into 1-inch balls
- Step 2: Freeze on a tray until solid, then transfer to a zip-top freezer bag
- Duration: Up to 3 months
- To bake: Roll frozen dough balls in sugar and bake from frozen, adding 1–2 minutes to the bake time.
Bonus Tip: Label your dough or cookies with the date and baking time. You’ll thank yourself later.
Final Thoughts: Fall in Cookie Form
These pumpkin sugar cookies are everything we love about autumn, all wrapped up in a single, delicious bite. They’re soft, warm, spiced just right, and ridiculously easy to make.
Whether you’re a seasoned baker or just starting, this recipe is approachable, fun, and practically foolproof. Bake them for Halloween parties, Thanksgiving dessert spreads, or just a cozy afternoon at home.
Once you taste them, you’ll understand why baking these cookies is like capturing the essence of fall and serving it with a smile.
More Pumpkin Goodness You’ll Love
If you’re loving the pumpkin vibes and want to keep the cozy baking energy going, here are a few more easy fall recipes that pair perfectly with your pumpkin sugar cookie session:
🧇 Best 10-Min Pumpkin Waffles Recipe for Sunday
Fluffy, crisp-edged, and spiced to perfection, these quick waffles make the perfect lazy Sunday brunch treat.
🍪 No-Bake & Easy Pumpkin Protein Balls Recipe for Fall
Seeking a healthier pumpkin snack that requires no baking? These protein-packed bites are sweet, spiced, and satisfying on the go.
🧁 The Best Pumpkin Cupcakes Recipe for Fall Parties
Moist, flavorful pumpkin cupcakes topped with dreamy cream cheese frosting. A guaranteed crowd-pleaser for any fall celebration.

Ella Foster, co-founder of FoodBears.com, is a skilled writer whose love for cooking fuels her creative work. Her passion for experimenting in the kitchen brings authentic flavor and culinary inspiration to every piece she crafts for the platform.