
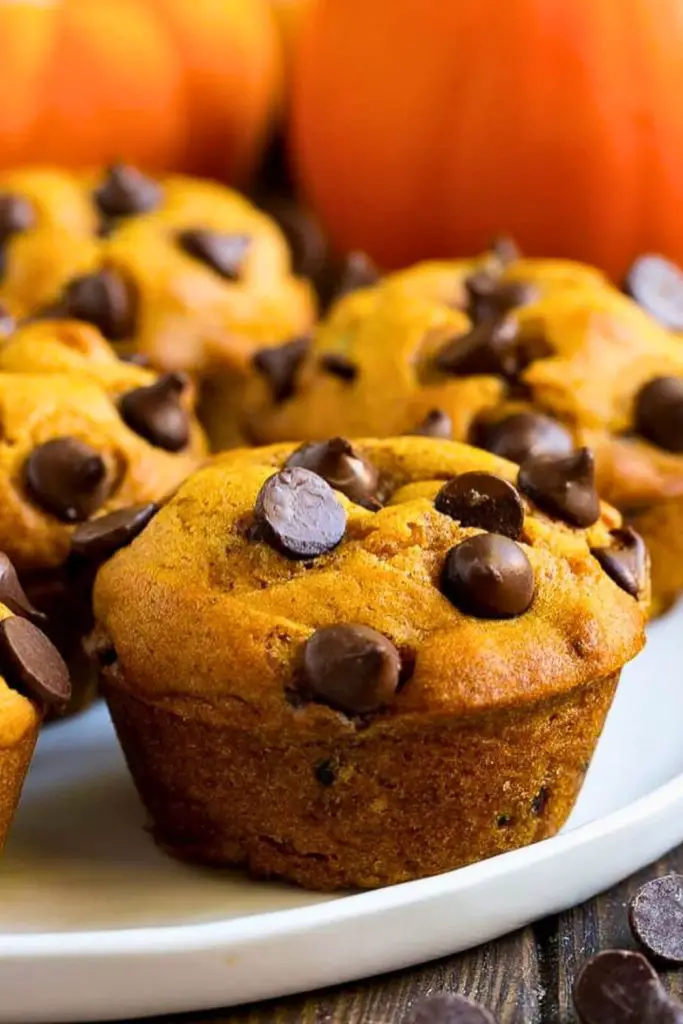
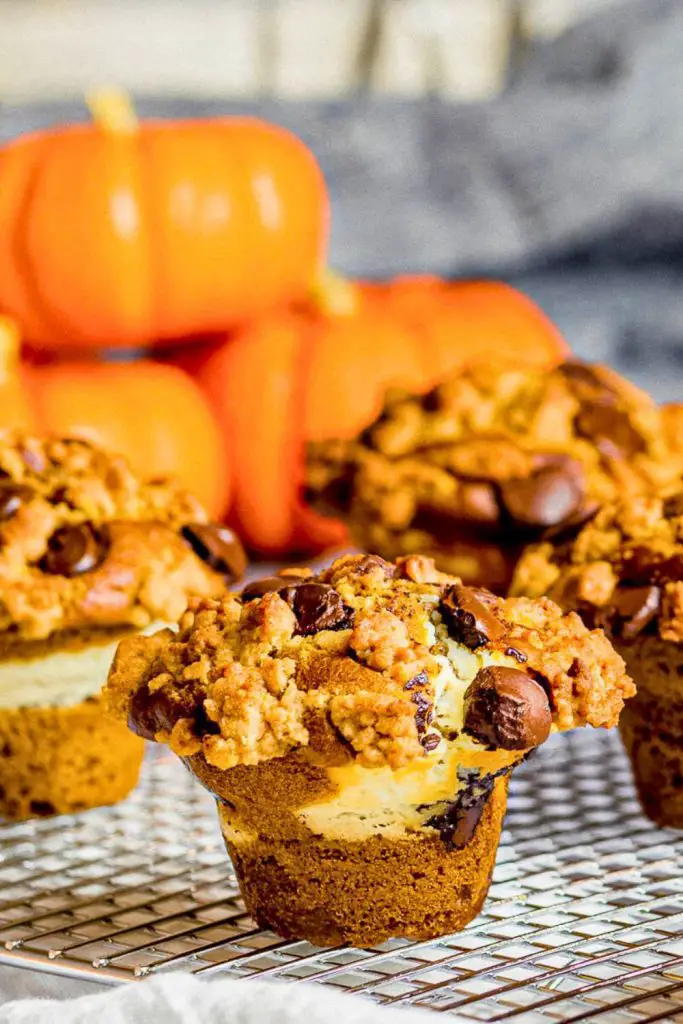
Nothing says fall quite like the cozy combo of pumpkin and chocolate. And when that combo is wrapped into a moist, fluffy muffin? You’ve got a treat that tastes like a warm hug in every bite.
Whether you’re baking for brunch, prepping snacks for the week, or just craving something sweet, these Pumpkin Chocolate Chip Muffins hit the spot every single time.
In this post, we’re diving into how to make these bakery-style muffins with step-by-step guidance. No fluff, no complicated baking jargon, just a reliable recipe tested and loved by pumpkin enthusiasts (and even a few pumpkin skeptics!). Let’s get started on your new favorite muffin.
🧡 Why You’ll Fall in Love with These Muffins
These Pumpkin Chocolate Chip Muffins aren’t just your average fall bake. They’re next level. Here’s why they’ll become a permanent part of your seasonal baking lineup:
✅ Moisture Like No Other
Thanks to the combo of pumpkin puree, oil, brown sugar, and a spoonful of sour cream, these muffins stay unbelievably soft and moist for days. We even tested them with butter, and oil still wins hands down for that fluffy, tender crumb.
✅ Bursting with Flavor
Each muffin is spiced just right with a cozy blend of pumpkin spice and a hint of vanilla. The molasses in the light brown sugar deepens the flavor, giving them that warm, slightly caramelized note that screams “fall comfort.”
✅ Easy, No-Fuss Recipe
No mixer needed. Just two bowls, a whisk, and a spatula. The steps are simple and forgiving, making this recipe perfect for both seasoned bakers and beginners.
✅ Kid & Family-Approved
Tested and approved by picky eaters, including the creator’s nephews, who gave them two enthusiastic thumbs up. Even folks who claim they’re “not into pumpkin” couldn’t stop at just one.
✅ Loaded with Chocolate Chips
Because pumpkin + chocolate = magic. Every bite is filled with melty, semisweet chocolate chips that make these muffins feel extra indulgent.
🧾 Ingredients You’ll Need
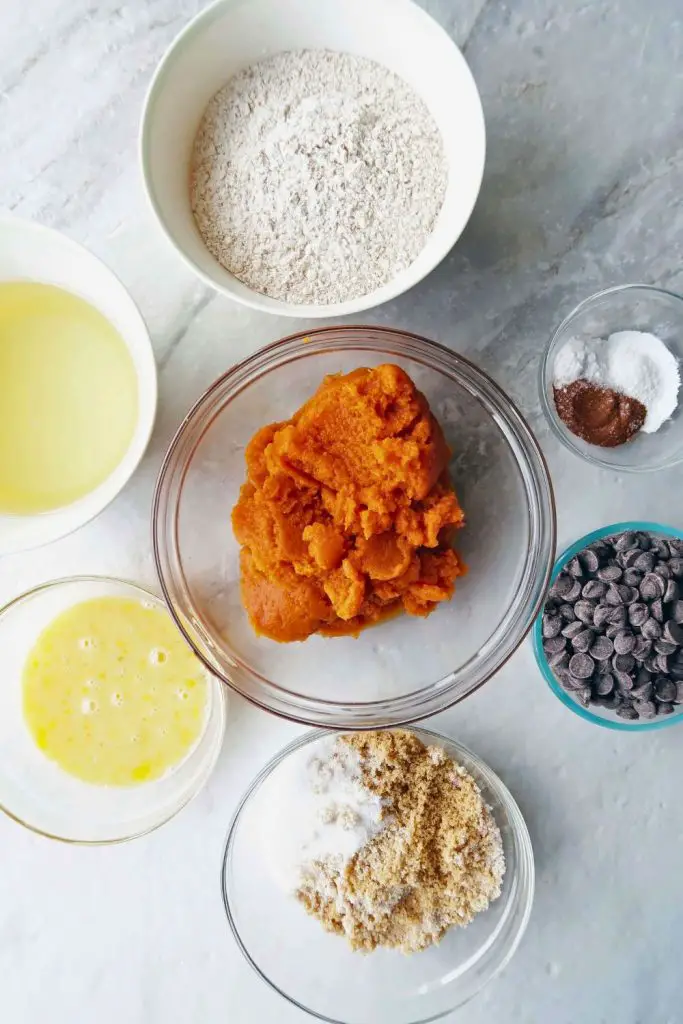
Here’s everything you need for a batch of 12 bakery-style muffins. These pantry staples come together to make a muffin that’s perfectly sweet, spiced, and chocolatey.
| Ingredient | Amount | Notes |
|---|---|---|
| Pumpkin Purée | 1 ¼ cups (300g) | Use 100% canned pumpkin, not pumpkin pie filling |
| Neutral Cooking Oil | ½ cup | Avocado, canola, or vegetable oil all work well |
| Granulated Sugar | ⅔ cup (135g) | Adds sweetness and structure |
| Light Brown Sugar (packed) | ½ cup (100g) | Adds moisture and rich, molasses flavor |
| Sour Cream | ¼ cup (60g) | Full-fat is best; plain Greek yogurt can be used as a substitute |
| Large Eggs | 2 | Should be at room temperature |
| Vanilla Extract | 2 teaspoons | Adds warm, aromatic flavor |
| All-Purpose Flour | 1 ¾ cups (220g) | Spoon and level for accuracy |
| Pumpkin Pie Spice | 2 teaspoons | Homemade or store-bought; adds signature fall spice |
| Baking Powder | 2 teaspoons | Helps the muffins rise nicely |
| Baking Soda | ¾ teaspoon | Balances acidity and adds lift |
| Salt | ½ teaspoon | Enhances flavor throughout the batter |
| Semisweet Chocolate Chips | 1 ½ cups + extra for topping | Adds melty, chocolatey goodness in every bite |
Tip: For bakery-style Presentation, sprinkle a few extra chocolate chips on top of each muffin before baking.
👩🍳 How to Make Pumpkin Chocolate Chip Muffins
(Step-by-Step with Tips for Success)
These pumpkin chocolate chip muffins are packed with warm spices, rich chocolate chips, and that dreamy fall flavor we all crave when the weather cools down.
They’re easy to make, and with the right steps, you’ll get soft, tall muffins every single time.
Let’s walk through it together from preheating the oven to that glorious first bite.
🔥 Step 1: Preheat the Oven to Get the Rise Right
Your muffin success story starts with proper heat.
Set your oven to 425°F (218°C). This might seem high for muffins, but it’s exactly what helps create those beautiful domed tops that look straight out of a bakery.
The high heat gives the batter a powerful lift in the first few minutes of baking, which is crucial for maintaining its structure.
📍 Pro Tip: Place your oven rack in the center position. This helps distribute heat evenly so all muffins rise the same.
While your oven is heating up, line a 12-cup muffin tin with paper liners or lightly grease each cup if you prefer muffins without the wrapper.
🥣 Step 2: Mix the Wet Ingredients
Time to build flavor and moisture.
In a large mixing bowl, combine the following:
- 1¼ cups (300g) pumpkin puree
- ½ cup neutral cooking oil (like avocado, canola, or vegetable)
- ⅔ cup (135g) granulated sugar
- ½ cup (100g) packed light brown sugar
- ¼ cup (60g) sour cream (or full-fat plain Greek yogurt)
- 2 large eggs, room temperature
- 2 teaspoons vanilla extract
Start slowly with a whisk, then increase the pace once the ingredients begin to blend.
The goal? A smooth, uniform, silky-sweet batter with a rich golden-orange color and aroma that already hints at the deliciousness ahead.
🍂 Why oil instead of butter?
Butter brings flavor, sure, but oil brings moisture. These muffins are already packed with flavor from the pumpkin and spices, so oil is the better call here for that irresistible soft crumb.
Also, make sure all your wet ingredients are at room temperature. When everything is at the same temperature, your batter mixes more evenly and bakes more predictably.
🧂 Step 3: Whisk the Dry Ingredients Separately
Grab a medium-sized bowl and whisk together your dry ingredients:
- 1¾ cups (220g) all-purpose flour
- 2 teaspoons pumpkin pie spice
- 2 teaspoons baking powder
- ¾ teaspoon baking soda
- ½ teaspoon salt
👃 Optional: Make your own pumpkin spice with a blend of cinnamon, nutmeg, ginger, allspice, and cloves if you like a custom flavor profile. Store-bought works beautifully too.
Use a whisk to thoroughly blend these dry ingredients. This ensures that your leavening agents (baking powder and soda) are evenly distributed, resulting in perfectly risen muffins.
🍂 Step 4: Combine Wet and Dry (Gently!)
Now it’s time to bring it all together, but slowly and carefully.
Pour your dry ingredients into the bowl with the wet ingredients. Don’t whisk. Instead, switch to a spatula and fold gently.
🔄 How to fold: Use a motion that scrapes the bottom of the bowl, lifts the batter, and turns it over on itself. Repeat until just combined.
Here’s why you want to go slow: Muffin batter is delicate. If you overmix, the gluten in the flour develops too much, and you’ll end up with dense, chewy muffins (and no one wants rubbery muffins).
Look for the point when the dry ingredients are mostly incorporated, but it’s okay if you still see a few streaks of flour. That means it’s time for the next step.
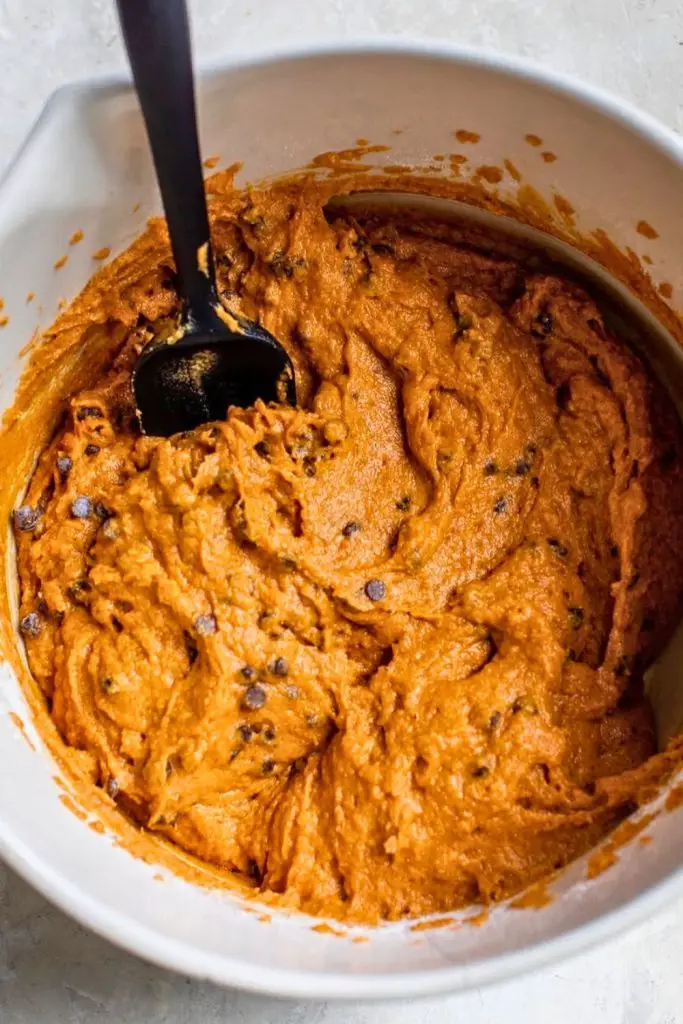
🍫 Step 5: Add the Chocolate Chips
Let’s make these muffins magical.
Add 1½ cups of semisweet chocolate chips to the batter. Fold gently until the chips are well distributed and no flour remains in the bowl.
🍪 Pro Tip: Reserve a small handful of chips to sprinkle on top of each muffin before baking. It makes the muffins look gorgeous and gives that “just from the bakery” look.
Be sure to scrape the sides and bottom of the bowl to catch any hidden pockets of flour or pools of sugar.
And if you’re thinking, “Is 1½ cups too much chocolate?”—it’s not. These are pumpkin chocolate chip muffins, after all!
🧁 Step 6: Fill the Muffin Tin
You should now have a thick, scoopable batter that smells divine.
- Use a large cookie scoop or spoon to divide the batter into the 12 muffin cups.
- Fill each cup almost to the top. Yes, we’re filling high! That’s how you get those bakery-style muffin tops.
- If you have any leftover batter, go back and even it out across the tin.
Sprinkle your reserved chocolate chips (or even some coarse sugar for a little sparkle and crunch) on top of each muffin.
💡 Fun Tip: Want a crispier top? Try brushing the muffin tops with a little milk or cream before baking.
⏲️ Step 7: Bake Like a Pro (Two-Stage Method)
Let’s bake these beauties the right way.
Place the muffin tin on the center oven rack and bake at:
- 425°F (218°C) for 9 minutes
→ Don’t peek! Keep the oven door closed.
After 9 minutes:
- Reduce the temperature to 350°F (175°C)
- Continue baking for 12 more minutes
Do not open the oven door when lowering the temperature. Sudden cool air can make the muffins sink in the middle.
This two-stage baking technique is a professional method that yields tall, domed muffins with soft centers and golden edges.
🔍 Step 8: Check for Doneness
Don’t rely just on the timer to test the muffins!
Insert a toothpick into the center of a muffin:
- If it comes out clean or with a few moist crumbs, you’re good to go.
- If it has wet batter, give them another 2–3 minutes, then check again.
✅ Ideal texture: A few moist crumbs are perfect. That means your muffins are baked just right and not dry.
Once done, remove the muffin tin from the oven and place it on a cooling rack. The muffins will continue to set slightly as they cool in the pan.
❄️ Step 9: Cool and Enjoy
Let the muffins sit in the tin for 5-7 minutes. Then, using a butter knife, gently lift each one out and place them on a wire rack to cool completely.
⚠️ Don’t skip this step: If muffins sit in the hot pan too long, steam builds up and can make the bottoms soggy or greasy.
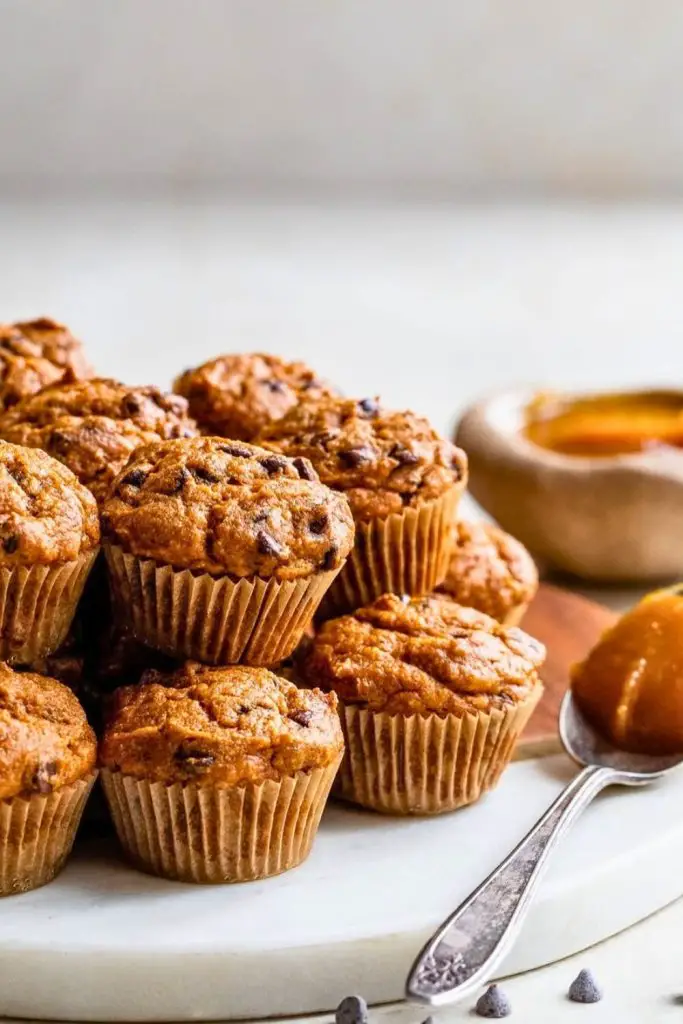
Once they’re cool enough to handle, dive in!
The chocolate will still be slightly melty, the crumb will be soft and tender, and the spice will linger on your taste buds in the best possible way.
And if you’re like the video creator? You’ll probably burn your mouth a little because they smell too good to wait for.
✅ 5 Pro Tips for Muffin Success
Want muffins that look like they came straight from a bakery case every single time? These pro tips will take your pumpkin chocolate chip muffins from “pretty good” to irresistible.
1. Use Room Temperature Ingredients
This might seem minor, but it’s huge in baking.
At room temperature, eggs, sour cream, and pumpkin puree mix more easily and evenly. Cold ingredients can cause the batter to seize or curdle slightly, which affects both the texture and rise.
📌 Quick Tip: Forgot to take your eggs out of the fridge? Submerge them in a bowl of warm (not hot) water for 5 minutes to bring them to room temperature fast.
2. Don’t Overmix the Batter
This is the golden rule for muffin baking.
Once you add the dry ingredients to the wet mixture, gently fold it with a spatula just until the flour disappears. Overmixing activates the gluten in the flour, making muffins tough and rubbery instead of light and fluffy.
🥄 Think of it like folding whipped cream, you want a soft, gentle hand.
3. Use the Two-Stage Baking Method
Want those tall, dome-topped muffins you see at coffee shops? This trick does the job beautifully.
Start by baking at 425°F (218°C) for 9 minutes, then reduce the oven temperature to 350°F (175°C) and continue baking for an additional 12 minutes.
That initial high heat gives the batter a big lift before the lower heat gently finishes baking the center.
🧁 Result? Perfectly domed muffins with a soft, even crumb.
4. Fill the Muffin Cups Almost to the Top
Most muffin recipes recommend filling cups ¾ full, but this one’s different.
For these pumpkin chocolate chip muffins, fill each muffin liner almost to the top. This batter is thick and designed to rise straight up, rather than spilling over.
💡 Don’t worry, they won’t overflow. Just divide the batter evenly and use it all.
5. Sprinkle Extras on Top
This is the secret to bakery-style beauty.
Before baking, add a few extra chocolate chips or a pinch of coarse sugar on top of each muffin. It not only makes them prettier but adds texture and enhances that rich, chocolatey aroma as they bake.
🎉 Presentation matters even with muffins!
🍫 Fun Variations to Try
Love the base recipe but want to switch things up? These simple variations enable you to customize the muffins according to your cravings, dietary needs, or the ingredients you have available.
Here’s a handy table of ideas:
| Variation | What to Do |
|---|---|
| Mini Muffins | Use flax eggs (1 tbsp flaxseed + 3 tbsp water per egg) and plant-based sour cream. |
| Nutty Crunch | Fold in ½ cup chopped pecans or walnuts with the chocolate chips |
| Chocolate Overload | Swap semisweet chips for mini chips, dark chocolate, or white chocolate |
| Cinnamon Swirl | Mix 2 tbsp cinnamon sugar and swirl into the batter before baking |
| Dairy-Free | Use non-dairy yogurt and dairy-free chocolate chips |
| Vegan | Use flax eggs (1 tbsp flaxseed + 3 tbsp water per egg) and plant-based sour cream |
| Gluten-Free | Sub a 1:1 gluten-free flour blend, just don’t overmix |
| Healthier Version | Use half whole wheat flour and cut sugar slightly (⅓ cup white, ⅓ cup brown) |
| Pumpkin Mocha Muffins | Add 1 tsp espresso powder to the dry mix for a subtle coffee twist |
| Spiced-Up | Add extra nutmeg, cardamom, or ground cloves for deeper spice |
These swaps are easy and make this recipe endlessly flexible—perfect for busy mornings, weekend baking, or holiday brunches.
🎃 Final Thoughts
There’s something magical about the way these Pumpkin Chocolate Chip Muffins capture all the best parts of fall in one bite: warm spices, soft texture, melty chocolate, and cozy vibes you can’t get enough of.
Whether you’re making them for a crisp Sunday morning breakfast, packing them in lunchboxes, or pairing them with your afternoon coffee, they never disappoint.
Even if you’re not usually a pumpkin fan, these muffins might change your mind. They’re rich, moist, perfectly spiced, and incredibly simple to whip up – just one bowl, one whisk, and a few pantry staples.
So go ahead, bookmark this recipe, share it with your pumpkin-loving friends, and don’t forget to sprinkle a few extra chocolate chips on top. You deserve muffins that look (and taste) like they came straight from a café.
🍂 Recommended Fall Recipes You’ll Love
Looking for more cozy pumpkin treats? Try one of these next:
- Quick 5-Ingredient Pumpkin Mousse for Fall
Light, fluffy, and ready in minutes, this is perfect for satisfying last-minute dessert cravings. - The Best Pumpkin Bread Pudding You’ll Need
A warm, custardy classic with a fall twist and dreamy toffee drizzle. - Fun Fall Treat: Pumpkin Cheesecake Bars Recipe
Creamy, spiced, and layered with a graham cracker crust, pure dessert bliss.


Ella Foster, co-founder of FoodBears.com, is a skilled writer whose love for cooking fuels her creative work. Her passion for experimenting in the kitchen brings authentic flavor and culinary inspiration to every piece she crafts for the platform.