
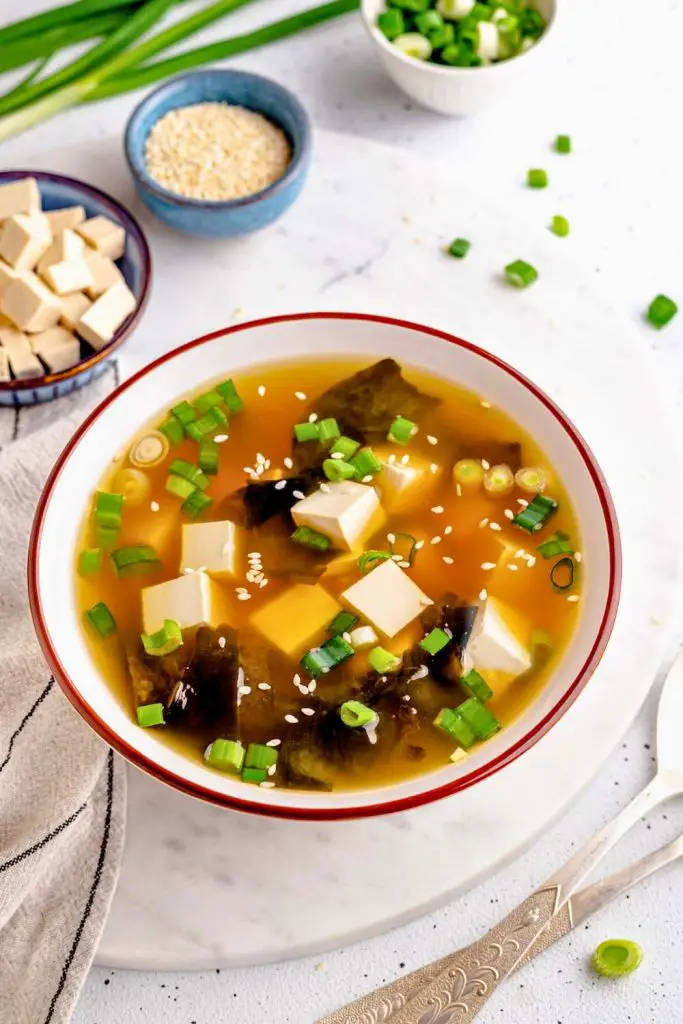
There’s something truly comforting about a warm bowl of miso soup. It’s simple yet intensely flavorful, nourishing yet light, and it’s a staple in Japanese households for good reason.
Served as a side dish in many Japanese meals or enjoyed on its own for a cozy moment, it’s the kind of soup that warms you from the inside out.
If you’ve only had miso soup in restaurants, you might be surprised at how easy (and rewarding) it is to make it from scratch at home.
The difference in taste between homemade miso soup and the instant packets is remarkable, fresh, clean, and layered with subtle umami flavors.
In this guide, I’ll walk you step-by-step through making traditional miso soup the authentic way, starting with a homemade dashi broth (the soul of Japanese soups).
Why Make Miso Soup from Scratch?
There’s nothing wrong with grabbing a packet of instant miso soup when you’re in a rush. But if you’ve only experienced the quick version, you’re missing out on the deep, nuanced flavors that make traditional miso soup so beloved in Japan.
Here’s why it’s worth making miso soup the authentic way:
- Pure, clean taste. Fresh ingredients mean your broth is free from additives, preservatives, or artificial flavor boosters.
- Customizable to your preference. Want it lighter? Use white miso and less soy sauce. Want it richer? Go for red miso or a blend.
- Better texture. Fresh tofu cubes are silky and tender, wakame seaweed is perfectly hydrated, and the spring onions add a crisp bite—far from the mushy texture of rehydrated instant toppings.
- A cultural experience. Preparing miso soup from scratch connects you to centuries of Japanese culinary tradition, where soup-making is an art form.
- Healthier and nutrient-rich. Homemade dashi preserves kombu’s natural minerals, miso’s probiotics, and the fresh protein from tofu, without excess sodium from prepackaged mixes.
Ingredients You’ll Need
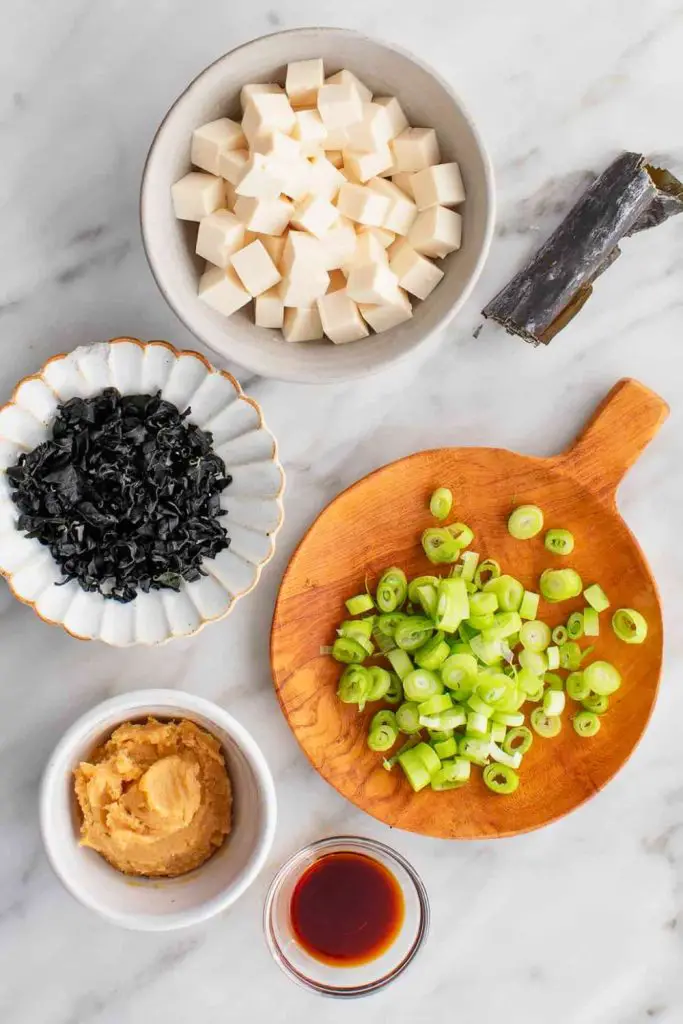
Here’s a complete ingredient breakdown for 4–5 servings of traditional miso soup.
| Ingredient | Amount | Japanese Term | Notes / Substitutions |
|---|---|---|---|
| Cold water | 1 liter | – | Base for the dashi. Must be cold to extract flavor slowly from kombu. |
| Dried kombu (kelp) | 10 g | 昆布 (Kombu) | Essential for dashi’s umami flavor. Look for thick, dark-green sheets in Asian markets. |
| Bonito flakes | 15 g | 鰹節 (Katsuobushi) | Dried, shaved skipjack tuna. Omit for vegetarian version. |
| Spring onion | 30 g | ネギ (Negi) | Slice diagonally. Both green and white parts can be used. |
| Aburaage (twice-fried tofu) | 2 pieces | 油揚げ (Aburaage) | Lightly sweet, spongy texture. Optional; can substitute thinly sliced mushrooms. |
| Tofu (firm or silken) | 150 g | 豆腐 (Tofu) | Cut into bite-sized cubes. Silken is creamier; firm holds shape better. |
| Wakame seaweed (rehydrated) | 1 tbsp | わかめ (Wakame) | Adds oceanic flavor and texture. Optional but traditional. |
| Soy sauce | ¼ tsp | 醤油 (Shōyu) | Optional for extra depth. Use light soy sauce for a more delicate flavor. |
| Miso paste (white, red, or yellow) | 4 tbsp | 味噌 (Miso) | Base for the dashi. It must be cold to extract flavor slowly from kombu. |
Step-by-Step Guide: How to Make Miso Soup
Making miso soup is about more than following a recipe. It’s about paying attention to small details that make a big difference in flavor and texture.
From the gentle soaking of kombu to the final garnish of spring onions, each step builds layers of umami and comfort.
Below, you’ll find a step-by-step guide that takes you through the process from start to finish.
Step 1: Making Kombu Dashi
The dashi is the backbone of miso soup. Without it, you’re left with just hot miso water, which is nowhere near as flavorful.
The first step in making dashi is extracting the delicate umami from kombu (dried kelp).
Here’s how to do it:
Measure and prepare the kombu. Use about 10 grams of dried kombu. You’ll notice it has a dark, almost black-green color and may have a light white powder on the surface that’s natural and full of flavor. Don’t rinse it off; just give it a gentle wipe with a dry cloth if needed.
Soak in cold water. Place the kombu in a pot with 1 liter of cold water. The water must be cold at this stage. Why? Starting with cold water allows the kombu’s glutamates (umami compounds) to dissolve slowly, creating a more complex flavor profile.
Soak for 30 minutes. This resting time hydrates the kombu and starts releasing flavor without heat. You’ll notice the kelp softens and expands sometimes more than doubling in size.
Heat slowly. After soaking, place the pot on the stove over low to medium-low heat. This is where patience pays off. Heating too quickly can shock the kombu and cause bitterness.
Watch for tiny bubbles. As the water heats, keep an eye out for small bubbles forming around the edges. This is your signal to move to the next step.
Remove before boiling. Just before the water boils, remove the kombu. Boiling kombu can release too many vegetal compounds, which may make your broth cloudy or overly strong.
Pro Tip: If you love a stronger sea flavor, you can leave the kombu in for a little longer. But for traditional miso soup, the clean, subtle umami of a shorter extraction is preferred.
Step 2: Adding Bonito Flakes
Once your kombu has imparted its flavor, it’s time to add katsuobushi, dried, shaved bonito flakes. This step turns kombu dashi into awase dashi, the classic Japanese soup base for miso soup.
Follow these steps:
- Bring to a boil: With the kombu removed, increase the heat and let the water come to a gentle boil.
- Turn off the heat: As soon as it reaches boiling, turn the stove off. You don’t want to cook the bonito flakes aggressively; just steep them.
- Add bonito flakes: Sprinkle in 15 grams of katsuobushi. They’ll float on top at first, then gradually sink as they absorb the hot broth.
- Steep for 5 minutes: This resting period extracts the bonito’s smoky, savory flavor without oversteeping, which could make the broth bitter or overly fishy.
- Strain the broth: Place a fine mesh strainer over a bowl and line it with kitchen paper or cheesecloth. Slowly pour the broth through, catching all the bonito flakes and any tiny particles. You should be left with a clear, golden broth that smells slightly smoky and deeply savory.
Cultural Note: Bonito flakes are made by fermenting, smoking, and shaving skipjack tuna, a process that can take months. This is one of the oldest preserved food traditions in Japan, and it’s the reason miso soup has such a distinctive taste.
Vegetarian Option: If you prefer a vegetarian miso soup, simply skip the bonito flakes. Your kombu dashi will still provide a gentle ocean-like umami.
Step 3: Prepping the Soup Ingredients
While your bonito flakes are steeping, it’s the perfect time to prepare the soup’s mix-ins. Traditional miso soup ingredients are chosen for flavor balance, texture contrast, and color appeal.
Here’s the classic trio used in this recipe:
1. Spring Onion (Negi)
- Use about 30 grams.
- Slice diagonally into thin pieces. This not only looks elegant but also increases surface area for more flavor release.
- You can use both the white and green parts, though the white part is sharper and the green part adds a mild freshness.
2. Aburaage (Twice-Fried Tofu) – Optional but Recommended
- Take 2 pieces of aburaage and cut them into thin strips.
- Aburaage has a light sweetness and spongy texture that soaks up the miso broth beautifully.
- If you can’t find it, you can substitute thinly sliced mushrooms for an earthy touch.
3. Tofu
- Use about 150 grams of tofu.
- Silken tofu will be delicate and creamy; firm tofu holds its shape better.
- Cut into small cubes just the right size for one bite with a spoon or chopsticks.
Optional Add-Ins:
- Wakame seaweed (rehydrated) for a subtle briny taste.
- Mushrooms for extra umami.
- Fresh clams for a seafood twist.
Step 4: Bringing It All Together
With your dashi strained and ingredients prepped, it’s time to combine them.
- Return the strained dashi to the pot. Place it back on the stove over medium heat.
- Add the longer-cooking ingredients first. Spring onions and aburaage go in now, as they take a few minutes to soften and release flavor.
- Add wakame. If using dried wakame, add about 1 tablespoon. It will rehydrate quickly in the hot broth.
- Optional soy sauce. Add ¼ teaspoon for depth. This is subtle but adds a layer of savoriness that complements the miso.
Step 5: Incorporating the Miso Paste
This is the most important step for preserving flavor. Miso paste contains delicate aromatic compounds and beneficial probiotics, and boiling can damage both.
How to Add Miso Paste Properly:
- Lower the heat to a gentle simmer. This prevents the soup from boiling once the miso is added.
- Place miso paste in a ladle or mesh strainer. Add 4 tablespoons (about 60 grams) of your chosen miso paste to a ladle.
- Dissolve gradually. Use a spoon or chopsticks to stir the paste with some hot broth from the pot until smooth. This ensures even distribution without clumps.
- Stir into the pot. Once the paste is dissolved, gently stir it into the soup.
Choosing Your Miso:
- White miso (Shiro). Mild, sweet, and great for beginners.
- Red miso (Aka). Stronger, saltier, and richer in umami.
- Yellow miso (Awase). A balanced blend of white and red; versatile and crowd-pleasing.
Tasting Tip: Different brands vary in saltiness, so taste after adding your miso and adjust with a little more paste if needed.
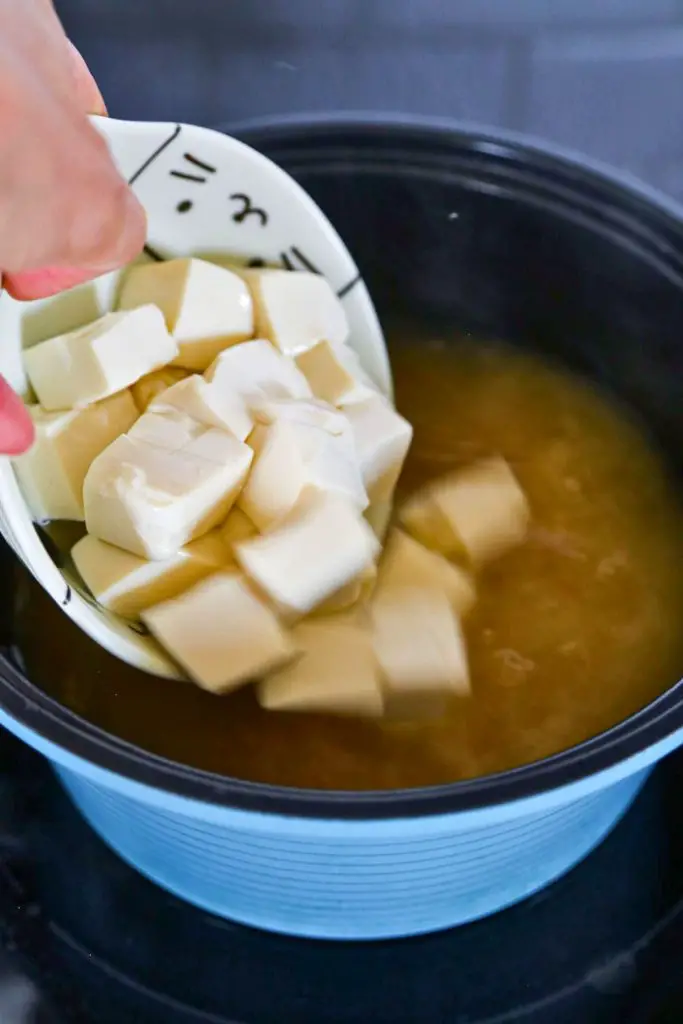
Step 6: Adding Tofu and Final Touches
The tofu is always added last to keep it delicate and fresh-tasting.
- Add tofu cubes – Slide them gently into the soup so they don’t break.
- Warm through – Let the tofu heat on low for 2–3 minutes. You just want it warm, not boiling.
- Avoid boiling – Once miso paste is in, never let the soup boil—it will dull the flavor and ruin the delicate balance.
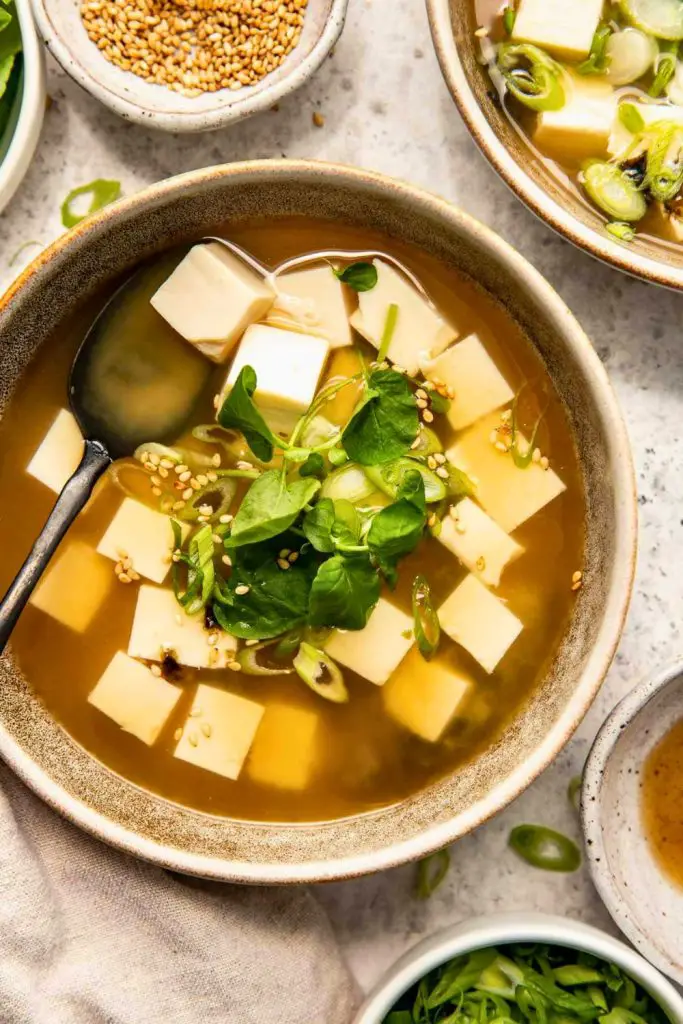
- Serve immediately – Miso soup is best fresh.
- Garnish – Sprinkle extra sliced spring onions into each bowl for a fresh, vibrant finish.
Pro Tips for Perfect Miso Soup
Making miso soup is simple, but small mistakes can affect the flavor, texture, and overall experience. Follow these five pro tips to take your miso soup from good to unforgettable:
1. Never Boil After Adding Miso Paste
Boiling miso soup after the paste is added is the fastest way to dull its flavor and kill the probiotics that make it so healthy. Always add miso paste at the end, with the heat lowered to a gentle simmer. Let it warm through, not boil.
2. Taste as You Go
Not all miso pastes are created equal; some are saltier, others sweeter. Always taste the soup after dissolving the miso paste, then adjust by adding a little more if needed. This ensures a balanced flavor that’s neither bland nor overpowering.
3. Use Fresh Ingredients for the Best Texture
Fresh tofu, crisp spring onions, and rehydrated wakame make a huge difference in mouthfeel. Avoid using tofu that’s been sitting in your fridge for more than a few days, as it can take on unwanted flavors.
4. Layer Your Ingredients by Cooking Time
Add ingredients that take longer to cook (like root vegetables or aburaage) first, then softer ingredients like wakame and tofu at the end. This prevents overcooking delicate additions.
5. Make It Fresh for the Best Flavor
Miso soup is best enjoyed on the day it’s made. While you can reheat it gently, the flavors are most vibrant when fresh, and the textures of tofu and wakame are at their peak right after cooking.
Serving Suggestions

Miso soup is incredibly versatile; it can be the star of a light meal or a perfect supporting dish. Here are some delicious ways to enjoy it:
- Traditional Japanese Breakfast: Pair with steamed rice, grilled fish, and pickled vegetables.
- Sushi Night: Serve as a warm, comforting starter alongside sushi rolls or sashimi.
- Rice Bowls: Enjoy with donburi dishes like teriyaki chicken or beef gyudon.
- Tempura Meals: The clean, umami-rich broth balances the crispy richness of tempura.
- Noodle Accompaniment: Sip alongside soba or udon noodles for a complete Japanese comfort food experience.
- Light Lunch: Pair with a simple salad for a healthy midday meal.
Presentation Tip: Use small lacquer or ceramic bowls and garnish each serving with fresh spring onion slices for a restaurant-style touch.
Nutritional Benefits of Miso Soup
Miso soup isn’t just flavorful, it’s also packed with nutrients that support overall health. Here’s a breakdown of the nutritional benefits of each key ingredient:
| Ingredient | Main Nutrients | Health Benefits |
|---|---|---|
| Miso Paste | Protein, probiotics, vitamin K, manganese | Supports gut health, boosts immunity, provides plant-based protein |
| Kombu (Kelp) | Iodine, calcium, iron, magnesium | Supports thyroid health, strengthens bones, aids in mineral intake |
| Bonito Flakes | Protein, B vitamins, niacin | Promotes muscle health, supports energy production |
| Tofu | Protein, probiotics, vitamin K, and manganese | Protein, calcium, and iron |
| Wakame Seaweed | Iodine, vitamin A, vitamin C, magnesium | Supports metabolism, boosts skin and eye health, aids digestion |
| Spring Onions | Vitamin C, antioxidants, fiber | Builds muscle, supports bone health, and is a plant-based protein source |
Calorie Note: A standard serving of miso soup (about 1 cup) is generally low in calories, around 40–70 kcal, depending on ingredients, making it a light yet nourishing choice for any meal.
Conclusion
Making traditional Japanese miso soup at home is simple, rewarding, and opens the door to exploring more Japanese cooking.
With just a few key ingredients and some mindful preparation, you can create a warm, umami-rich bowl that feels both nourishing and comforting.
So next time you crave a cozy, healthy soup, skip the instant packet, grab some kombu, bonito flakes, and miso paste, and make it fresh. Your taste buds will thank you.
You May Also Like
If you loved this miso soup recipe, here are three other cozy, flavor-packed soups you’ll want to try next:
- 🍅 Top Minestrone Soup Recipe for a Cozy Fall Night – A hearty, vegetable-rich Italian classic perfect for cool evenings.
- 🥧 Creamy Chicken Pot Pie Soup Recipe You’ll Love – All the comfort of a chicken pot pie, transformed into a creamy, spoonable soup.
- 🍄 Rich & Creamy Mushroom Soup Recipe for Winter – Earthy mushrooms meet silky cream for the ultimate winter comfort food.
Each recipe is easy to follow, packed with flavor, and perfect for creating your cozy meal moments.


Ella Foster, co-founder of FoodBears.com, is a skilled writer whose love for cooking fuels her creative work. Her passion for experimenting in the kitchen brings authentic flavor and culinary inspiration to every piece she crafts for the platform.