
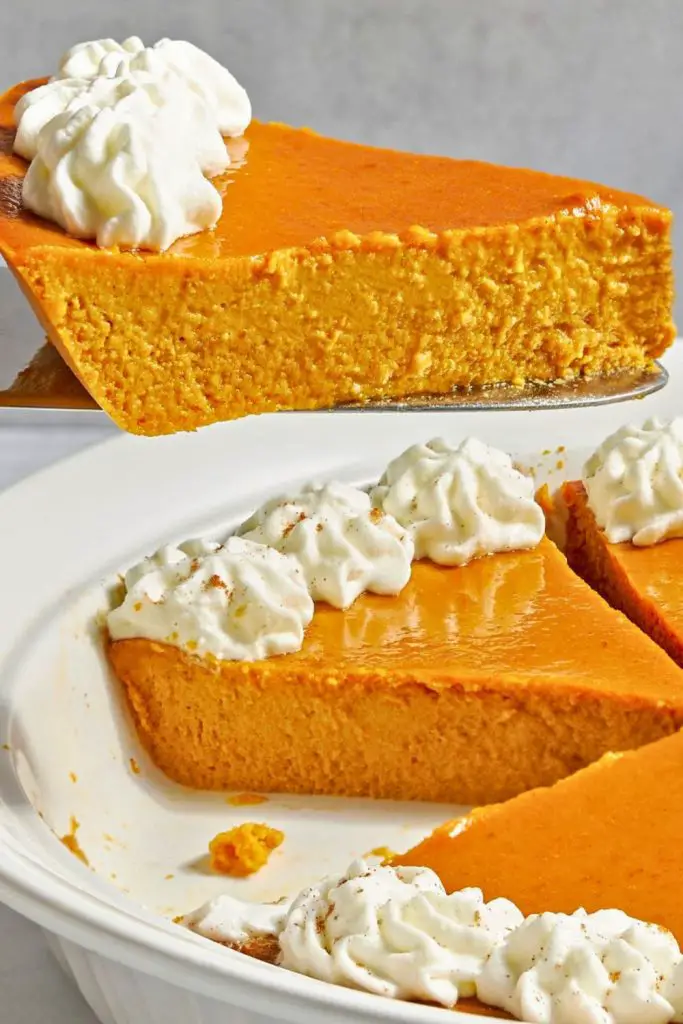
If you love pumpkin pie but don’t love the carbs or the hassle of making a crust, you’re going to be obsessed with this Crustless Pumpkin Pie Recipe.
It’s everything you crave about pumpkin pie: creamy, spiced, sweet, and comforting… just without the crust! Whether you’re living the keto lifestyle or simply looking for a lighter dessert for fall, this pie has you covered.
Let’s dive into this rich, low-carb classic, which has all the cozy fall flavors you love minus the crust and the guilt.
🥧 Why Make a Crustless Pumpkin Pie?
Let’s talk about the real reason this crustless pumpkin pie recipe is such a winner, especially if you’re following a keto or low-carb lifestyle.
Traditional pumpkin pie is usually made with a buttery, flaky crust. Sounds great, right? But here’s the thing: crusts are carb-heavy, often made from white flour and sugar, which can be a total dealbreaker if you’re avoiding carbs or gluten.
You could try a keto-friendly pie crust. Numerous almond flour or coconut flour crust recipes are available.
But let’s be honest, they’re not always the easiest to make. Some fall apart. Others burn quickly. And honestly? Sometimes, we’re just not in the mood to fuss with extra steps. That’s where this crustless version swoops in and saves the day.
Not only does skipping the crust make the process quicker and easier, but it also:
- Keeps the carbs ultra-low
- Let the creamy pumpkin custard shine
- Cuts down on prep and cleanup
- Still delivers all the cozy fall flavors you love
You won’t miss the crust promise. You may end up preferring it this way! This pie is all about that silky, creamy, spiced filling that practically melts in your mouth.
And if you want to jazz it up with toppings like whipped cream, chopped nuts, or a drizzle of sugar-free caramel? Go for it.
📝 Ingredients You’ll Need
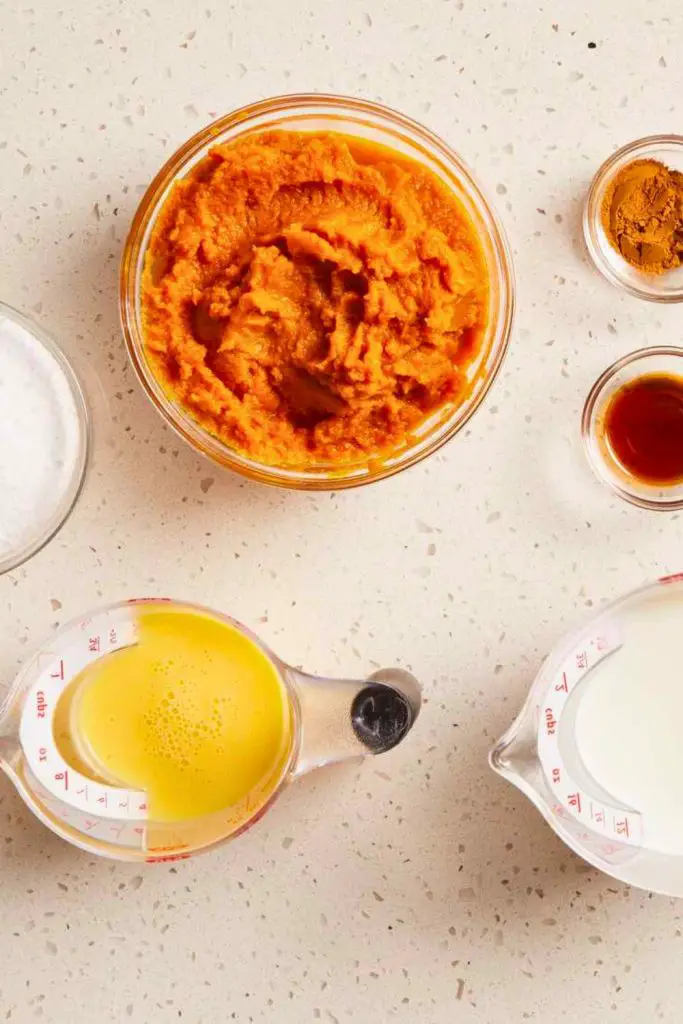
This easy crustless pumpkin pie recipe calls for only a few ingredients, most of which you likely already have on hand. Every component plays a key role in the flavor and texture, especially since we’re skipping the crust.
Here’s a quick-reference ingredient table to make prep even simpler:
| Ingredient | Amount | Purpose |
|---|---|---|
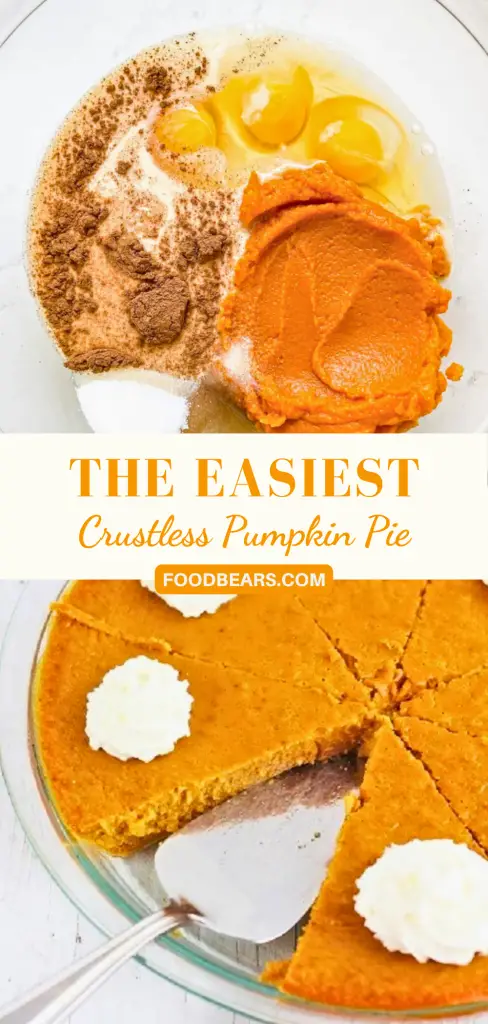
| Pumpkin Puree | 1½ cups | The star of the show is pure canned pumpkin (not pie filling) |
| Large Eggs | 3 (beaten) | Helps set the pie into a soft, custard-like texture |
| Brown Sweetener | ¾ cup | Adds a rich, sweet depth; use keto-friendly sweeteners like Swerve Brown |
| Ground Cinnamon | ½ teaspoon | Brings warmth and complements the pumpkin |
| Pumpkin Pie Spice | 1¾ teaspoons | Gives the pie that signature fall flavor blend |
| Heavy Cream | ¾ cup | Makes the filling ultra creamy and luscious |
✅ Tip: Always double-check your canned pumpkin label, it should say 100% pumpkin and nothing else.
You can also customize this base depending on your dietary needs or flavor preferences. Want it dairy-free? Swap the heavy cream for full-fat coconut milk.
Want extra spice? Toss in a dash of nutmeg or cloves. This recipe is flexible and foolproof.
🧑🍳 Step-by-Step: How to Make Crustless Pumpkin Pie
Ready to whip up the easiest and creamiest crustless pumpkin pie ever? This step-by-step guide will walk you through the process from preheating your oven to enjoying that first melt-in-your-mouth bite.
No pastry skills required, just a few basic tools and your favorite fall playlist in the background.
🔥 Step 1: Preheat the Oven
Before you reach for the mixing bowl, preheat your oven to 350°F (175°C). This step is crucial. Starting with a properly heated oven ensures your pie bakes evenly and sets beautifully without turning rubbery or sinking in the middle.
Think of your oven like the stage and your pie like the star—it needs the spotlight ready to go when it enters.
✅ Tip: Always use an oven thermometer if you can. Most ovens run slightly hot or cold, and custard pies like this one are sensitive to temperature changes.
🧴 Step 2: Grease Your Pie Dish
Next, grab your 9-inch pie plate and generously spray it with non-stick cooking spray. Without a crust, there is no protective layer between the custard and the glass or ceramic, so greasing is key.
You can also use:
- Butter (for a richer finish)
- Coconut oil spray (for a dairy-free option)
- Avocado oil spray (neutral and keto-friendly)
🍽 Pro Tip: Don’t skip the corners! Custard tends to stick if any part of the dish is left dry.
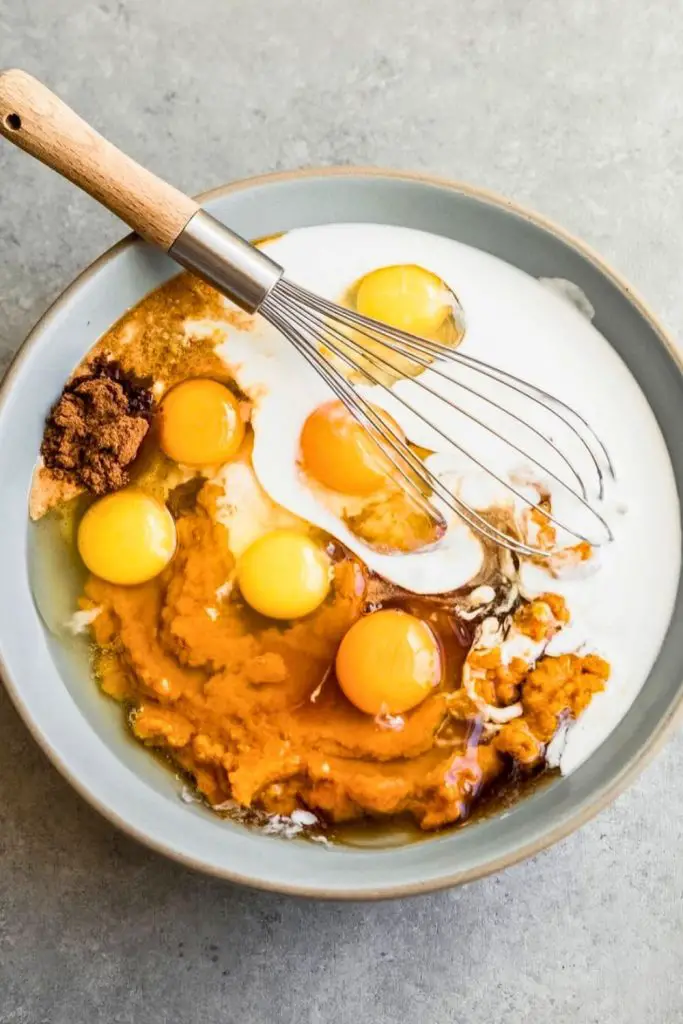
🎃 Step 3: Mix the Pumpkin Base
Time to get your hands dirty in a good way! Grab a large mixing bowl and add:
- 1½ cups of pure pumpkin puree (from a can)
Ensure you’re using pure pumpkin, not pumpkin pie filling. Pie filling often contains sugar and other additives that can alter the flavor and disrupt the texture of the pie.
Now crack in:
- 3 large eggs, already beaten
The eggs transform this mixture into a smooth, custard-like pie. As they bake, they help the pumpkin mixture firm up while still remaining luscious and creamy.
🥄 You can beat the eggs in a small bowl before adding them, or lightly beat them right in the mixing bowl with the pumpkin. Either way, make sure they’re fully mixed and yolks are broken down.
🍬 Step 4: Add the Sweetness
This pie gets its sweetness without the sugar rush thanks to keto-friendly brown sweetener.
Add to your bowl:
- ¾ cup of brown sweetener (Swerve Brown is recommended)
This sweetener mimics the rich molasses taste of traditional brown sugar but without the carbs. It’s packable, meaning you can scoop and press it just like regular brown sugar, and it melts beautifully into the pumpkin mix.
If you don’t have Swerve, other options include:
- Lakanto Golden (less packable, but still sweet)
- Allulose blend (for a smoother finish)
- Monk fruit and erythritol combo
🍯 Tip: Taste your mixture before baking to ensure it’s just right. Sweeteners vary in intensity, and some people prefer a slightly sweeter or more subtle flavor.
🌶️ Step 5: Add the Spices
You can’t call it pumpkin pie without the spices. That signature fall aroma comes from a blend of warm, cozy flavors that bring the pumpkin to life.
Sprinkle in:
- ½ teaspoon ground cinnamon
- 1¾ teaspoons pumpkin pie spice
Pumpkin pie spice is typically a blend of cinnamon, nutmeg, ginger, and cloves. It adds depth and warmth that complements the pumpkin’s earthiness.
Want to make your spice blend?
- 1 tsp cinnamon
- ¼ tsp nutmeg
- ¼ tsp ginger
- Pinch of cloves or allspice
👃 Your kitchen is going to start smelling like a fall-scented candle, and we’re not mad about it.
🥛 Step 6: Stir in the Cream
This is where the magic happens. Pour in:
- ¾ cup of heavy cream
This makes the pie custard-rich, velvety, and indulgent without being too heavy. The fat from the cream helps carry all those spices and enhances the silky texture of the finished pie.
If you’re dairy-free or paleo:
- Swap for full-fat coconut milk
- Or try unsweetened almond milk with a tablespoon of melted coconut oil
🧁 Bonus: Heavy cream helps the pie hold its shape without getting watery—no one wants soggy pumpkin!
🍴 Step 7: Whisk It All Together
Now that all your ingredients are in the bowl, it’s time to whisk everything into a smooth, uniform batter.
You can use:
- A balloon whisk (old-school but effective)
- A silicone spatula (gentle and flexible)
- A hand mixer (quickest, with the least effort)
The goal is a silky, lump-free batter. Every bit of spice and sweetener should be evenly distributed, and the eggs should be fully integrated.
💪 Pro Tip: Whisk in a figure-eight motion, it helps mix more efficiently and evenly.
You’re looking for a texture that’s:
- Thick but pourable
- Smooth without streaks or clumps
- A rich orange color
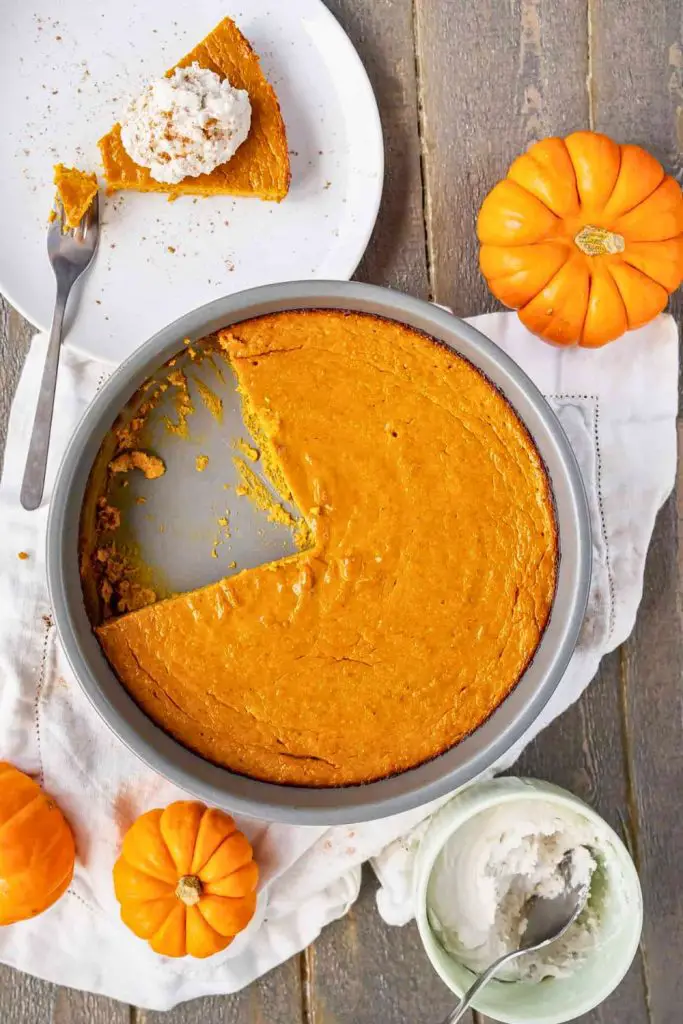
🧁 Step 8: Pour and Bake
Once your mixture is smooth and blended, carefully pour it into your greased pie plate. Scrape the sides of the bowl to get every last bit. This is gold!
Place the dish in the center of your preheated oven. Bake for 30 to 40 minutes. Oven times may vary slightly, so check at the 30-minute mark.
🔍 How to Tell When It’s Done:
- The center should be set, not jiggly.
- It should bounce back when lightly pressed.
- A toothpick or knife inserted near the center should come out mostly clean.
- The top may puff slightly but will settle as it cools.
⚠️ Don’t overbake! Overcooking can lead to cracks or a rubbery texture. Slight cracking is normal, though it’s a custard thing!
🧊 Step 9: Cool and Slice
Once baked to perfection, remove your crustless pumpkin pie from the oven and place it on a cooling rack.
Let it rest at room temperature for at least 30 minutes. This allows the pie to set further and makes slicing easier.
If you try to cut it too soon, it might fall apart or look messy (still delicious though!). For cleaner slices:
- Chill in the fridge for 1–2 hours
- Or pop it in the freezer for 30–40 minutes before serving
🍽 A Few Notes on Cracking:
If your pie cracks a little on top, no big deal. That’s completely normal for custard-based pies and won’t affect the flavor at all.
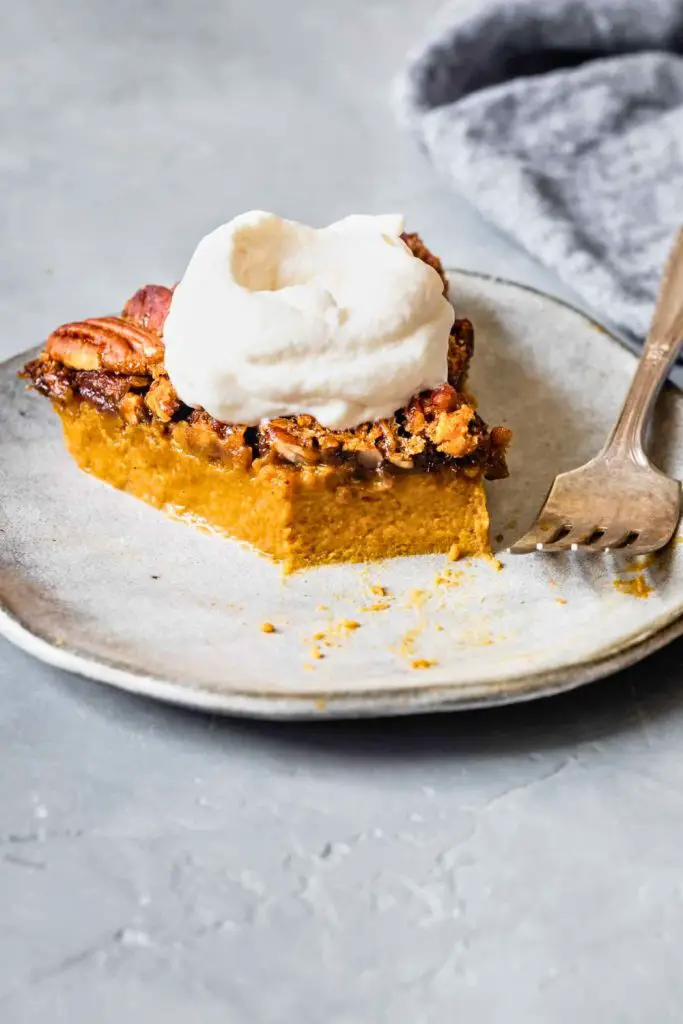
🕊️ Whipped cream covers everything. No one will even notice!
🍦 Step 10: Serve It Up: Topping Ideas
Your pie is cool, firm, and ready to slice. Let’s talk toppings. This pie is a blank canvas for fun fall garnishes that’ll take it to the next level.
Here are some no-fail topping ideas:
| Topping | Why It Works |
|---|---|
| Whipped Cream | Classic and creamy perfect balance to the spices |
| Cinnamon Sprinkle | Aesthetic and flavorful finishing touch |
| Chopped Pecans or Walnuts | Adds crunch and a nutty contrast to the smooth custard |
| Sugar-Free Caramel Drizzle | A sweet, sticky upgrade without the sugar |
| Keto Ice Cream | Makes this dessert feel like a full-on treat |
| Pumpkin Seeds | Toasted seeds add a rustic, crunchy element |
🎉 Get creative—make it your own! Serve with a side of hot coffee, a maple latte, or even a chai tea for the ultimate fall dessert experience.
👩🍳 Pro Tips for the Best Crustless Pumpkin Pie
Even though this pie is incredibly simple to make, a few expert tricks can take it from good to OMG, is this keto? Here are some pro-level tips to make sure your crustless pumpkin pie turns out creamy, smooth, and perfectly spiced every single time:
✅ Use Room Temperature Ingredients
Cold eggs or cream can create an uneven batter and may affect how well your pie sets. If you pull your ingredients straight from the fridge, give them 10–15 minutes at room temperature before mixing.
Think of it as baking harmony: When all the ingredients are at a similar temperature, they blend more smoothly and bake more evenly.
✅ Don’t Skip the Whisk
Yes, you can technically use a spatula, but a whisk makes a difference. You want everything fully incorporated, especially the eggs and spices. A few clumps of spice or bits of unmixed sweetener can mess with both texture and flavor.
🎯 Bonus Tip: Whisk in an “S” or figure-eight pattern to cover more surface area.
✅ Check for Doneness Like a Pro
Custard pies like this can be a little tricky. You don’t want them underbaked, but you also don’t want to overbake them and end up with a rubbery texture.
Here’s the sweet spot:
- The center should not jiggle like Jell-O, but may still look slightly soft.
- Lightly press the middle; it should bounce back gently.
- A toothpick or small knife inserted should come out mostly clean, not wet.
✅ Let It Cool Before Slicing
As tempting as it may be to dive right in, cooling is essential. The custard sets further as it cools, giving you those beautiful, clean slices.
Want it extra neat? Chill the pie in the refrigerator for 1 to 2 hours before serving. It also tastes even better cold!
✅ Add Toppings Strategically
If your pie cracks a bit during cooling, don’t worry. This is a common occurrence with crustless custard pies. Just add a generous dollop of whipped cream or a few chopped pecans right on top, and the problem is solved.
🎨 Variations to Try
Want to get creative with your crustless pumpkin pie recipe? Here are some fun and flavorful variations that will keep things fresh while remaining keto-friendly.
| Variation | What to Do |
|---|---|
| Maple Pumpkin Pie | Add ½ tsp maple extract to the batter for cozy, maple-syrup flavor |
| Chocolate Chip Pumpkin Pie | Mix in ¼ cup sugar-free chocolate chips before baking |
| Nutty Crunch Pie | Sprinkle chopped pecans or walnuts on top before baking |
| Coconut Pumpkin Pie | Bake in muffin tins (lined or silicone) for 20–25 minutes for single serving.s |
| Mini Pumpkin Pies | Bake in muffin tins (lined or silicone) for 20–25 minutes for a single serving |
| Extra Spicy | Add a pinch of cayenne or extra cloves for a spicy fall kick |
| Cheesecake Swirl | Swirl in a few spoonfuls of sweetened cream cheese before baking |
| Espresso Pumpkin Pie | Add 1 tsp instant espresso powder to deepen the flavor |
| Caramel Pecan Topping | Top with keto-friendly caramel sauce and toasted pecans before serving |
✨ These tweaks are great for holidays, brunches, or just keeping things interesting throughout pumpkin season.
🥶 Can You Freeze Crustless Pumpkin Pie?
Absolutely, yes! One of the biggest perks of this pie is that it freezes beautifully. That means you can make it ahead of time, save leftovers for later, or prep extra pies for the holidays.
Here’s how to do it right:
🧊 Step-by-Step: How to Freeze Crustless Pumpkin Pie
- Cool Completely: First, let your pie cool fully at room temperature. Freezing it while it’s still warm can create condensation and alter the texture.
- Wrap Securely: Wrap the pie tightly in plastic wrap, ensuring that no air is trapped. Then wrap the pie again in aluminum foil, or place the wrapped pie in a large, freezer-safe zip bag.
- Label & Freeze: Label it with the date and pop it in the freezer. It will stay fresh for up to 2 months.
🔄 How to Thaw and Serve
- Overnight method: Move the pie to the fridge and let it thaw slowly overnight.
- Quick method: Let it thaw on the counter for 1–2 hours (only if you’re serving it soon).
Once thawed, it’s ready to eat cold, or you can warm it slightly in the microwave or oven.
🧁 Tip: Wait until after thawing to add toppings like whipped cream or nuts for the freshest results.
🎯 Final Thoughts
If you’re searching for a dessert that’s simple, satisfying, and packed with cozy fall vibes, this crustless pumpkin pie recipe is your answer. It skips the crust but delivers big on flavor, rich, creamy, spiced just right, and low in carbs.
Whether you’re celebrating Thanksgiving or just craving a mid-week pumpkin treat, this recipe checks all the boxes.
You don’t need to be a baking pro. You don’t need fancy ingredients. You will need a mixing bowl, a pie dish, and approximately 10 minutes of preparation time. From there, the oven does all the magic.
So, go ahead and slice a piece, top it with whipped cream, and enjoy a moment of fall bliss. 🧡
🥄 More Pumpkin Recipes to Try Next
Looking for more cozy pumpkin treats that are just as easy and crowd-pleasing? We’ve got you covered:
- 👉 The Best Pumpkin Bread Pudding You’ll Need
Warm, custardy, and topped with a dreamy drizzle, this one’s made for chilly fall nights. - 👉 Fun Fall Treat: Pumpkin Cheesecake Bars Recipe
Creamy cheesecake meets pumpkin spice in a dessert that’s perfect for sharing (or not!). - 👉 Quick Pumpkin Chocolate Chip Muffins Recipe
Moist, fluffy, and studded with melty chocolate chips, this recipe is ready in just 30 minutes!

Ella Foster, co-founder of FoodBears.com, is a skilled writer whose love for cooking fuels her creative work. Her passion for experimenting in the kitchen brings authentic flavor and culinary inspiration to every piece she crafts for the platform.