
If your weeknights feel like a blur and dinner is often a last-minute scramble, this Balsamic Chicken recipe is about to become your new favorite go-to. It’s simple, flavorful, meal-prep friendly, and best of all, requires minimal cleanup.
Whether you’re cooking for your family, meal prepping for the week, or trying to impress someone with a no-fail dinner, this dish has your back.
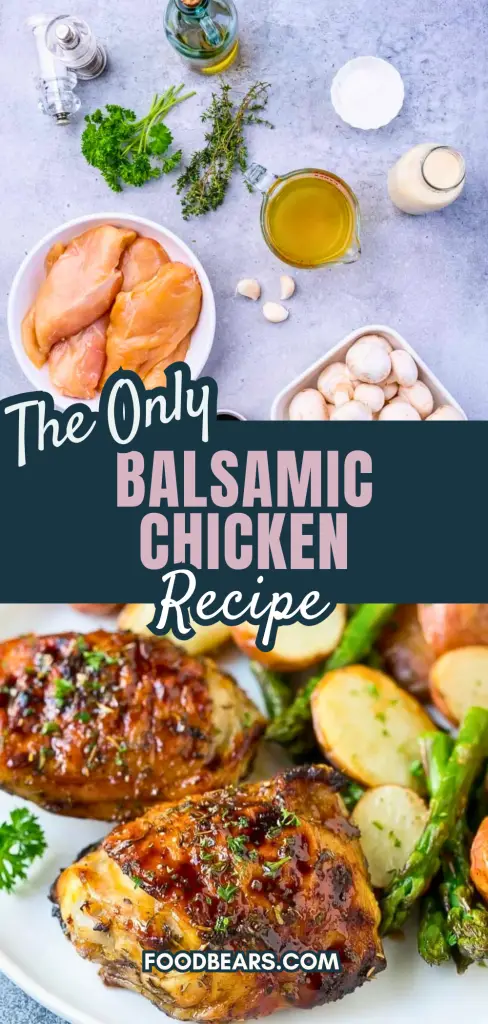
The rich balsamic glaze, a punch of herbs, and juicy chicken come together like a dream, without the need for fancy ingredients or complex steps.
Let’s walk through this clean comfort recipe step by step. I’ll break it down in a way that’s super easy to follow, share helpful tips, and make sure you know exactly how to get perfectly juicy chicken every single time.
⭐ Why This Balsamic Chicken Recipe Works

If you’ve ever struggled to make chicken breasts that aren’t bland, dry, or forgettable, this balsamic chicken recipe is here to rescue your weeknight dinner routine.
So… why does it work so well?
Let’s break it down:
1. The Marinade Packs a Punch
At the heart of this recipe is a powerhouse marinade, a simple blend of olive oil, tangy balsamic vinegar, mustard, and dried herbs.
On their own, boneless skinless chicken breasts are, well… pretty plain. But with this marinade? They soak up a bold, rich flavor that feels like a cozy dinner from a fancy restaurant.
2. Balanced Sweet, Tangy, and Herby Flavors
The balsamic vinegar brings the perfect sweet-acidic balance, Dijon mustard adds a creamy kick, and herbs like rosemary and thyme lend an earthy, home-cooked feel. Every bite is full of character.
3. Minimal Ingredients, Maximum Flavor
You don’t need a long shopping list or fancy tools. With just a few pantry staples, you can create something that tastes gourmet but takes minimal effort.
4. Easy Prep + Easy Clean-Up
We’re talking one bowl for the marinade and a Ziploc bag for marinating. Bonus: Using the bag not only saves space in the fridge but also makes clean-up a total breeze. No chicken juice mess on the counter? Yes, please.
5. Perfectly Cooked, Every Time
By baking the chicken at 400°F, and checking the internal temperature with a meat thermometer. You’re setting yourself up for tender, juicy results, not overcooked, rubbery meat.
🧾 Ingredients You’ll Need

Here’s a quick and easy reference table of everything you’ll need to make this flavorful balsamic chicken:
| Ingredient | Amount | Notes |
|---|---|---|
| Olive oil | 1/4 cup | Helps emulsify and coat the chicken |
| Balsamic vinegar | 1/3 cup | Provides sweet-tangy depth of flavor |
| Dijon mustard | 1 tablespoon | Adds creaminess and mild spice |
| Dried thyme | 1 teaspoon | Earthy and aromatic |
| Dried rosemary | 1 teaspoon | Pairs perfectly with balsamic |
| Salt | 1 teaspoon | Adjust to taste |
| Ground black pepper | 3/4 teaspoon | Boneless, skinless chicken breasts |
| Boneless skinless chicken breasts | 4 medium pieces | The base of this recipe |
| Olive oil spray or regular oil | As needed | For greasing the baking dish |
| Fresh parsley (optional) | For garnish | Adds color and a fresh finish |
🛒 Pro Tip: Want to save even more time? Prep the marinade in advance and store it in the fridge for up to 2 days before adding the chicken.
🍴 Step-by-Step: How to Make Balsamic Chicken

If you’re ready to transform your usual chicken dinner into something deeply flavorful and unforgettable, this step-by-step balsamic chicken guide is for you.
Whether you’re a busy home cook or a novice in the kitchen, these steps will help you create a dish that’s full of tangy sweetness, rich herbs, and juicy goodness.
Let’s break it down, one delicious step at a time.
🔥 Step 1: Whisk Up the Flavor Bomb Marinade
Before we even touch the chicken, let’s start with the real star of this recipe: the balsamic marinade.
This isn’t just any sauce, it’s the secret weapon that turns boring chicken breasts into something you’ll want to make on repeat.
What Goes Into the Marinade:
- 1/4 cup olive oil
- 1/3 cup balsamic vinegar
- 1 tablespoon Dijon mustard
- 1 teaspoon dried thyme
- 1 teaspoon dried rosemary
- 1 teaspoon salt
- 3/4 teaspoon ground black pepper (or to taste)
In a medium-sized mixing bowl, combine all the ingredients. Grab a whisk and go to town.
You’re not just mixing oil and vinegar here, you’re creating a bold, balanced blend that hits all the right notes: tangy, savory, herby, and just the right touch of richness.
🥄 Quick Tip: Dijon mustard acts as a natural emulsifier here. It helps the oil and vinegar bind together smoothly, giving you a creamy, velvety marinade that clings beautifully to the chicken.
And can we talk about nostalgia for a sec? Using Grey Poupon mustard adds a touch of flair and a lot of flavor. Remember those old commercials? Fancy or not, this stuff delivers.
Once whisked, set your marinade aside. It’s time to move on to the chicken.
🍗 Step 2: Prep and Marinate the Chicken
Here’s where the magic begins. Grab 4 boneless, skinless chicken breasts and ensure they’re roughly the same size for even cooking.
Now, to marinate like a pro, we’re using a large Ziploc bag. Why?
- It’s mess-free.
- It keeps the marinade in contact with every part of the chicken.
- And it saves precious fridge space.
Here’s how to do it:
- Open your Ziplock bag and roll down the top edge twice (this trick keeps things tidy and prevents raw chicken juices from leaking onto the outside of the bag).
- Pour the entire marinade into the bag first.
- Add the chicken breasts one at a time.
- Unroll the top and seal it, squeezing out as much air as possible.
- Gently massage the bag with your hands, ensuring the marinade coats every inch of the chicken.
💡 Why use a bag instead of a bowl? A big bowl takes up more room in the fridge, and it might not coat the chicken evenly. The bag hugs the chicken literally making every bite taste better.
Pop that bag into the fridge. For best results, marinate for at least 1 hour. If you’ve time, let it sit overnight (up to 24 hours). The longer it soaks, the deeper the flavor.
🕒 Minimum time: 1 hour
⏳ Ideal time: 8–24 hours
🔄 Step 3: Preheat and Prep the Baking Dish
Okay, marinade time is done. The chicken is packed with flavor and ready to shine. But before we toss it into the oven, let’s prep the baking environment.
First, preheat your oven to 400°F (205°C).
Yes, this should technically be the first thing you do before pulling out your ingredients, but hey, we’ve all forgotten to preheat the oven. So, if you haven’t done it yet, do it now!
Next: Prepare your baking dish.
You’ll need a shallow baking dish or a large oven-safe skillet. Lightly coat the bottom with olive oil spray or rub a small amount of oil between your fingers. This keeps the chicken from sticking and makes cleanup easier.
💡 Don’t crowd the pan! Leave a little room between each chicken breast. Overlapping or tight spacing can cause the chicken to steam instead of roast, meaning you lose that golden baked texture.
Now you’re ready for the main event.
🧑🍳 Step 4: Add Chicken and Drizzle Extra Marinade
Remove the marinated chicken from the fridge and gently remove each piece from the bag. Arrange them in the prepared baking dish, giving each one its own space to shine.
But don’t toss that bag just yet! There’s flavor left behind.
Do this:
- Grab a spoon and drizzle a little of that leftover marinade right over the top of the chicken.
This not only enhances the flavor but also gives the chicken a beautiful glossy finish once baked. A little dripping down the sides? Totally fine. That’s all part of the flavor game.
⏱️ Step 5: Bake and Check the Temp
Now, let the oven do the heavy lifting.
Slide the dish onto the center rack and bake for 20 to 25 minutes, depending on the thickness of your chicken breasts.
Here’s how to know it’s ready:
You’re aiming for an internal temperature of 160°F (71°C). The chicken will continue cooking slightly after you take it out of the oven, climbing to a safe 165°F as it rests.
Use a digital meat thermometer for this step; it’s a small investment with big results.
How to use it:
- Insert the probe into the thickest part of the chicken.
- Avoid touching the bone or going too shallow.
- Wait for the reading.
🧠 Perfect range:
- 160°F: Pull it from the oven
- 165°F: Safe and juicy
- Over 180°F: You’re heading into dry, tough territory
If your chicken reads around 170–173°F when pulled from the oven, you’ve nailed it. That’s the sweet spot for moist, flavorful chicken that still feels fully cooked and satisfying.
The Smell Test:
When it’s ready, your kitchen will smell like a gourmet bistro. The balsamic vinegar caramelizes slightly, the herbs become aromatic, and the mustard adds a savory tang that fills the air with promise.
🍽 Final Touch Before Serving
Don’t skip this part; it brings everything together.
- Spoon some of the pan juices back over each chicken breast. This adds moisture and flavor, and makes the dish look even more irresistible.
- Sprinkle with chopped fresh parsley for a pop of color and a touch of brightness.
Let the chicken rest for 3–5 minutes before slicing. This allows the juices to redistribute, keeping every bite juicy.
🎉 And That’s It—Perfect Balsamic Chicken Every Time
This isn’t just a recipe. It’s a method. A system. A fail-proof strategy to make chicken that doesn’t taste like an afterthought.
Whether you’re serving it with mashed potatoes, rice, salad, or veggies, or slicing it up for wraps and meal prep, you now have a go-to balsamic chicken recipe that delivers flavor without fuss.
🍽️ How to Serve Balsamic Chicken

You’ve pulled your beautifully roasted balsamic chicken from the oven—it’s juicy, flavorful, and filling your kitchen with the best smells ever. Now the question is: What should I serve with it?
The beauty of this dish lies in its versatility. It pairs well with just about everything, from hearty comfort food sides to lighter, low-carb options.
🥔 Classic Pairings
- Garlic mashed potatoes – Creamy and comforting. Perfect for soaking up those balsamic pan juices.
- Roasted vegetables – Think carrots, Brussels sprouts, or zucchini. The caramelization complements the tangy chicken.
- Steamed rice or herbed quinoa – A clean, wholesome base that balances the bold flavors.
🥗 Light & Fresh Options
- Simple green salad – Toss some mixed greens with olive oil and lemon juice for a fresh contrast.
- Cauliflower rice – For a low-carb option that still feels hearty.
- Grilled asparagus or green beans – quick, easy, and packed with nutrients.
🥪 Bonus: Use It as a Protein Base!
This chicken isn’t just for dinner—it’s amazing sliced and repurposed in other meals. Try it in:
- Wraps and pitas
- Meal prep bowls
- Sandwiches with arugula and goat cheese
- Pasta salads for picnics or work lunches
💡 Pro Tip: Save some of that flavorful pan sauce and drizzle it over your sides. It elevates everything!
🧊 Leftovers? Meal Prep Gold!
One of the best things about this balsamic chicken recipe, besides its delicious taste, is how well it stores. It’s a proper meal prep MVP, perfect for busy weeks when you want real food without a fuss.
🥡 Storing Leftovers
- Fridge: Store in an airtight container for up to 4 days.
- Freezer: Freeze cooked chicken (whole or sliced) in freezer-safe bags for up to 3 months.
✨ Reheating Tip: Reheat gently in the microwave with a splash of broth or olive oil to keep it juicy. Or reheat in a covered skillet over low heat.
📅 Meal Prep Ideas
Make a big batch of balsamic chicken on Sunday and enjoy it throughout the week in creative ways:
🍱 Weekly Meal Prep Combos:
| Day | Meal Idea |
|---|---|
| Monday | Balsamic chicken + quinoa + roasted broccoli |
| Tuesday | Sliced chicken in a wrap with spinach + hummus |
| Wednesday | Chicken tossed with greens + feta + balsamic glaze |
| Thursday | Chicken with sweet potato mash + green beans |
| Friday | Chicken sandwich with arugula + aioli |
You’ll never be bored, and you’ll always be prepared.
😎 Quick Tip: If you’re freezing portions, wrap them individually so you can grab just what you need. Label with dates to keep track.
🧠 Secret Tips for Balsamic Chicken

Want to take this dish from delicious to restaurant-worthy? These little secrets can make a huge difference in both flavor and cooking experience:
🥄 1. Massage That Marinade
Once you seal the Ziploc bag, don’t just toss it in the fridge. Take a few extra seconds to massage the marinade into every inch of the chicken. This helps the flavor soak in more evenly.
🧊 2. Don’t Skip the Chill Time
Yes, one hour is fine in a pinch. But for next-level flavor, marinate overnight. The longer it sits, the deeper and more complex the flavor gets.
🗓️ Plan ahead: Marinate the night before, and you’ll thank yourself the next day.
🥄 3. Use a Spoon to Baste from the Pan
Once the chicken is cooked, spoon the pan juices back over the meat before serving. It adds moisture and boosts the balsamic-herb flavor like crazy.
🌿 4. Add a Fresh Finish
A sprinkle of fresh parsley right before serving adds brightness and a pop of color. You can even elevate the presentation with a squeeze of lemon juice or a light drizzle of balsamic glaze.
🌡️ 5. Temp It Like a Pro
Use a digital thermometer and aim for an internal temperature of 160°F before resting the chicken. It continues to cook for a few minutes outside the oven, just enough to reach that perfect 165°F sweet spot without drying out.
📏 Dry chicken = sad dinner. A thermometer is your best friend in this situation.
🥰 Final Thoughts: Balsamic Chicken Is a Total Dinner Win
There’s something truly special about a recipe that’s simple to make but tastes like you spent hours in the kitchen. This balsamic chicken recipe is precisely that: clean, comforting, and packed with bold flavor in every bite.
It’s the kind of dish that fits seamlessly into your weeknight routine but also feels fancy enough for a cozy dinner party or Sunday meal prep.
From the rich, herby marinade to the juicy, tender chicken and all those flavor-packed pan juices, every part of this recipe comes together perfectly.
If you’ve ever struggled to make chicken breasts taste like more than, well, just chicken, this one’s for you. Add it to your rotation, bookmark it, and don’t forget to share it with someone who needs a go-to chicken dish that always delivers.
📌 More Cozy, Easy Recipes to Try Next
If you loved this balsamic chicken, here are a few other tried-and-true favorites you’ll want to add to your weekly meal plan:
🧡 Easy Butternut Squash Soup for Fall Vibes
A creamy, roasted soup that tastes like autumn in a bowl, perfect for chilly nights and cozy weekends.
🍷 40-Min Easy Chicken Marsala Recipe for Dinner
Rich, savory, and surprisingly simple, this wine-infused chicken dish feels fancy but comes together fast.
🌿 Easy 30-Min Pesto Chicken Recipe for Busy Girls
Fresh, herby, and lightning quick, perfect for those nights when you want something homemade in a hurry.

Ella Foster, co-founder of FoodBears.com, is a skilled writer whose love for cooking fuels her creative work. Her passion for experimenting in the kitchen brings authentic flavor and culinary inspiration to every piece she crafts for the platform.