
There’s something magical about the cozy aroma of cinnamon, pumpkin spice, and buttery scones wafting through your kitchen on a crisp fall morning.
If you’ve ever fallen in love with the Starbucks pumpkin scones, you’re in for a treat. This homemade pumpkin scones recipe is not only more straightforward than you think. But it’s also richer in flavor, texture, and satisfaction.
Let’s bake the best pumpkin scones ever, from scratch, using simple pantry ingredients, pro-level tips, and just one bowl!
🧡 Why You’ll Fall in Love With These Pumpkin Scones
If you’re a fan of cozy fall flavors, these pumpkin scones will quickly become your favorite baking project. They’re rich, flaky, and bursting with warm spices that instantly fill your kitchen with the scent of autumn.
Unlike other recipes, this version skips the chill time, so you can go from craving to eating in under an hour without compromising on texture or taste.
These scones are better than Starbucks. Yes, you heard that right. While Starbucks’ pumpkin scones are iconic, they often tend to be dry or overly sweet.
This homemade version is everything theirs isn’t: moist, perfectly spiced, buttery, and completely customizable.
What truly sets these scones apart:
- Ice-cold butter for ultra-flaky layers
- Pumpkin puree for natural color, flavor, and softness
- Brown sugar + cream for rich, tender crumb
- No stand mixer needed, just a couple of bowls and your hands
- Spice flexibility, you can tweak the mix to match your favorite fall flavors
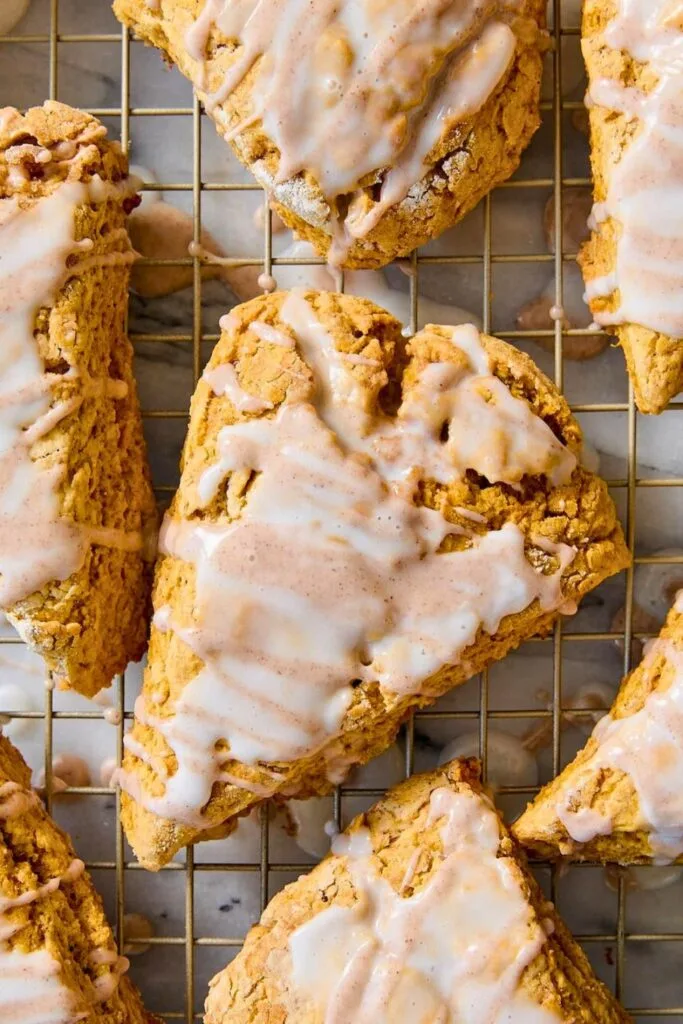
And let’s not forget that glaze… It’s like the cherry on top. Drizzle on a classic vanilla glaze or double up with a pumpkin spice swirl for a full Starbucks-style moment, but way better.
🍁 Ingredients You’ll Need
All of the ingredients are simple pantry staples, but using them cold is the secret to scone success. Here’s everything you’ll need:
Dry Ingredients:
| Ingredient | Measurement | Notes |
|---|---|---|
| All-purpose flour | 2 ¼ cups (270g) | Forms the scone structure |
| Granulated sugar | ¼ cup (50g) | Adds light sweetness |
| Baking powder | 1 ½ teaspoons | Helps with rise |
| Baking soda | ¼ teaspoon | Reacts with pumpkin/brown sugar for puff |
| Salt | ½ teaspoon | Balances sweetness |
| Cinnamon | 1 ½ teaspoons | Classic warm spice |
| Pumpkin pie spice | 1 ½ teaspoons | Use store-bought or homemade |
Cold Butter:
| Ingredient | Measurement | Notes |
|---|---|---|
| Unsalted butter | ½ cup (113g) | Cut into small cubes, kept cold/frozen |
Wet Ingredients:
| Ingredient | Measurement | Notes |
|---|---|---|
| Pumpkin puree | ½ cup (122g) | Use canned or homemade, smooth texture |
| Heavy cream | ½ cup (120ml) | For richness and moisture |
| Brown sugar | ¼ cup (55g) | Use light or dark for deeper flavor |
| Vanilla extract | 1 ½ teaspoons | Adds depth |
| Egg | 1 large | Binds the dough |
🔪 Tools You’ll Want on Hand
- Mixing bowls (1 large, 1 medium)
- Whisk and spatula
- Pastry mat or lightly floured surface
- Bench scraper or sharp knife
- Baking sheet with parchment paper
- Measuring cups and spoons
- Optional: pastry cutter or food processor
🥣 Step-by-Step: How to Make Pumpkin Scones From Scratch
Let’s break down this delicious pumpkin scones recipe into 10 simple steps. Whether you’re a weekend baker or just getting started, this recipe is designed to be easy, fun, and foolproof.
Plus, we’re skipping the long chill times (with one optional freezing trick), so you can bake and enjoy these scones in under an hour.
🔥 Step 1: Preheat and Prep
Before anything else, preheat your oven to 400°F (200°C). A hot oven is crucial for that immediate rise you want in scones; it helps puff them up and creates a golden, crisp edge.
Now’s the time to also line a baking sheet with parchment paper and get your tools ready:
- A pastry mat or a clean, floured surface
- Bench scraper or knife
- Two mixing bowls
Having everything prepped before diving in makes the process smoother (and keeps you from scrambling mid-bake!).
❄️ Step 2: Freeze the Butter
Here’s the secret to the flakiest scones ever: ice-cold butter.
Take ½ cup (113g) of unsalted butter and cut it into small cubes. Then place it in the freezer for 10–15 minutes while you prep everything else.
Why does this matter? When cold butter is placed in a hot oven, it melts and releases steam, creating those lovely flaky layers.
Warm butter will melt into the dough, resulting in dense, flat scones. So yes, chill that butter like it just saw a ghost.
🧂 Step 3: Mix the Dry Ingredients
In a large mixing bowl, add the following:
- 2 ¼ cups all-purpose flour
- ¼ cup granulated sugar
- 1 ½ tsp baking powder
- ¼ tsp baking soda
- ½ tsp salt
- 1 ½ tsp ground cinnamon
- 1 ½ tsp pumpkin pie spice
Whisk this together until all the dry ingredients are evenly combined.
Pro Tip: Homemade pumpkin pie spice lets you control the flavor. Try adding a pinch of cardamom or extra allspice if that’s your thing. You can make a big batch and store it for all your fall baking needs.
🎃 Step 4: Combine the Wet Ingredients
Grab a medium bowl and whisk together:
- ½ cup pumpkin puree
- ½ cup heavy cream
- ¼ cup brown sugar
- 1 ½ tsp vanilla extract
- 1 large egg
This mixture should be smooth and creamy with a rich golden-orange color. If you’re using homemade pumpkin puree, ensure it’s not too watery. The goal is for it to be thick and smooth.
If you’re going store-bought, Libby’s brand has excellent texture and vibrant color, making it a reliable choice.
🧈 Step 5: Incorporate the Butter
Now, take your frozen butter cubes out of the freezer and toss them directly into your bowl of dry ingredients.
You’ve got a few options here:
- Use your hands: Rub the butter into the flour until you have coarse crumbs with some pea-sized chunks remaining.
- Use a pastry cutter: Great if your hands run hot or you’re in a warm kitchen.
- Use two forks or knives: This takes a little longer but works just as well.
You’re aiming for a sandy texture with visible bits of butter still scattered throughout. Those bits are going to melt into magic when baked.
Why not overdo it? If the butter pieces are too small, the scones won’t puff as nicely, and the texture will suffer. You want some variation, big chunks give flaky pockets, small ones melt evenly for tenderness.
🥄 Step 6: Mix It All
Pour your wet pumpkin mixture into the flour and butter mix. Using a spatula or wooden spoon, gently fold everything together just until no dry streaks remain.
The dough will be thick and sticky, which is normal for scones. Resist the urge to overmix. It’s okay if it’s a little shaggy-looking. Overmixing develops gluten and can lead to chewy, tough scones. We’re going for tender and flaky!
Optional Add-ins: Want to get fancy? Gently fold in ½ cup of any of the following:
- Mini chocolate chips
- Chopped walnuts or pecans
- Crystallized ginger
📏 Step 7: Shape the Dough
Generously flour your surface or use a pastry mat for easy cleanup. Dump your sticky dough onto the floured area and lightly dust the top and your hands with flour.
Pat it into an 8-inch square, about ¾ to 1 inch thick.
Using a bench scraper or a sharp knife:
- First, cut the square into 4 equal smaller squares
- Then cut each square diagonally into 2 triangles
Voilà! You now have 8 beautiful scones ready to be transferred to your baking sheet.
Pro Tip: A bench scraper works wonders here. It helps lift the sticky dough cleanly and keeps the shape intact.
🧊 Step 8: Chill (Optional But Recommended)
This step isn’t required, but it makes a noticeable difference in how your scones rise and hold their shape.
Pop the shaped scones onto the baking sheet and place them in the freezer for 20-30 minutes. Chilling them firms up the butter and relaxes the dough. This helps the scones puff up instead of spreading out during baking.
You can also freeze them solid and bake later; add a few extra minutes to the baking time.
🖌️ Step 9: Brush and Bake
Once chilled, brush the tops with a bit of heavy cream. This gives the scones a golden, glossy finish as they bake.
Slide the tray into your preheated oven and bake at 400°F (200°C) for:
- 20 minutes = soft, fluffy scones with tender centers
- 25 minutes = crisp edges and slightly firmer texture
- Frozen scones = 25 to 30 minutes
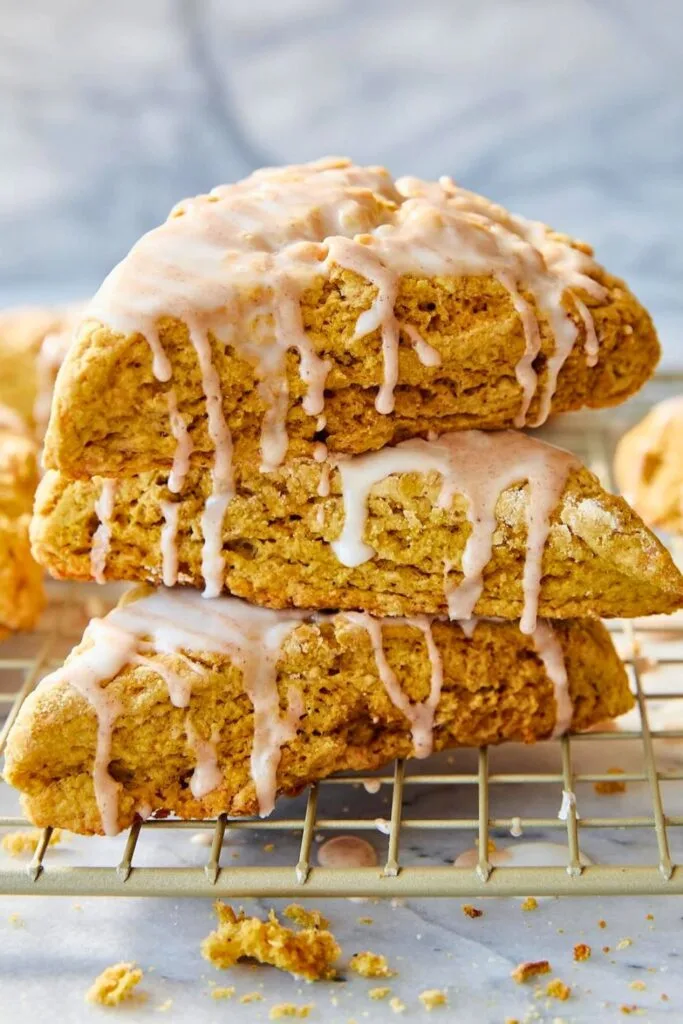
You’ll know they’re done when the tops are golden and they feel firm to the touch.
Don’t overbake! Scones can dry out quickly, so check them at the 20-minute mark.
Let the scones cool on the tray for a few minutes before transferring them to a wire rack.
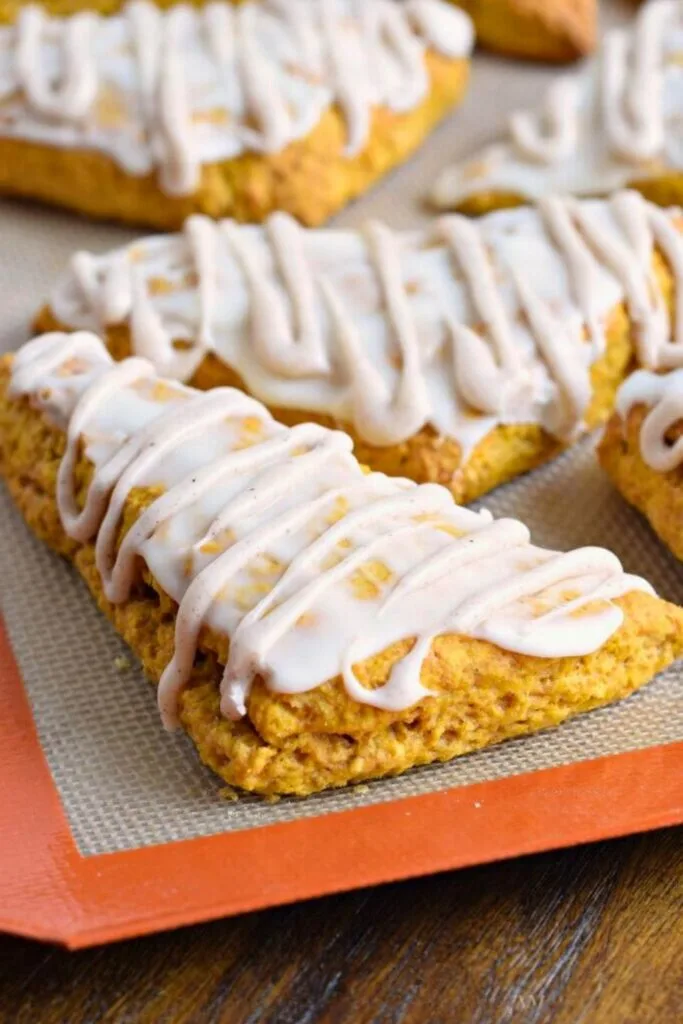
🍬 Step 10: Glaze Time!
While the scones are baking (or cooling), it’s time to whip up a sweet glaze. You’ve got two options: do both for a Starbucks-style look!
Vanilla Glaze (Basic):
| Ingredient | Measurement |
|---|---|
| Powdered sugar | 1 ½ cups (180g) |
| Milk | 2 tablespoons |
Whisk until smooth and drizzle over cooled scones. This one’s simple, sweet, and lets the pumpkin flavor shine.
Pumpkin Spice Glaze (Optional):
Add to the basic vanilla glaze:
- ¼ teaspoon pumpkin pie spice
- 1 tablespoon pumpkin puree
Mix well and drizzle over the vanilla glaze for an iconic layered look.
Glaze Hack: Use a spoon or a piping bag for neater lines. Want a thicker glaze? Use less milk. For a lighter drizzle, thin it out slightly.
✅ Tips for the Best Pumpkin Scones
Want your scones to look and taste like they came from a high-end bakery? These practical, no-fuss tips will help you perfect your pumpkin scones every single time.
1. Always Use Cold Butter
This is the golden rule for flaky, tender scones. Cold butter creates steam when it melts in the oven, which forms the scone’s signature layers. Freeze the butter for at least 10 minutes before cutting it into the flour.
Too warm? The butter will melt into the dough, creating dense, greasy scones instead of airy, layered ones.
2. Don’t Overwork the Dough
Mix the ingredients just until they come together. It’s okay if the dough looks a little rough or sticky; that’s what gives the scones their soft, tender texture.
Think: rustic, not perfect. Over-mixing leads to overdeveloped gluten and a chewy texture (which no one wants in a scone!).
3. Use a Pastry Mat or Well-Floured Surface
Pumpkin adds moisture, which means this dough is naturally sticky. To keep things under control, flour your surface generously and use a pastry mat if possible.
A pastry mat is a total game changer: it prevents sticking, makes shaping easier, and even has measurements to help you get the perfect 8-inch square.
4. Don’t Skip the Optional Chill
If you have 20–30 minutes, pop the shaped scones in the freezer before baking. This firms up the butter and prevents the scones from spreading too much.
Bonus: You can freeze them solid and bake later!
5. Vary the Spices to Make It Your Own
Homemade pumpkin pie spice allows you to fine-tune the flavor. Add more cinnamon for warmth, a hint of cardamom for an exotic touch, or extra nutmeg for a deeper flavor.
☕ Serving Suggestions: How to Enjoy Pumpkin Scones
These scones are a celebration of fall, and they pair wonderfully with your favorite cozy drinks and toppings. Whether you’re having them for breakfast, an afternoon treat, or dessert, here’s how to serve pumpkin scones like a pro.
1. Pair With Coffee or Tea
A warm scone and a hot drink? Name a better duo.
- Pumpkin spice latte for double the fall vibes
- Vanilla chai tea to complement the spices
- Cold brew with cream for a café-style morning
- Hot apple cider for a fruity contrast
2. Warm It Up Before Serving
If you’re serving leftover or refrigerated scones, pop one in the microwave for 10–15 seconds or reheat in the oven at 300°F (150°C) for 5–7 minutes. This softens the texture and brings back that buttery aroma.
3. Add a Spread or Topping
Pumpkin scones are already flavorful, but if you want to go all out:
- Slather on some whipped cream cheese
- Add a small pat of butter while it’s warm
- Serve with apple or fig preserves
- Drizzle with extra glaze or maple syrup
4. Turn It Into Dessert
Top with a scoop of vanilla ice cream and a drizzle of glaze or caramel sauce for a simple fall-inspired dessert. It’s like pie but flakier and more satisfying.
❄️ Storing and Freezing Tips
These pumpkin scones store beautifully, whether you’re keeping leftovers for tomorrow’s breakfast or prepping a big batch for the month ahead.
Short-Term Storage (Room Temperature)
- Store cooled scones in an airtight container at room temperature for up to 2 days.
- Keep them in a dry, cool spot away from direct sunlight.
- Line the container with a paper towel to absorb excess moisture and maintain texture.
Refrigerator Storage
- For slightly longer freshness, store in the fridge for up to 5 days.
- To reheat, place in a warm oven (300°F/150°C) for 5–7 minutes, or microwave for 15 seconds.
Note: Refrigeration can dry scones out over time, so wrap tightly and use airtight containers.
Freezing Unbaked Scones (Highly Recommended!)
Want fresh scones anytime? Here’s how to freeze the dough:
- Shape the dough into triangles as usual.
- Place scones on a baking sheet lined with parchment and freeze until solid (1–2 hours).
- Transfer frozen scones to a zip-top freezer bag or an airtight container.
- Freeze for up to 3 months.
To bake from frozen: No need to thaw. Just bake at 400°F (200°C) and add 5–7 minutes to the baking time.
Freezing Baked Scones
Yes, you can also freeze already-baked scones:
- Cool completely
- Wrap each scone individually in plastic wrap
- Place in a freezer-safe bag or container
- Freeze for up to 2 months
To reheat: Thaw at room temperature, then warm in a toaster oven or regular oven at 300°F for 5–10 minutes.
Glaze after thawing if you want the prettiest presentation!
🎃 Final Thoughts
There you have it – the ultimate pumpkin scones recipe that delivers bakery-level results right at home.
Soft on the inside, crisp on the outside, and topped with that sweet spiced glaze… they’re practically made for your next coffee break or fall gathering.
So next time the weather cools down and you’re craving something cozy, skip the Starbucks line and whip up these homemade pumpkin scones instead.
Your kitchen will smell amazing, your taste buds will thank you, and let’s be honest, you’ll probably want to bake them again tomorrow.
🍂 You May Also Love
If you’re into cozy, easy pumpkin treats, here are a few more fall-inspired recipes to keep the oven warm:
- 🥞 Best Pumpkin Pancakes Recipe for Fall Mornings
Fluffy, spiced, and ready in under 20 minutes, perfect for busy fall mornings. - 🍞 Best Pumpkin Bread Recipe for Busy Moms
A classic one-bowl loaf that’s moist, sweet, and freezer-friendly. - 🍫 Easy & Yummy Pumpkin Brownies in 30 Mins
Fudgy, flourless, and loaded with pumpkin-chocolate goodness, no mixer required!


Ella Foster, co-founder of FoodBears.com, is a skilled writer whose love for cooking fuels her creative work. Her passion for experimenting in the kitchen brings authentic flavor and culinary inspiration to every piece she crafts for the platform.