
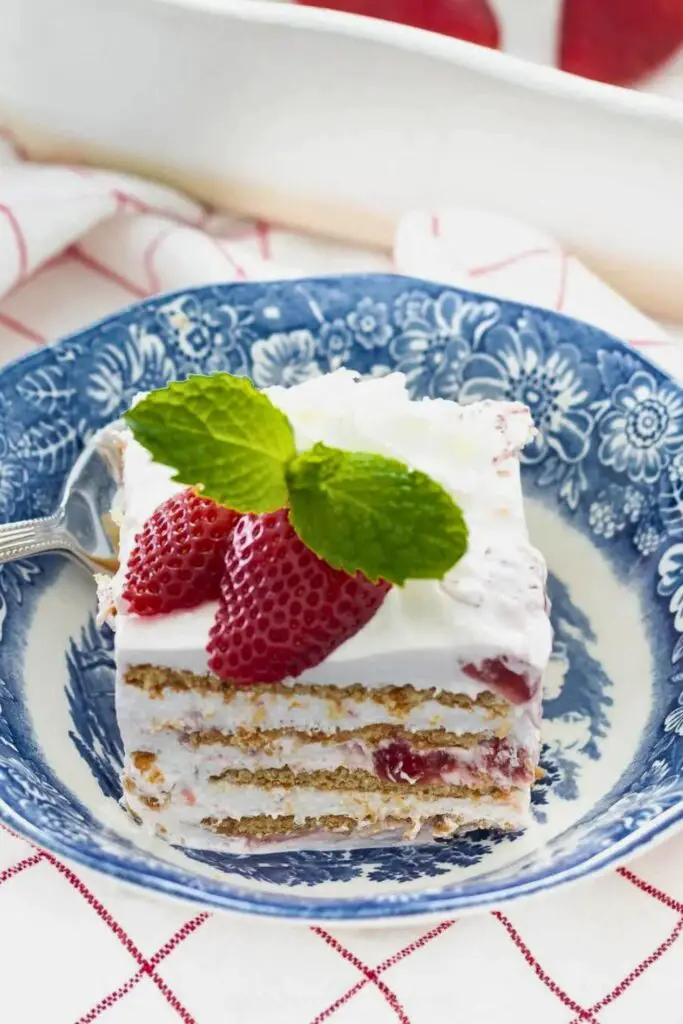
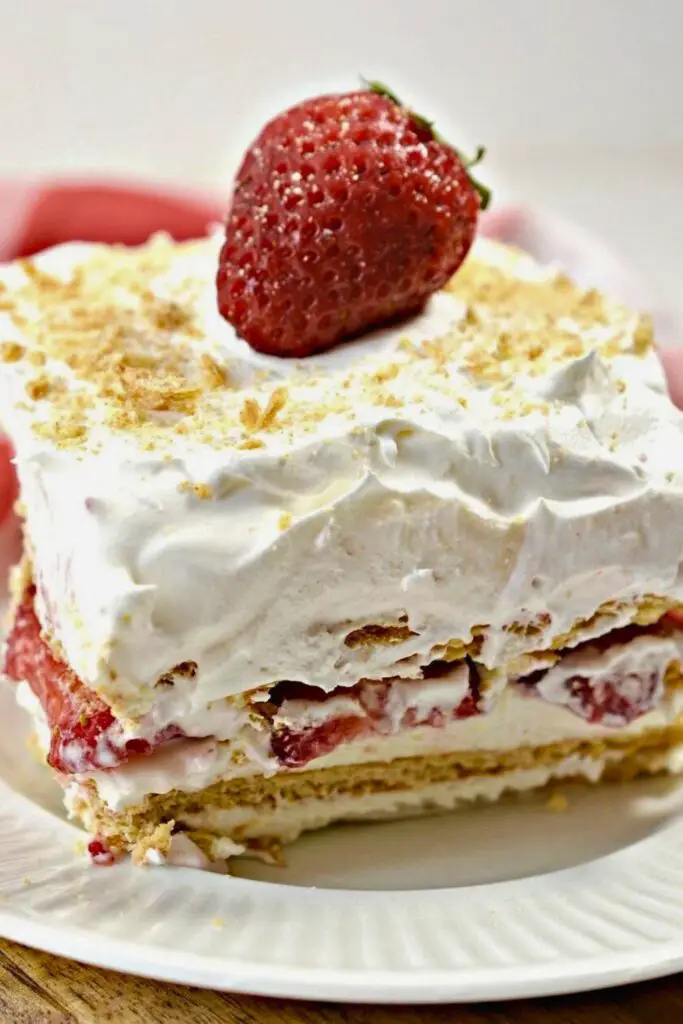
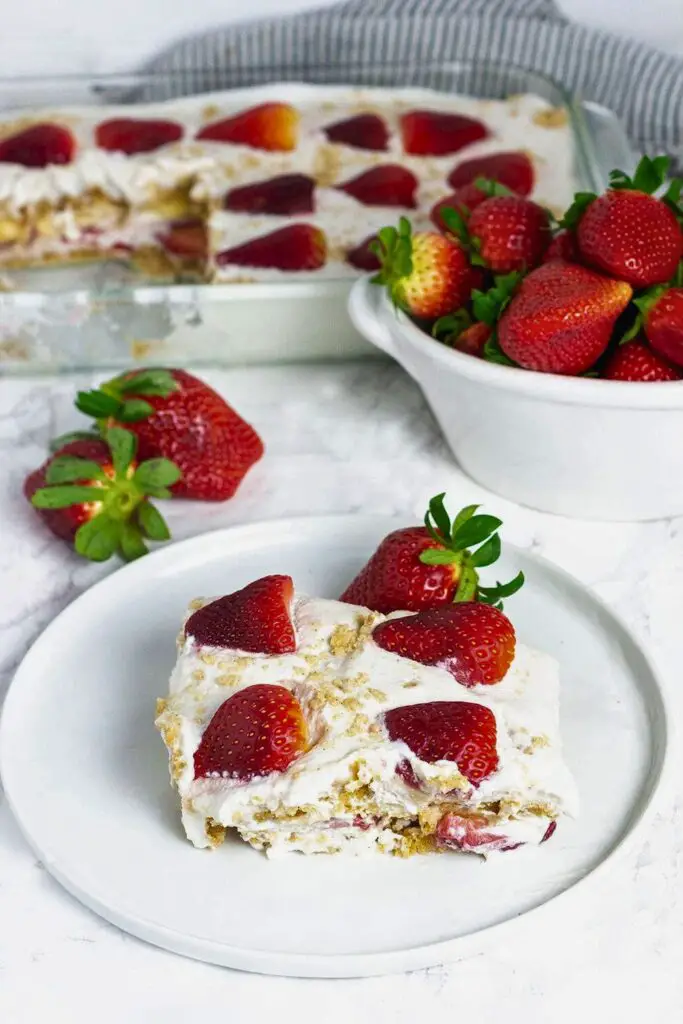
Who wants to fire up the oven when it’s blazing hot outside? That’s where this Strawberry Icebox Cake comes in. It’s cold, creamy, fruity, and layered like a dream. But here’s the best part: it’s made with everyday ingredients and zero baking. Yes, zero.
Think of it as a sweet lasagna—layers of graham crackers, whipped cream, and juicy strawberries stacked together and chilled to perfection. This dessert is proof that sometimes the simplest things are the most delicious.
❤️ Why You’ll Fall in Love With Strawberry Icebox Cake
Let’s be honest. Not every dessert checks all the boxes. But this strawberry icebox cake? It’s the full package. Here’s a deep dive into why it’s a crowd favorite and why it might just become your new obsession.
1. No Baking = No Stress
Who wants to stand in front of a 350°F oven on a hot day? No one. This cake skips the stove entirely. You’re just layering and chilling. It’s so simple, even your kids could help you build it.
“It’s like assembling edible building blocks—with strawberries and whipped cream as the mortar!”
2. It’s Practically Foolproof
You don’t need to be a baker. No dough, no rising, no cracking. The fridge does all the heavy lifting while you relax.
Even if your layering isn’t perfect, the flavors still meld together beautifully. It’s impossible to mess this up.
3. Fewer Ingredients, More Flavor
We’re talking 7 simple ingredients. Most of them are probably already in your kitchen. No obscure powders or pricey extracts. Just real food doing real magic.
4. It Gets Better the Next Day
You know those desserts that dry out overnight? Not this one.
After chilling, the graham crackers soak up the moisture from the cream and strawberries, turning soft and cake-like. It actually tastes better the next day, so it’s perfect for making ahead of parties or potlucks.
5. It’s Light, Cold, and Sweet—But Not Too Sweet
This icebox cake is refreshing and light, unlike rich chocolate cakes or heavy cheesecakes. The cream is just sweet enough, and the strawberries bring natural tartness. You’ll feel satisfied, not stuffed.
6. It Looks Beautiful Without Any Decorating Skills
Even if you’re not a “Pinterest mom,” this dessert still looks Instagram-worthy. All those layers—strawberries peeking out, soft cream waves, and a few berries on top—make it look like you worked all day, even though you didn’t.
📋 Ingredients You’ll Need
Let’s keep it real simple. Here’s what you’ll need to make this no-bake masterpiece.
| Ingredient | Amount | Purpose |
|---|---|---|
| Graham crackers | 1 box (about 18 sheets) | Acts as the ‘cake’ layer |
| Fresh strawberries | 2 cups, sliced | Main flavor + color |
| Heavy whipping cream | 2 cups | Base for whipped topping |
| Powdered sugar | ½ cup | Sweetens the cream |
| Vanilla extract | 1 tsp | Adds flavor |
| Cream cheese (optional) | 4 oz, softened | Adds tang and structure to cream |
| Strawberry jam (optional) | ¼ cup | Boosts strawberry flavor |
Pro Tip: If you’re short on time, substitute the whipped cream with Cool Whip. It holds up great and saves a step.
🥣 How to Make Whipped Cream from Scratch
Store-bought whipped topping is fine in a pinch, but fresh homemade whipped cream? That’s on a whole new level. It’s silkier, fluffier, and more flavorful—and honestly, it just makes your dessert taste homemade.
Let’s break down exactly how to make it without a hitch.
What You’ll Need:
- Heavy whipping cream – Must be cold. Look for at least 36% milk fat.
- Powdered sugar helps stabilize and sweeten the cream.
- Vanilla extract – Adds flavor depth.
- Optional: Cream cheese for structure, especially if making ahead.
Step-by-Step Instructions:
1. Chill Everything
Cold is key. Place your mixing bowl and beaters in the fridge or freezer for 10–15 minutes before starting. Warm tools can deflate the cream.
2. Pour and Add
In your chilled bowl, pour:
- 2 cups of heavy whipping cream
- ½ cup of powdered sugar
- 1 tsp vanilla extract
Add 4 oz of softened cream cheese if you’re using cream cheese now.
3. Whip It Good
Using a hand mixer or stand mixer:
- Start on low speed to prevent splashing.
- Gradually increase to medium-high.
- Beat until soft peaks form (the cream starts to hold its shape), then go a little longer to stiff peaks (the peaks hold firmly and don’t droop).
Caution: Don’t overbeat! Once it starts looking like butter, there’s no going back.
How to Know It’s Done:
- Dip a spoon in and turn it upside down. If the cream holds a peak, you’re good.
- Look for a glossy, cloud-like texture. Not grainy. Not clumpy.
🍓 Preparing the Strawberries Like a Pro
The strawberries are the star of this show. You risk a soggy or bland dessert if they’re not prepped right. Here’s how to get the most out of your berries—sweet, juicy, and just the right texture for layering.
1. Choose the Right Strawberries
Look for:
- Bright red color
- No white or green tips
- Firm but not hard
- Sweet smell (if they don’t smell like strawberries, they won’t taste like much)
Avoid:
- Mushy or overly soft berries
- Berries with mold or dark spots
- Pale, underripe berries
Pro Tip: Local or in-season strawberries always taste better.
2. Wash Gently, Dry Thoroughly
- Place strawberries in a colander.
- Rinse under cool water just before slicing (not earlier—moisture leads to mold).
- Pat dry with a paper towel.
Never soak them—they’ll absorb water and get mushy.
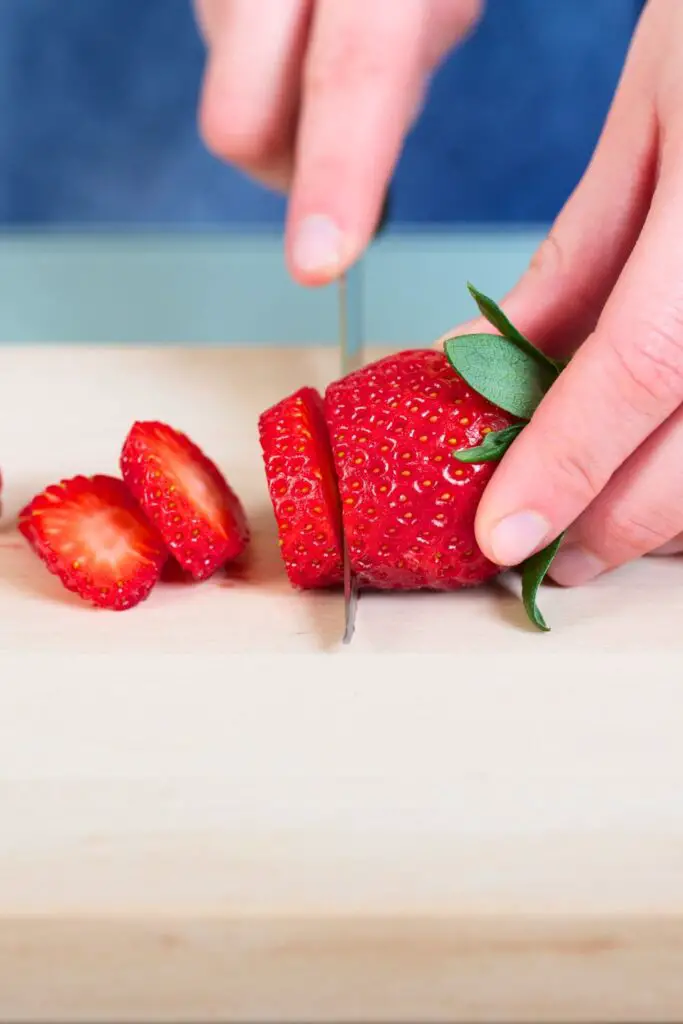
3. Hull and Slice Evenly
Use a small paring knife or a strawberry huller to remove the green tops and white core. Then, slice into even, thin slices—about ⅛ to ¼ inches thick.
“Uniform slices make for even layering, which means every bite is balanced and beautiful.”
4. Optional: Boost Their Sweetness
If your strawberries aren’t super sweet, don’t worry. You can easily fix that.
Two quick methods:
- Toss with sugar: Add 1–2 tsp of sugar and let them sit for 10 minutes.
- Mix with jam: Stir in a spoonful of strawberry jam for extra flavor and shine.
This step also helps create a little syrup, which adds moisture and richness to your cake layers.
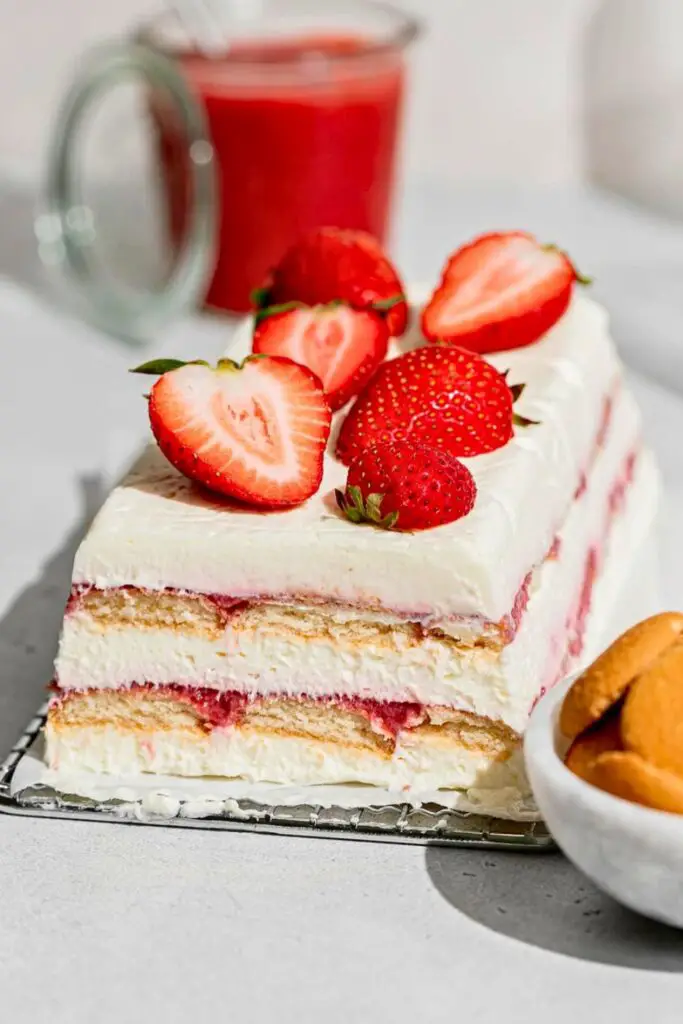
Build Your Strawberry Icebox Cake Like a Pro
Assembling a strawberry icebox cake is like playing with food—except it ends in something absolutely delicious.
You’re stacking, layering, and smoothing like a dessert architect. It’s fun, stress-free, and when done right, the layers create a stunning striped effect once sliced.
Let’s break it down step by step so you can get perfect results every time.
🧊 Step 1: Choose the Right Dish
Pick a 9×13-inch baking dish or something similar. Glass works best to see the beautiful layers from the sides. But any deep dish will do.
Don’t use a shallow pan. You want enough depth for 3–4 full layers.
Optional: Lightly grease the dish or line it with parchment paper for easier slicing and lifting. It’s unnecessary but helpful if you’re making it for a party.
🧁 Step 2: Start With a Thin Cream Layer
Spread a thin layer of whipped cream at the bottom of your dish.
Why this matters:
- It acts like glue to hold your bottom Graham cracker layer in place.
- It prevents sliding when you slice and serve later.
Use a rubber spatula to smooth it out. Think of it like buttering toast—just a light, even coat.
🍪 Step 3: Add Your First Graham Cracker Layer
Now it’s time to lay down your foundation—the graham crackers.
- Place full graham cracker sheets across the bottom in a single layer.
- Break them to fit the shape of your pan snugly. No big gaps.
- You can overlap slightly if needed.
Pro Tip: Flip the crackers so the smoother side faces up. It gives a neater finish and absorbs cream better.
This is your “cake” base—it’ll soften beautifully once chilled.
🍦 Step 4: Add a Whipped Cream Layer
Scoop about 1/3 of your whipped cream over the graham cracker layer.
- Use a spatula to spread it out to the edges gently.
- Don’t press too hard or the crackers might shift.
- Smooth it into a light, even coat.
The goal here is not to drown the crackers but to coat them well enough for the strawberries to stick.
Optional: If you added cream cheese to the whipped cream, the texture will be thicker—use the back of a spoon to swirl for a pretty effect.
🍓 Step 5: Add a Strawberry Layer
Time for the star of the show: the strawberries.
- Place sliced strawberries evenly across the whipped cream.
- Slight overlap is fine, but don’t double-stack.
- Use the best-looking slices for this layer if presentation matters.
Want extra flavor? Drizzle 1–2 teaspoons of strawberry jam or syrup over the top for that bakery-style finish.
Tip: Press the strawberry slices in gently so they stay in place when you layer on top.
🔁 Step 6: Repeat the Layers
This is where it gets fun and your cake takes shape.
Repeat the layering in this order:
- Graham crackers
- Whipped cream
- Strawberries
You should have enough for 3 to 4 full layers, depending on the size of your dish and how generous your scoops are.
Final layer: End with a layer of whipped cream. It gives your cake a clean, frosted top. Save your best strawberry slices for garnish.
🎨 Step 7: Decorate the Top
Here’s where you get to be creative!
Try one of these ideas:
- Arrange sliced strawberries in a fan or swirl pattern.
- Dot the top with whole or halved strawberries.
- Sprinkle crushed graham crackers for texture.
- Add mint leaves for a fresh, summery touch.
- Drizzle with chocolate or strawberry sauce for extra flair.
Keep it simple or go wild—it’s your masterpiece!
🛑 Common Mistakes to Avoid
Before you chill the cake, check for these common hiccups:
❌ Too much whipped cream between layers can make the cake slide. Keep it even.
❌ Uneven strawberries – Big chunks don’t sit well. Thin, even slices are key.
❌ Skipping chill time – This is non-negotiable. The magic happens in the fridge.
❌ Gaps between graham crackers – They’ll make slicing messy. Fill in the cracks.
🧊 Step 8: Chill It (The Most Important Step!)
Once your layers are built and topped:
- Cover the dish tightly with plastic wrap or foil.
- Chill in the fridge for at least 6 hours, but overnight is best.
Why overnight is best:
The graham crackers soak up the cream and strawberry juices, transforming into a soft, cake-like texture. It’s a total flavor meld.
No baking, no mess—just let time and the fridge do the magic.
🍴 How to Serve Strawberry Icebox Cake Like a Pro
You’ve chilled it overnight, the layers are soft and set, and it’s showtime. But hold on—a messy slice can ruin the magic, so here’s how to serve it like a boss:
1. Chill Before Slicing (Yes, Again!)
- If you’ve taken it out of the fridge to “soften,” don’t let it sit more than 10–15 minutes.
- The colder it is, the cleaner the cut.
2. Use the Right Knife
- Use a sharp chef’s knife or serrated bread knife.
- Dip the knife in hot water, then dry it before slicing.
- Wipe the blade between each cut to keep those layers pretty and crisp.
3. Lift With a Spatula or Cake Server
- Slide a thin spatula under the first slice and lift gently.
- The first piece might be messy, but the rest will be perfect.
4. Add the Final Touch
Want to impress your guests (or your Instagram followers)?
Try this on each plate:
- Add a fresh mint leaf.
- Dust lightly with powdered sugar.
- Add a drizzle of chocolate or strawberry sauce.
📸 Perfect for photos—and it tastes as good as it looks.
🌈 Fun Flavor Variations to Try
Once you master the base version of this cake, you’ll want to mix it up. Here are some creative ways to put a spin on the classic strawberry icebox cake:
1. Triple Berry Icebox Cake
- Use strawberries, blueberries, and raspberries in each fruit layer.
- Swap vanilla extract for lemon zest to brighten the flavor.
- Patriotic and perfect for Memorial Day or the 4th of July.
2. Strawberry Shortcake Icebox Cake
- Use pound cake slices or shortbread cookies instead of graham crackers.
- Add sliced bananas for a fruitier twist.
- Finish with a dollop of whipped cream and a cherry on top.
3. Chocolate-Covered Strawberry Cake
- Use chocolate graham crackers or crushed Oreos as your base.
- Drizzle melted dark chocolate between each whipped cream layer.
- Add mini chocolate chips on top for a fun crunch.
4. Strawberry Cheesecake Icebox Cake
- Mix cream cheese into your whipped cream (1:2 ratio of cream cheese to cream).
- Swirl in some strawberry jam or purée.
- Top with crushed graham crackers and cheesecake bites.
5. Tropical Strawberry Mango Cake
- Replace half the strawberries with thin mango slices or pineapple chunks.
- Add a hint of toasted coconut in the cream or on top.
- Light, exotic, and beachy vibes all the way!
💬 Final Thoughts: Simple, Sweet, and So Worth It
There’s something special about recipes that are easy to make, beautiful to look at, and unforgettable to eat—and this Strawberry Icebox Cake checks all three boxes. With just a few layers and a little fridge time, you get a dreamy dessert that’s as refreshing as it is rewarding.
Whether you’re hosting a summer brunch, surprising Mom with something sweet, or just chilling on the couch with a spoon in hand, this cake will deliver comfort and smiles with every bite.
No baking. No stress. Just pure strawberry bliss. 🍓
📌 Loved This? You’ll Crave These Next:
👉 20 Quick Summer Dessert Recipes for Busy Women
Beat the heat and satisfy your sweet tooth in no time. These desserts are pretty, frozen, fruity, and ready in under 30 minutes—perfect for any busy schedule.
👉 Quick & Cute: 20 Mother’s Day Cupcakes in 45 Min
Whip up adorable, heartfelt cupcakes to show Mom some love. Frosting, flowers, and fun designs—all doable in less than an hour!
👉 30 Fresh & Fun Summer Dinner Ideas to Try
Cool your dinner routine with light, colorful, easy-to-cook meals that scream summer. No heavy dishes, flavor-packed happiness!

Ella Foster, co-founder of FoodBears.com, is a skilled writer whose love for cooking fuels her creative work. Her passion for experimenting in the kitchen brings authentic flavor and culinary inspiration to every piece she crafts for the platform.