
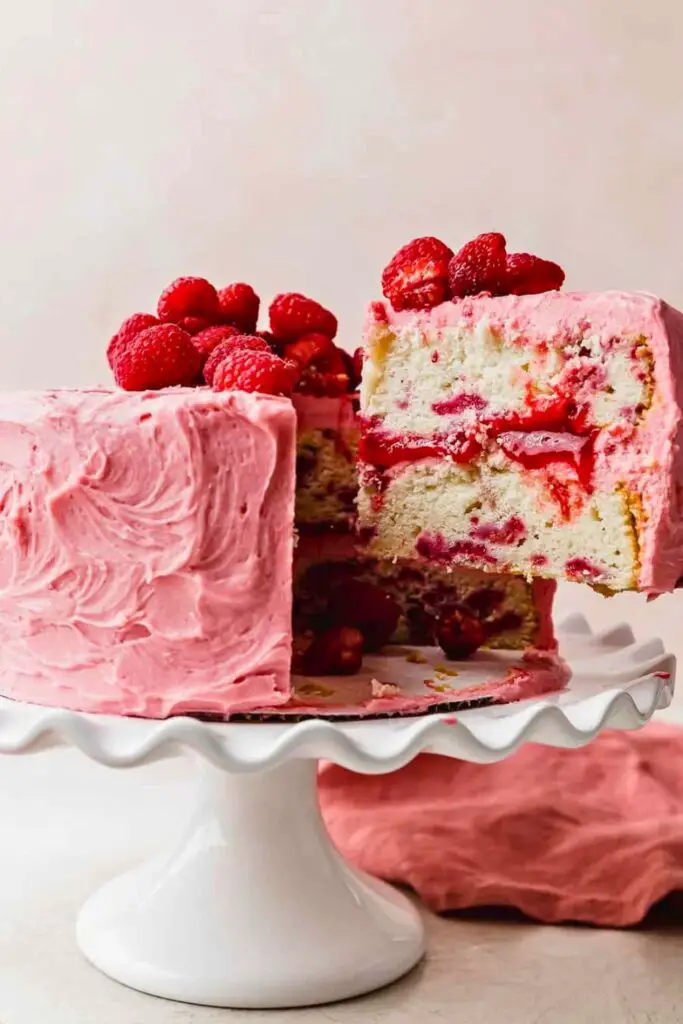
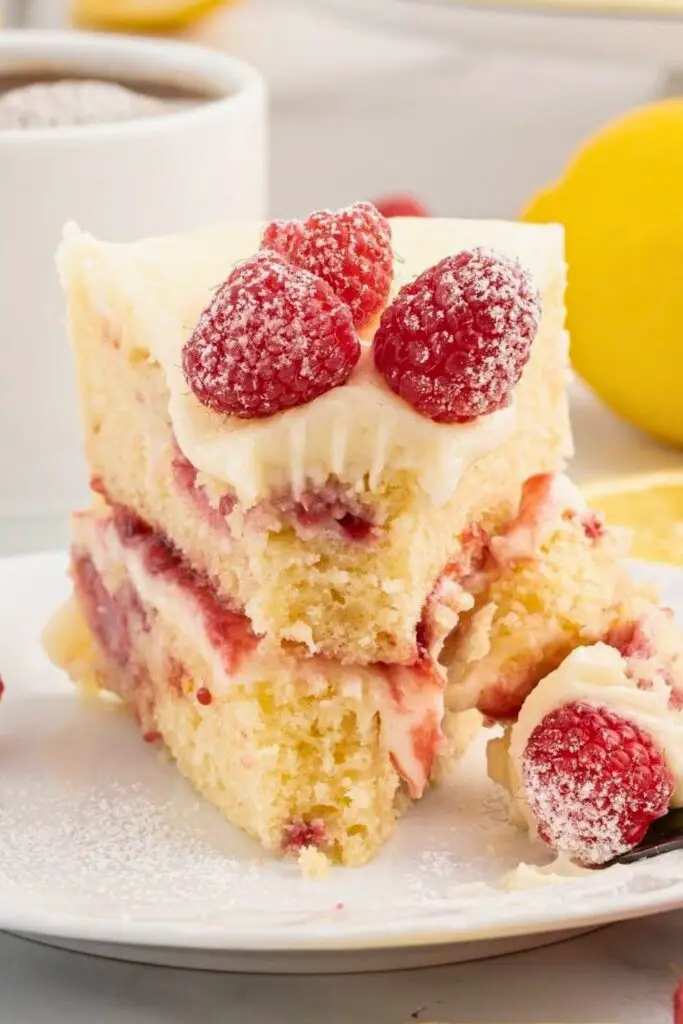
There’s something magical about lemons and raspberries together. One is tart, zesty, and bright. The other is sweet, juicy, and bursting with flavor. Put them together in a cake? You’ve got a dessert that feels like a bite of summer.
Whether you’re celebrating a birthday, bringing dessert to a potluck, or just craving something fruity and sweet, this lemon raspberry cake hits the spot.
It’s soft, moist, fresh, and layered with tangy-sweet goodness that everyone will ask for seconds.
Let’s review everything you need to know, from ingredients and baking tips to the full recipe and decorating ideas. Are you ready to make something amazing?
Read more:
Ingredients (with Measurements)
Here’s a quick table of everything you’ll need for the cake, filling, and frosting:
| Ingredient | Amount |
|---|---|
| All-purpose flour | 2½ cups (310g) |
| Baking powder | 2½ tsp |
| Baking soda | ½ tsp |
| Salt | ½ tsp |
| Unsalted butter (room temp) | 1 cup (226g) |
| Granulated sugar | 1½ cups (300g) |
| Eggs | 4 large |
| Vanilla extract | 2 tsp |
| Fresh lemon zest | 2 tbsp (from 2 large lemons) |
| Fresh lemon juice | ¼ cup (60ml) |
| Buttermilk | 1 cup (240ml) |
| Fresh raspberries (for batter) | 1½ cups |
| All-purpose flour (to coat raspberries) | 1 tbsp |
For the Frosting:
- Cream cheese (room temp) – 8 oz (226g)
- Unsalted butter (room temp) – ½ cup (113g)
- Powdered sugar – 3 cups (360g)
- Fresh lemon juice – 1 tbsp
- Lemon zest – 1 tsp
- Vanilla extract – 1 tsp
For Filling (Optional but Yum!):
- Raspberry jam – ½ cup
- Fresh raspberries – ½ cup
How to Make Lemon Raspberry Cake: Step-by-Step Guide
Step 1: Gather Everything First (Mise en Place)
Do you ever get halfway through a recipe and realize you forgot to soften the butter or you’re out of eggs?
Don’t let that happen.
Start by laying out every ingredient—measured, at room temperature—and all your tools:
- 2 mixing bowls (one for wet, one for dry)
- Measuring cups/spoons or kitchen scale
- Hand mixer or stand mixer
- Spatula: whisk an offset spatula
- Two 8-inch or 9-inch cake pans
- Cooling racks
- Parchment paper
- Zester or Microplane
This makes the rest of the process smoother and less stressful.
Step 2: Prep Your Pans and Oven
- Preheat your oven to 350°F (175°C).
- Grease your pans using butter or non-stick spray.
- Line the bottoms with parchment paper rounds—trust me, your cake will release perfectly.
- Lightly flour the pans and tap out the excess.
Why this matters: Skipping parchment or greasing can make your cake stick and tear. It’s worth the extra 2 minutes.
Step 3: Mix the Dry Ingredients
In a medium bowl, whisk together:
- 2½ cups all-purpose flour
- 2½ tsp baking powder
- ½ tsp baking soda
- ½ tsp salt
Whisking adds a little air and ensures the leavening agents (baking powder/soda) are evenly distributed.
You want a uniform rise, not uneven lumps or flat spots.
Step 4: Cream Butter and Sugar Like a Pro
In a large bowl, add:
- 1 cup unsalted butter (room temp)
- 1½ cups granulated sugar
Beat on medium-high speed for 3–4 minutes.
The butter should turn pale and fluffy. This is called “creaming,” essential for a tender, airy cake.
Why it works:
You’re whipping air into the butter, which helps the cake rise and feel soft instead of dense.
Step 5: Add Eggs, Lemon, and Vanilla
Add 4 large eggs, one at a time. Beat well after each one.
Then add:
- 2 tsp vanilla extract
- 2 tbsp lemon zest
- ¼ cup fresh lemon juice
Tip: The lemon juice may cause the mixture to look curdled. Don’t panic—it’s normal. It’ll smooth out later when you add flour and buttermilk.
Lemon juice brings that tangy citrus flavor, while the zest gives a deep, aromatic lemon punch.
Step 6: Alternate Dry Ingredients and Buttermilk
You’re going to add your flour mix and buttermilk in stages:
- Add ⅓ of the dry ingredients. Mix on low.
- Add ½ of the buttermilk (1 cup total). Mix again.
- Repeat, ending with the last ⅓ of the flour.
Don’t overmix. Once you see no more flour streaks, stop.
Why alternate?
It helps the batter stay stable. Dumping everything at once could make the cake tough or lumpy.
Step 7: Prepare and Fold in the Raspberries
Take 1½ cups fresh raspberries.
In a small bowl, toss them gently with 1 tbsp flour.
This stops them from sinking to the bottom of the cake.
Then, gently fold them into the batter using a rubber spatula. Be gentle—you don’t want to crush them and turn your batter pink (unless you like swirls!).
Frozen raspberries?
That’s totally fine. Just use them straight from the freezer and coat them in flour the same way. Don’t thaw—they’ll get mushy.
Step 8: Fill the Pans and Bake
Divide the batter evenly between your two prepared cake pans.
Use a spatula to smooth the tops.
Tap the pans gently on the counter a few times to release any air bubbles hiding in the batter.
Bake for 30 to 35 minutes, or until a toothpick inserted in the center comes out clean or with a few moist crumbs.
Your kitchen will start smelling amazing at around the 20-minute mark.
Step 9: Cool the Cakes
Let the cakes cool in the pans for 10 minutes. Then, run a knife around the edge and carefully invert it onto a wire rack.
Let cool completely before frosting. If you frost a warm cake, the frosting will melt and make a mess.
Want a shortcut?
Pop the cooled layers in the fridge for 30 minutes. They’ll be easier to frost and less likely to crumble.
Step 10: Make the Lemon Cream Cheese Frosting
In a large bowl, beat:
- 8 oz cream cheese (room temp)
- ½ cup butter (room temp)
Beat on medium-high until completely smooth (about 2 minutes).
Add:
- 3 cups powdered sugar (add 1 cup at a time)
- 1 tbsp lemon juice
- 1 tsp lemon zest (optional but flavorful)
- 1 tsp vanilla extract
Beat for 2–3 minutes until light, creamy, and spreadable.
Too runny? Chill for 15–20 minutes.
Too thick? Add 1 tsp lemon juice or milk at a time until smooth.
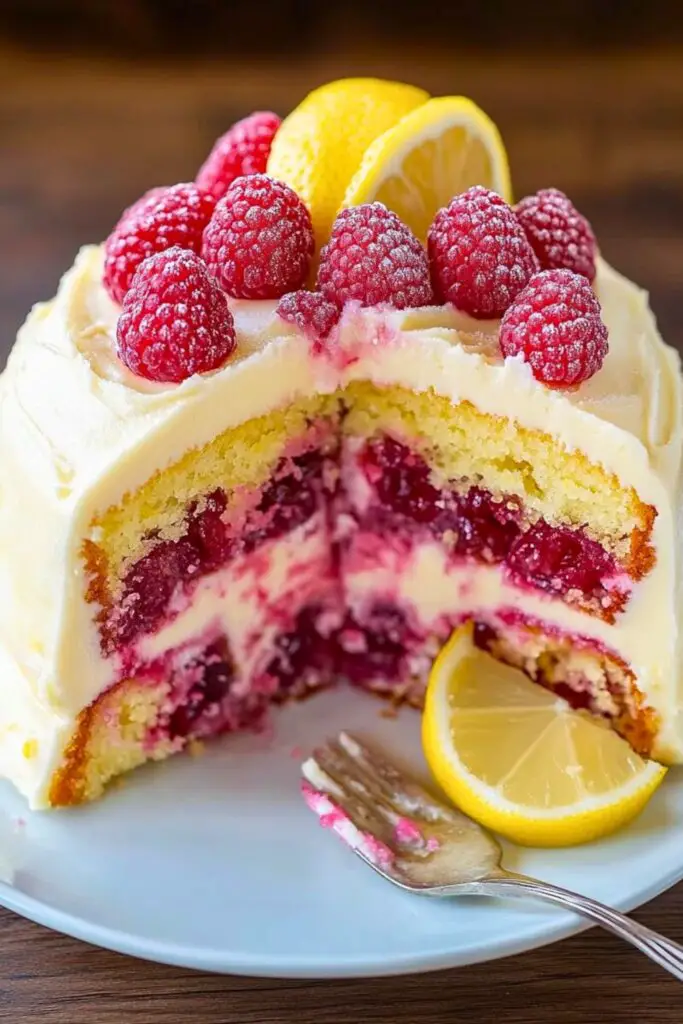
Step 11: Assemble the Cake
Optional (but awesome): Level the cakes.
Use a serrated knife to trim off domed tops so your layers sit flat.
Place the first cake layer on your serving plate or cake stand.
Spread a layer of frosting. Then:
- Add ½ cup raspberry jam
- Dot in some fresh raspberries (optional but juicy!)
Top with the second cake layer. Press down lightly to secure.
Step 12: Frost Like a Pro
Start with a crumb coat: a thin layer of frosting to trap loose crumbs. Chill for 20 minutes.
Then, apply the final layer of frosting. Use an offset spatula to smooth the top and sides.
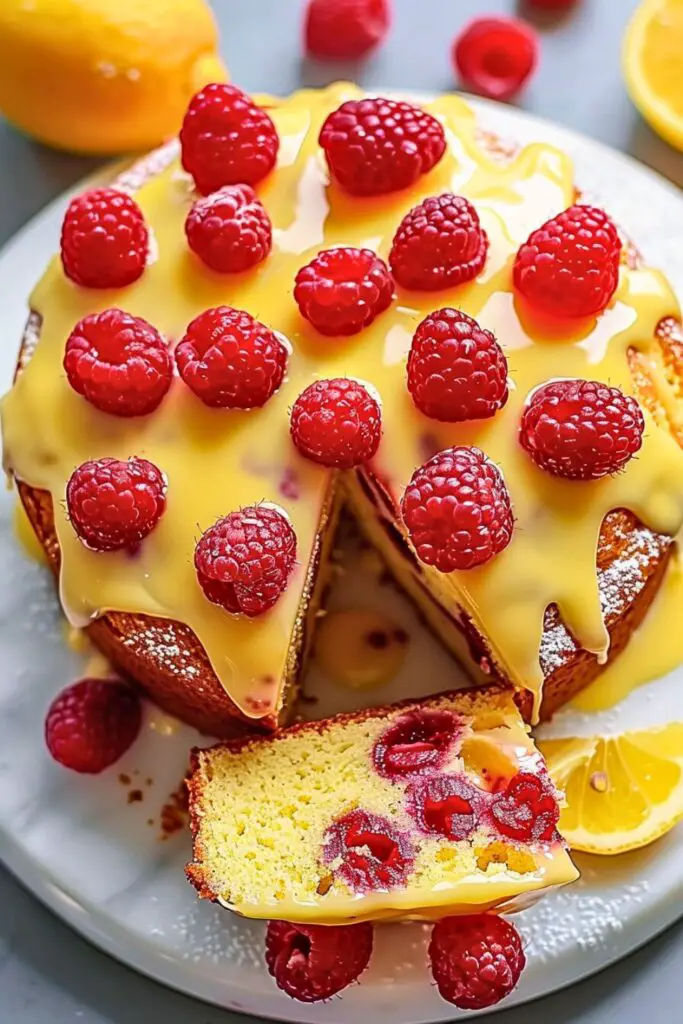
Decorate with:
- Fresh raspberries
- Lemon curls or twists
- Mint leaves or edible flowers (optional but gorgeous)
What If I Only Have Frozen Raspberries?
Don’t worry; frozen raspberries can totally work, and they’ll still bring all the flavor and juiciness you want in this cake. But they do behave a little differently from fresh berries, so here’s how to handle them the right way:
✅ Use Them Frozen, Not Thawed
This is the golden rule: Let frozen raspberries thaw first. They’ll release water and turn mush. That extra moisture can make your batter watery and throw off the texture of your cake. Plus, thawed berries bleed color everywhere, leaving you with streaky pink batter.
✅ Toss in Flour First
Like fresh berries, you’ll want to coat your frozen raspberries in 1 tablespoon of flour before folding them into the batter. This helps absorb any surface moisture and keeps them from sinking to the bottom while baking.
✅ Work Quickly
Add the frozen berries just before baking, and get the pans into the oven immediately. The longer the frozen berries sit in the batter, the more they melt and affect the texture.
✅ Expect a Slightly Longer Bake Time
Since frozen berries lower the batter’s overall temperature, you may need to add 5 minutes to the baking time. Watch the oven and do the toothpick test (look for moist crumbs, not raw batter).
Variations to Try
Want to give your lemon raspberry cake a twist? Try one of these fun and flavorful variations to mix things up!
1. Lemon Blueberry Cake
Swap raspberries for fresh or frozen blueberries. Blueberries hold their shape well and taste incredible with lemon. Add a few on top for decoration, too.
2. Raspberry Lemonade Cake
Add pink food coloring to the batter for a pretty pastel look, and replace some lemon juice with raspberry puree. It gives a lemonade vibe with real fruit flavor.
3. Lemon Curd Filling
Instead of raspberry jam between the layers, try a smooth, tangy lemon curd. You can make it at home or grab a jar from the store. It doubles down on that citrus flavor and makes the middle extra gooey and rich.
4. Raspberry Whipped Cream Frosting
Skip the cream cheese and make a light raspberry whipped cream using heavy cream, powdered sugar, and mashed raspberries. This is perfect for a summer version that’s light and fresh.
5. Make it Gluten-Free
Swap the all-purpose flour for a gluten-free 1:1 baking flour blend (like Bob’s Red Mill or King Arthur). Make sure the blend contains xanthan gum, or add ½ tsp yourself to help with structure.
6. Vegan Version
Use:
- Plant-based butter
- Almond milk + 1 tbsp vinegar (instead of buttermilk)
- Vegan cream cheese
- Egg substitute (like applesauce or flax eggs)
The result will be slightly different in texture but still delicious.
How to Store and Freeze
Room Temperature (Short-Term Storage)
If your kitchen is cool, the cake can be left out in an airtight container for up to one day. Just avoid direct sunlight or warm spots.
Refrigerator (Best Option)
Cover the cake with a lid or plastic wrap and refrigerate for 5 days. Bring to room temperature before serving so the cake softens and the frosting becomes creamy again.
Freezer (Great for Make-Ahead)
To Freeze the Cake Layers (Unfrosted):
- Wrap each layer tightly in plastic wrap.
- Wrap again in aluminum foil.
- Store in a freezer-safe bag or container for up to 2 months.
To use: Let the layers thaw at room temperature for a few hours, then frost as usual.
To Freeze Frosted Cake Slices:
- Cut slices and place them on a tray in the freezer for 1 hour.
- Once firm, wrap each slice in plastic and foil.
- Store in an airtight container for up to 1 month.
To thaw: Remove the wrapping and let it sit at room temperature for about 1 hour. The cake will taste just as fresh as day one!
Health Benefits (Because Cake Can Still Do Good)
Okay, we’re not saying this is a health food, but it does have a few perks, thanks to lemon and raspberries:
🍋 Lemons
- Rich in vitamin C, which helps boost your immune system.
- Contains antioxidants that support skin health.
- Helps with iron absorption when paired with other nutrients.
🍓 Raspberries
- Packed with fiber—one cup has around 8g!
- Full of antioxidants like quercetin and ellagic acid, which fight inflammation and protect your cells.
- High in vitamin C and manganese, which support skin and bone health.
💡 Bonus: Less Sugar Than Most Frosted Cakes
This lemon raspberry cake uses raspberries and lemon zest to naturally enhance sweetness, meaning you don’t have to rely entirely on sugar to carry the flavor.
And when do you make it from scratch?
You skip all the preservatives, artificial flavorings, and weird shelf-stabilizers in store-bought cake.
Final Thoughts: This Cake Is Pure Sunshine
This lemon raspberry cake is more than just a dessert. It’s a slice of joy. It’s the cake you make when you want something light, fruity, and unforgettable.
The balance between the tangy lemon and sweet berries is just a chef’s kiss. And with that creamy frosting? You’ve got a cake ready for birthdays, baby showers, or even a quiet Sunday afternoon.
So grab your lemons, pick up some raspberries, and treat yourself. You deserve it.

Ella Foster, co-founder of FoodBears.com, is a skilled writer whose love for cooking fuels her creative work. Her passion for experimenting in the kitchen brings authentic flavor and culinary inspiration to every piece she crafts for the platform.